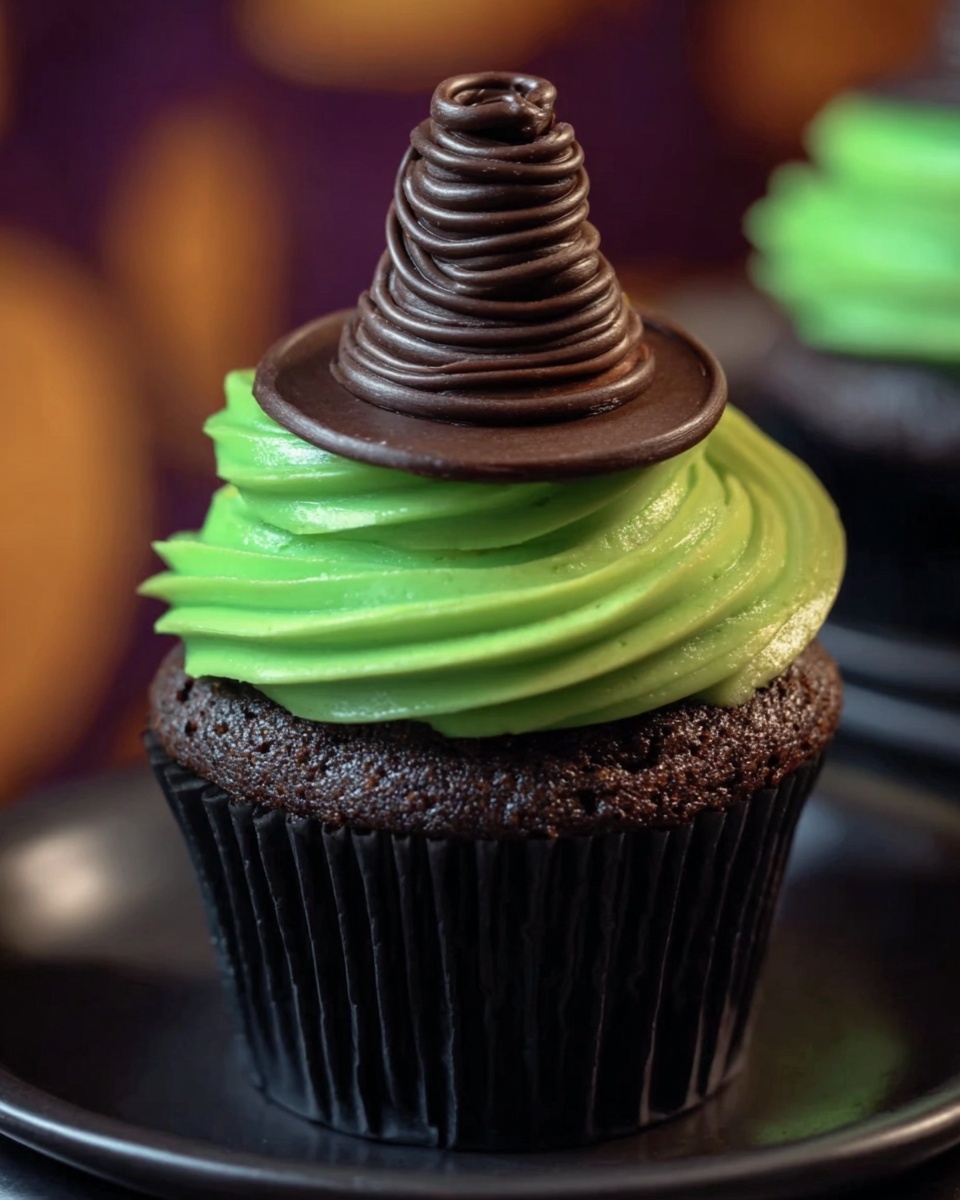
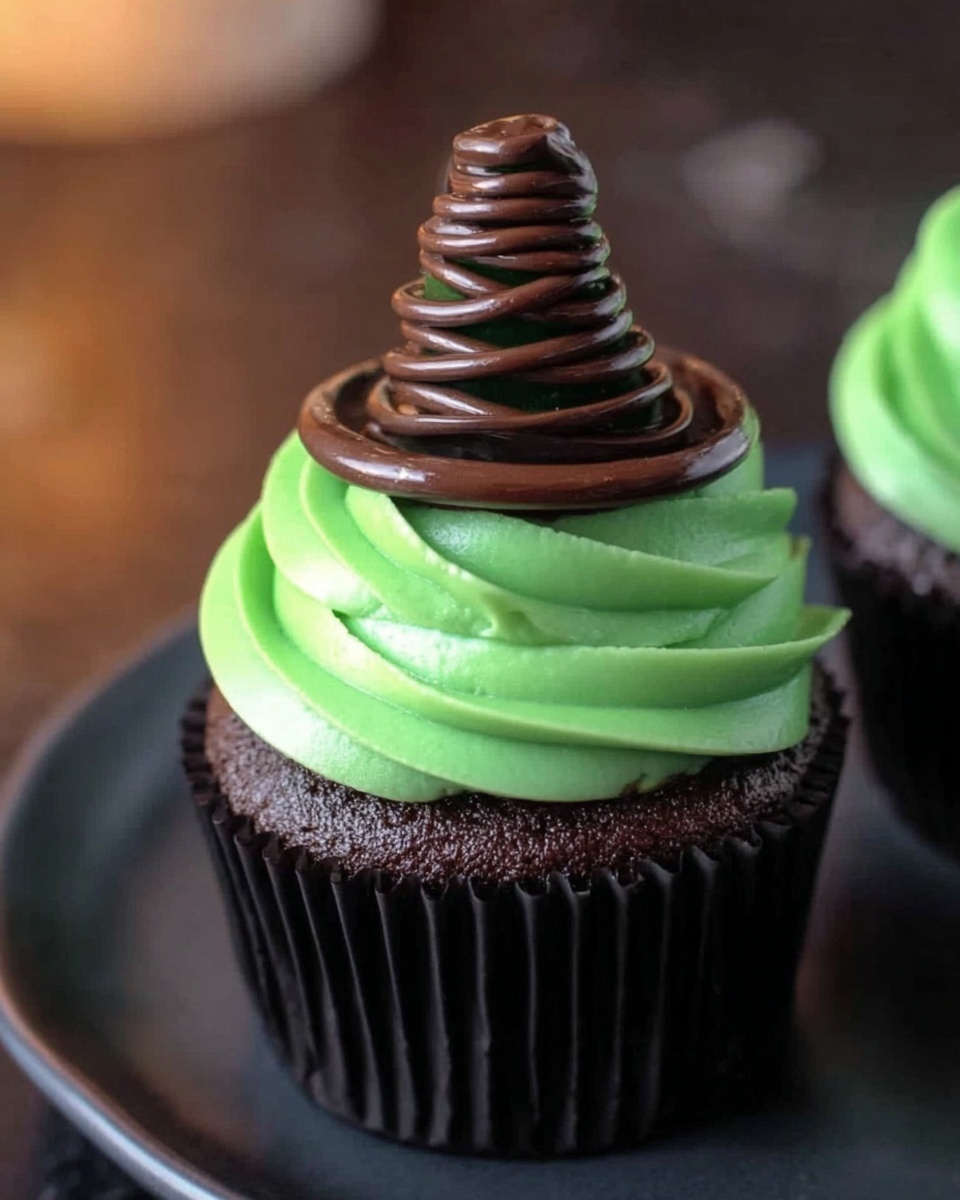
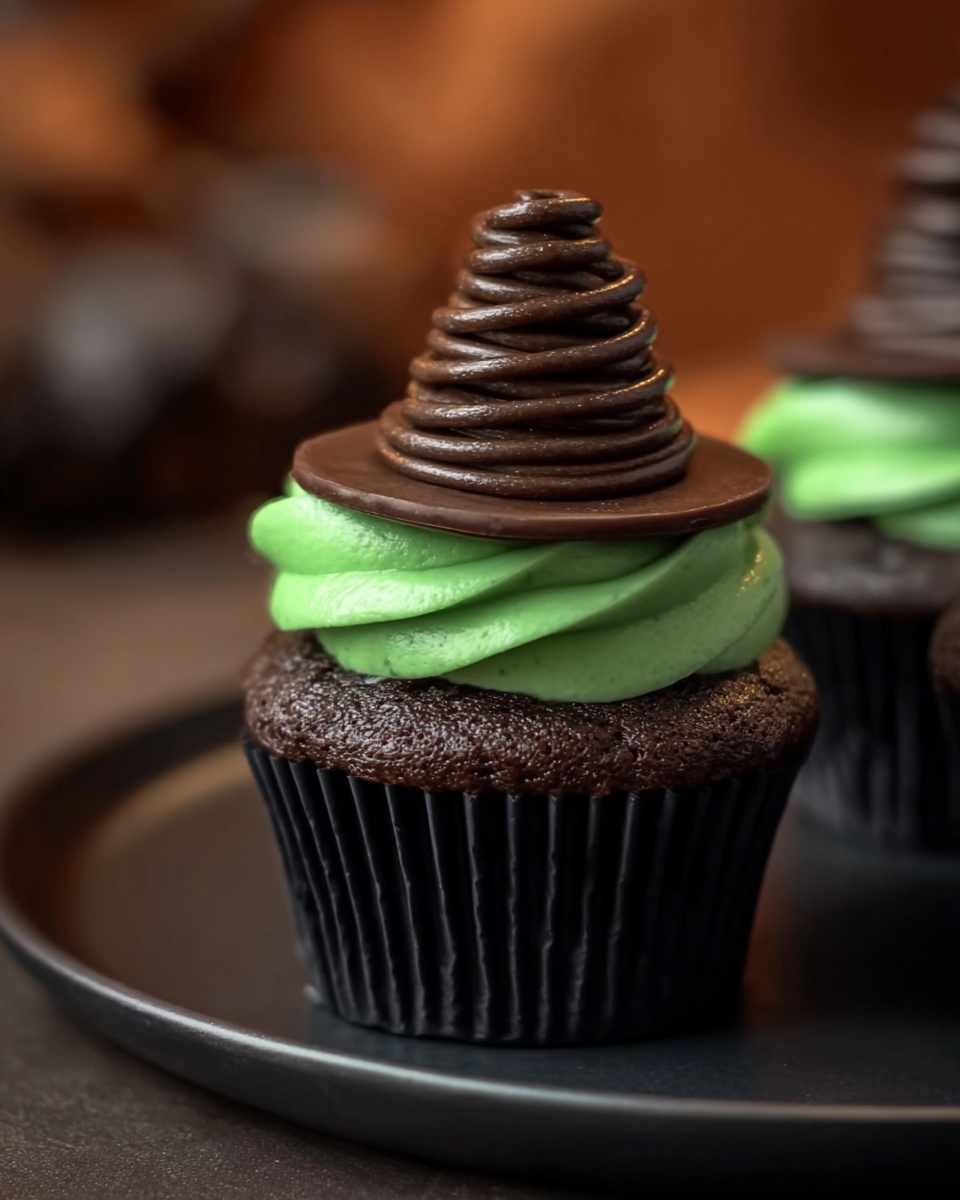
If you are searching for a festive, fun, and utterly delicious treat to wow your guests this spooky season, look no further than this Halloween Witch Hat Cupcakes Recipe. These cupcakes bring together moist dark chocolate cake, a surprise cream cheese filling dyed a spooky green, and a charming witch hat topper made from chocolate cookies and kisses. They are playful enough for kids and decadent enough to satisfy any chocolate lover. Every bite feels like a delightful Halloween party that you can enjoy making and sharing with friends and family. Let’s dive into the magic behind these enchanting cupcakes!
Ingredients You’ll Need
Keep it simple and fabulous with ingredients that create rich chocolatey flavors, with creamy and colorful surprises inside. Each component plays a key role in taste, texture, and adding that Halloween flair.
- Dark Chocolate Cake Mix: The base for our cupcakes, ensuring moistness and deep chocolaty goodness without fuss.
- Eggs: Essential for structure and fluffiness in the cupcakes; follow your mix’s instructions for best results.
- Oil: Adds moisture and tenderness to keep cupcakes soft and melt-in-your-mouth.
- Water: Activates the mix and balances the texture.
- Cream Cheese: Used for the optional filling, providing a smooth, tangy contrast to the rich cake.
- Sugar: Sweetens the cream cheese filling just right.
- Vanilla Extract: Enhances flavor in the cream cheese filling by adding warmth and depth.
- Green, Yellow, and Blue Food Coloring: Combined to create that perfect eerie green for the filling.
- Chocolate Sandwich Cookies: The base for the iconic “witch hats,” adding crunch and a minty touch if you choose the green filling kind.
- Dark Chocolate Kisses Candy: These sit atop the cookies, forming the pointed tip of the witch’s hat.
- Dark Chocolate Frosting: Frosts the cupcakes and glues the hats to the top, keeping everything luscious and festive.
- Green Frosting: For the hat’s band detail, adding a pop of spooky color and charm.
How to Make Halloween Witch Hat Cupcakes Recipe
Step 1: Prepare the Cupcake Batter
First things first, preheat your oven to 350°F (or follow the package instructions). This sets the stage for baking perfection. Prepare your dark chocolate cake mix according to the box directions—mixing together eggs, oil, and water as required. This batter will turn into beautifully rich and tender cupcakes that form the base of your Halloween treats.
Step 2: Prepare the Cream Cheese Filling
In a separate bowl, beat the cream cheese, sugar, egg, and vanilla extract until silky smooth. This filling adds a wonderful surprise inside each cupcake. Add your green, yellow, and blue food coloring drops carefully—this color combo creates a perfect eerie green shade that is vibrant and fun. Pop the mixture into the refrigerator for 10 to 15 minutes to firm up while you get your cupcake pans ready.
Step 3: Assemble the Cupcakes
Line two 12-cup pans with black cupcake liners to keep things festive and tidy. Then, fill each liner about one-third full with chocolate batter. Next, spoon a dollop of the green cream cheese filling into the center of each. Cover the filling with remaining batter so it’s fully enclosed. These cupcakes will have a magical little surprise inside that your friends will love discovering!
Step 4: Bake and Cool the Cupcakes
Bake your cupcakes for 13 to 16 minutes, or until a toothpick inserted comes out clean. It’s crucial not to overbake to keep them moist and tender. Allow them to cool in the pans for 30 minutes before transferring to a wire rack to cool completely. Cooling is important so the frosting and hats won’t melt or slip off.
Step 5: Create the Witch Hats
While cupcakes cool, it’s time for the fun part—making the witch hats! Use a small dab of chocolate frosting on each chocolate sandwich cookie and press a chocolate kiss candy in the center to form the classic pointed hat. Pipe a green frosting band around the base of the kiss to add that finishing touch of spooky style and color contrast.
Step 6: Frost and Decorate the Cupcakes
Once your cupcakes have cooled completely, frost their tops generously with the remaining chocolate frosting. Then, place one witch hat on top of each cupcake. The combination of rich chocolate and that perfectly detailed hat makes these cupcakes truly stand out for your Halloween party or any fall gathering.
How to Serve Halloween Witch Hat Cupcakes Recipe
Garnishes
Sprinkle a few edible glitter stars or tiny orange and black candy sprinkles around the muffin top for extra sparkle. You can also add small edible eyeballs or pumpkin-themed toppers to amp up the Halloween vibes. Each garnish adds a personalized touch to your already charming cupcakes.
Side Dishes
Pair these cupcakes with a bubbly black cherry soda or a creamy pumpkin spice latte for a thematic drink combo. Fresh fruit skewers with segments of orange and black grapes or a plate of assorted Halloween cookies also complement the cupcakes beautifully by offering contrasting textures and flavors.
Creative Ways to Present
For a memorable presentation, place your cupcakes on a tiered cake stand decorated with fake spider webs and mini pumpkins. You can arrange them around a centerpiece like a cauldron or a decorative broomstick to play on the witchy theme. Wrapping each cupcake in a little clear bag tied with a black and orange ribbon makes fabulous party favors too!
Make Ahead and Storage
Storing Leftovers
If you find yourself with any of these enchanting cupcakes left after the party, store them in an airtight container in the refrigerator. This keeps the frosting fresh and preserves the integrity of the cream cheese filling. They’ll remain moist and tasty for up to three days.
Freezing
You can freeze the baked cupcakes without frosting for up to two months. Wrap each cupcake in plastic wrap and then place them in a freezer-safe container. When ready to enjoy, thaw them overnight in the fridge, then frost and decorate as usual. The witch hats are best added fresh to keep their crunchy texture.
Reheating
To revive the cupcakes after refrigeration or freezing, let them come to room temperature naturally. Avoid microwaving once decorated as the frosting and chocolate hats can melt. If the cupcakes are unfrosted, a few seconds in the microwave will refresh their softness wonderfully.
FAQs
Can I make these cupcakes without the cream cheese filling?
Absolutely! The cream cheese filling is optional but adds a delightful surprise. If you prefer a traditional cupcake, simply fill the liners fully with the chocolate batter and bake as usual. The cupcakes will still be rich and moist.
What if I can’t find green food coloring?
No worries, you can use pre-made green frosting instead of coloring your cream cheese filling, or substitute natural ingredients like spinach powder for color. The cupcakes will still be delicious and your witch hats will steal the show!
Can I use another type of candy for the witch hats?
Definitely! While chocolate kisses work perfectly, you could also try mini ice cream cones dipped in chocolate or decorated sugar cones for a similar effect. Just make sure the candy is light enough to sit atop the cupcake without sinking.
Will these cupcakes keep well for a Halloween party next day?
Yes, they store well overnight in an airtight container in the fridge, making them a great make-ahead treat to reduce last-minute stress. Just add the witch hats fresh for the best look.
Is it okay to use regular chocolate sandwich cookies instead of mint flavored?
Of course! Mint-flavored cookies add a festive touch but regular chocolate sandwich cookies taste great and still provide the sturdy base needed for your witch hats. Choose your favorite!
Final Thoughts
These Halloween Witch Hat Cupcakes Recipe are more than just a cute dessert—they are a delicious statement piece for any Halloween gathering. From their rich, moist cake to the eerie green filling and whimsical witch hat toppers, they bring fun, flavor, and festivity to your table. I can’t wait for you to try making and sharing these with your loved ones. Happy Halloween baking!
Print
Halloween Witch Hat Cupcakes Recipe
- Prep Time: 20 minutes
- Cook Time: 14 minutes
- Total Time: 54 minutes
- Yield: 24 cupcakes
- Category: Dessert
- Method: Baking
- Cuisine: American
Description
These Halloween Witch Hat Cupcakes combine rich dark chocolate cupcakes filled with a creamy, vibrant green cream cheese filling and topped with whimsical chocolate witch hats. Perfect for festive parties, this recipe uses a boxed cake mix for convenience and adds a fun decorative twist with chocolate kisses and sandwich cookies to create an enchanting dessert that’s both easy and impressive.
Ingredients
For the Cupcakes:
- 1 (15.25 oz) box Dark Chocolate Cake Mix
- 3 Eggs (or follow package instructions)
- ½ cup Oil (or follow package instructions)
- 1 ¼ cups Water (or follow package instructions)
For the Cream Cheese Filling (Optional):
- 8 oz Cream Cheese (room temperature)
- ½ cup Sugar
- 1 Egg
- 1 tsp Vanilla Extract
For the Green Food Coloring:
- 34 drops Green food coloring
- 3 drops Yellow food coloring
- 2 drops Blue food coloring
For the Witch Hats:
- 24 Chocolate Sandwich Cookies (with green/mint filling or your choice)
- 24 Dark Chocolate Kisses Candy
- 1 (16 oz) tub Dark Chocolate Frosting
- 1 small Squeeze Tube of Green Frosting
Instructions
- Prepare the Cupcake Batter: Preheat the oven to 350°F (or follow the cake mix package instructions). Prepare the dark chocolate cake mix as directed on the box and set aside.
- Make the Cream Cheese Filling (Optional): In a mixing bowl, beat the cream cheese, sugar, egg, and vanilla extract until smooth using a hand mixer. Add green food coloring drops to the cream cheese mixture and blend until the color is even. Refrigerate the filling for 10-15 minutes to firm up slightly.
- Assemble the Cupcakes: Line two 12-cup cupcake pans with black cupcake liners. Fill each liner about one-third full with the prepared cake batter. Spoon a small amount of the green cream cheese filling onto each cupcake, then top with the remaining cake batter to cover the filling completely.
- Bake the Cupcakes: Bake the cupcakes in the preheated oven for 13-16 minutes (or as directed on the package) until a toothpick inserted into the center comes out clean. Remove from the oven and allow to cool in the pan for 30 minutes before transferring them to a wire rack to cool completely.
- Make the Witch Hats: While the cupcakes cool, assemble the witch hats by attaching a dark chocolate kiss candy to the center of each chocolate sandwich cookie using a small amount of dark chocolate frosting as glue. Pipe a small decorative band of green frosting around the base of each chocolate kiss to resemble the brim of a witch hat.
- Decorate the Cupcakes: Once the cupcakes are completely cool, frost their tops generously with the dark chocolate frosting. Place a completed witch hat on top of each frosted cupcake to finish the decoration.
Notes
- The cream cheese filling is optional but adds a moist and tangy surprise inside the cupcakes.
- You can substitute green food coloring quantities based on the intensity of color you prefer.
- Make sure cupcakes are fully cooled before frosting to prevent melting.
- Use black cupcake liners for a spooky Halloween effect.
- These cupcakes can be stored covered at room temperature for up to 2 days or refrigerated for longer freshness.


