
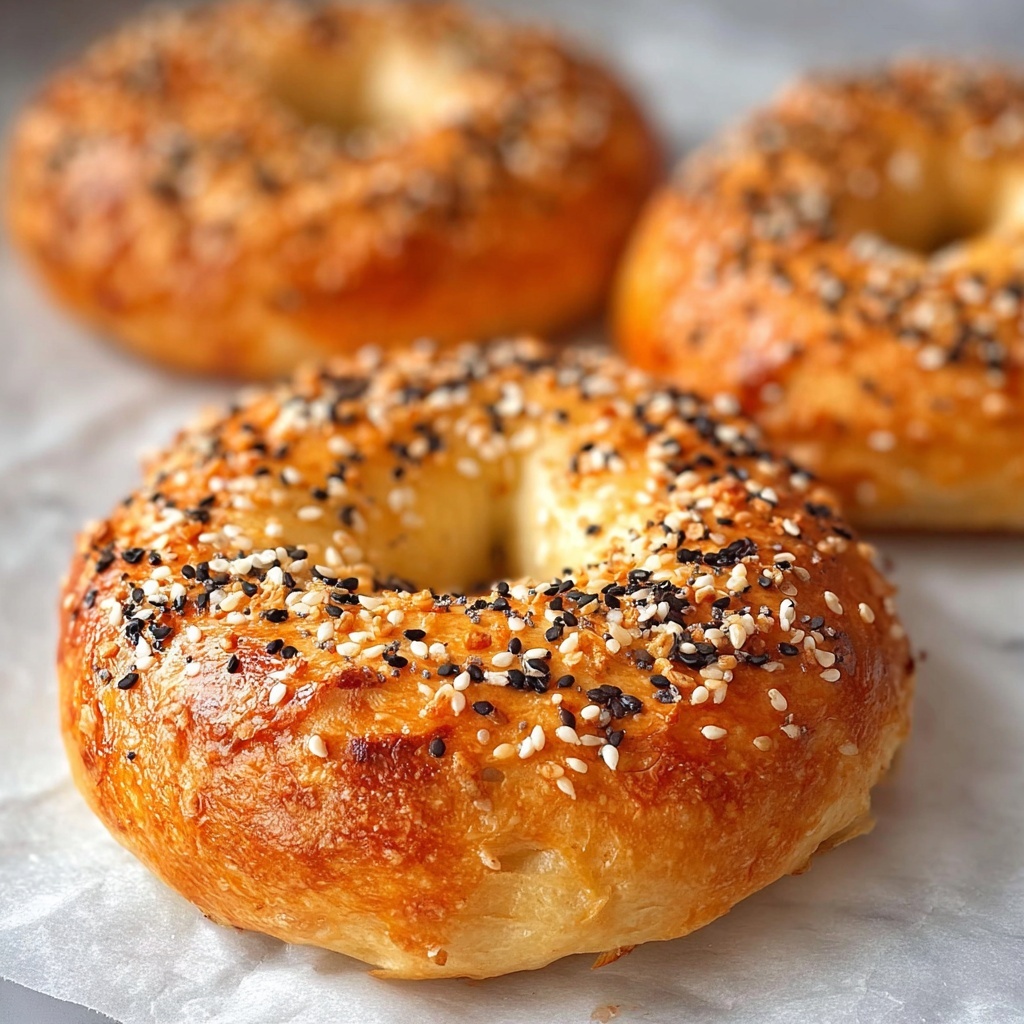
If you have been craving a fresh, chewy bagel but want to skip the store-bought versions loaded with preservatives, you are going to love this Easy Homemade Greek Yogurt Bagels Recipe. It combines the tangy creaminess of Greek yogurt with simple pantry staples to create bagels that are golden on the outside, soft and tender on the inside, and totally irresistible. This recipe is so straightforward that you’ll find yourself whipping up a batch anytime you want a delicious homemade treat without the fuss of traditional yeast-based bagels. Trust me, once you try these, you’ll never look at bagels the same way again!

Ingredients You’ll Need
These ingredients are incredibly simple but each plays a crucial role in delivering the taste, texture, and appearance of these delightful bagels. From the all-purpose flour that provides structure, to the Greek yogurt which adds moisture and a slight tang, each component comes together effortlessly.
- 2 cups all-purpose flour: The foundation that gives these bagels their chewy yet soft bite.
- 1 cup Greek yogurt: Adds moisture, protein, and a subtle tangy flavor that makes these bagels extra special.
- 1 tsp baking powder: A gentle leavening agent that helps the dough rise without the wait.
- 1/2 tsp salt: Enhances all the flavors and balances the overall taste.
- 1 tbsp honey (optional): Adds a touch of natural sweetness and helps with browning.
- 1 egg, beaten (for egg wash): Creates a beautiful golden sheen and helps toppings stick.
- Toppings: Sesame seeds, poppy seeds, or everything bagel seasoning for that classic bagel finish.
How to Make Easy Homemade Greek Yogurt Bagels Recipe
Step 1: Prepare Your Oven and Baking Sheet
Start by preheating your oven to 375°F (190°C) and line a baking sheet with parchment paper. This prevents the bagels from sticking and makes cleanup a breeze. Having your oven fully heated ensures the bagels bake evenly and get that perfect golden crust.
Step 2: Combine Dry and Wet Ingredients
In a mixing bowl, add the all-purpose flour, baking powder, and salt. Then stir in the Greek yogurt and honey if you’re using it. Mix everything until a sticky dough forms. Don’t worry if it feels a little tacky — that’s exactly what you want.
Step 3: Knead the Dough
Lightly flour your surface and knead the dough for 2 to 3 minutes until it becomes smooth and elastic. This quick kneading process helps develop the right texture so your bagels come out soft inside with a slight chew on the outside.
Step 4: Shape Your Bagels
Divide the dough into 4 equal portions. Roll each piece into a smooth ball, then poke a hole through the center with your finger and gently widen the hole until it looks like a bagel shape. The diameter of the hole can be adjusted depending on your preference — just be careful not to make it too large or it could close during baking.
Step 5: Egg Wash and Add Toppings
Place your shaped bagels on the prepared baking sheet. Using a pastry brush, coat each bagel generously with the beaten egg. This step is key for that shiny golden finish. Then sprinkle on your chosen toppings — sesame seeds, poppy seeds, or everything bagel seasoning make fantastic choices to add texture and flavor.
Step 6: Bake Until Golden Brown
Bake the bagels in your preheated oven for 20 to 25 minutes. Keep an eye on them near the end to make sure they don’t over-brown. When done, they should be puffed up and a delicious golden color, inviting you to dive in immediately.
Step 7: Cool Before Serving
Allow the bagels to cool on a wire rack for a few minutes. This brief cooling helps the interior set so every bite stays soft and chewy without being gummy. Now you’re ready to enjoy the fruits of your labor!
How to Serve Easy Homemade Greek Yogurt Bagels Recipe
Garnishes
These bagels are wonderfully versatile. You can keep it classic with cream cheese or butter, or add a splash of color and flavor with sliced tomatoes, fresh herbs like dill, or even a drizzle of honey. The combination of a warm, tangy bagel with fresh garnishes makes every bite exciting.
Side Dishes
Pair your homemade bagels with simple sides like scrambled eggs, smoked salmon, or a crisp green salad. They also go beautifully alongside a bowl of fresh fruit or a cup of your favorite soup for a cozy breakfast or lunch experience.
Creative Ways to Present
Imagine turning your Easy Homemade Greek Yogurt Bagels Recipe into mini sandwiches with deli meats and cheeses for a delightful party platter. You could even slice them into halves and toast them lightly for an elevated snack or brunch option. This recipe’s flexibility allows you to get creative and impress everyone at your table.
Make Ahead and Storage
Storing Leftovers
If you have leftovers, store them wrapped tightly in plastic wrap or in an airtight container at room temperature for up to 2 days. They maintain their fresh-baked texture best when consumed quickly, but if needed, refrigeration is an option to extend freshness a bit longer.
Freezing
These bagels freeze wonderfully! Wrap them individually in plastic wrap and place in a freezer-safe bag. They can be frozen for up to 1 month. When you want to enjoy one, thaw it at room temperature or toast directly from frozen for a quick breakfast treat.
Reheating
To bring your bagels back to life, slice them in half and toast in a toaster or toaster oven until warmed through and slightly crispy on the edges. Alternatively, a quick zap in the microwave for 15-20 seconds works if you’re in a hurry, but be mindful of the texture.
FAQs
Can I use flavored Greek yogurt to make these bagels?
While plain Greek yogurt is best to maintain the classic bagel flavor, using a mild flavored yogurt like vanilla can add a subtle sweetness. Just be cautious with strong flavors that could overpower the dough’s taste.
Do I need to boil these bagels before baking?
This Easy Homemade Greek Yogurt Bagels Recipe skips the traditional boiling step, making it quicker and more approachable without sacrificing delicious results. They bake up beautifully chewy without that extra step.
Can I make more than 4 bagels?
Definitely! You can double or triple the ingredient amounts to make more bagels. Just remember to adjust your baking sheet space accordingly so each bagel has room to expand without touching.
Are these bagels vegan or allergen-free?
This recipe includes egg for the wash and Greek yogurt, so it is not vegan or dairy-free as written. However, you could experiment with plant-based yogurt and egg substitutes if needed, but results may vary.
What toppings work best on these homemade bagels?
The classics like sesame seeds, poppy seeds, and everything bagel seasoning are great choices. You could also try garlic flakes, dried onion, or even coarse salt for different flavor profiles. Get creative and find your favorite!
Final Thoughts
There is something truly special about sinking your teeth into a warm, freshly baked bagel made from scratch, and this Easy Homemade Greek Yogurt Bagels Recipe makes that dream completely achievable. No complicated techniques or ingredients, just pure simple goodness. I encourage you to give this recipe a try—you’ll be amazed at how quickly it becomes a staple in your baking repertoire. Your mornings (and snack times!) will never be the same again.
Print
Easy Homemade Greek Yogurt Bagels Recipe
- Prep Time: 5 minutes
- Cook Time: 25 minutes
- Total Time: 30 minutes
- Yield: 4 bagels (4 servings)
- Category: Breakfast
- Method: Baking
- Cuisine: Greek-American
- Diet: Vegetarian
Description
These easy homemade Greek yogurt bagels combine simple ingredients to create a delicious, soft, and slightly tangy treat perfect for breakfast or snacks. Made with Greek yogurt and all-purpose flour, these bagels require minimal prep and baking time, resulting in a healthier alternative to traditional bagels with a chewy texture and delightful toppings.
Ingredients
Bagel Dough
- 2 cups all-purpose flour
- 1 cup Greek yogurt
- 1 tsp baking powder
- 1/2 tsp salt
- 1 tbsp honey (optional)
For Topping
- 1 egg, beaten (for egg wash)
- Sesame seeds, poppy seeds, or everything bagel seasoning (as desired)
Instructions
- Preheat Oven: Preheat your oven to 375°F (190°C) and line a baking sheet with parchment paper to prevent sticking.
- Mix Ingredients: In a large mixing bowl, combine the all-purpose flour, Greek yogurt, baking powder, salt, and optional honey. Stir until a dough begins to form.
- Knead Dough: Knead the dough on a clean surface for 2 to 3 minutes until it becomes smooth and elastic.
- Shape Bagels: Divide the dough into four equal portions. Roll each portion into a ball and then create a hole through the center, shaping it into a bagel form.
- Apply Egg Wash and Add Toppings: Using a brush, coat each bagel with the beaten egg to achieve a shiny golden crust. Sprinkle with your choice of sesame seeds, poppy seeds, or everything bagel seasoning.
- Bake: Place the prepared bagels on the baking sheet and bake in the preheated oven for 20 to 25 minutes or until they turn golden brown.
- Cool and Serve: Remove the bagels from the oven and allow them to cool slightly before serving to enjoy the perfect texture and flavor.
Notes
- You can substitute all-purpose flour with whole wheat flour for a healthier version, but the texture will be denser.
- Honey is optional but adds a subtle sweetness that balances the tanginess of Greek yogurt.
- Be sure to knead the dough sufficiently to develop gluten, which helps in achieving a chewy bagel texture.
- Experiment with different toppings or add mix-ins like dried herbs or cheese to customize your bagels.
- Store leftover bagels in an airtight container at room temperature for up to 2 days or freeze for longer storage.


