
“`html
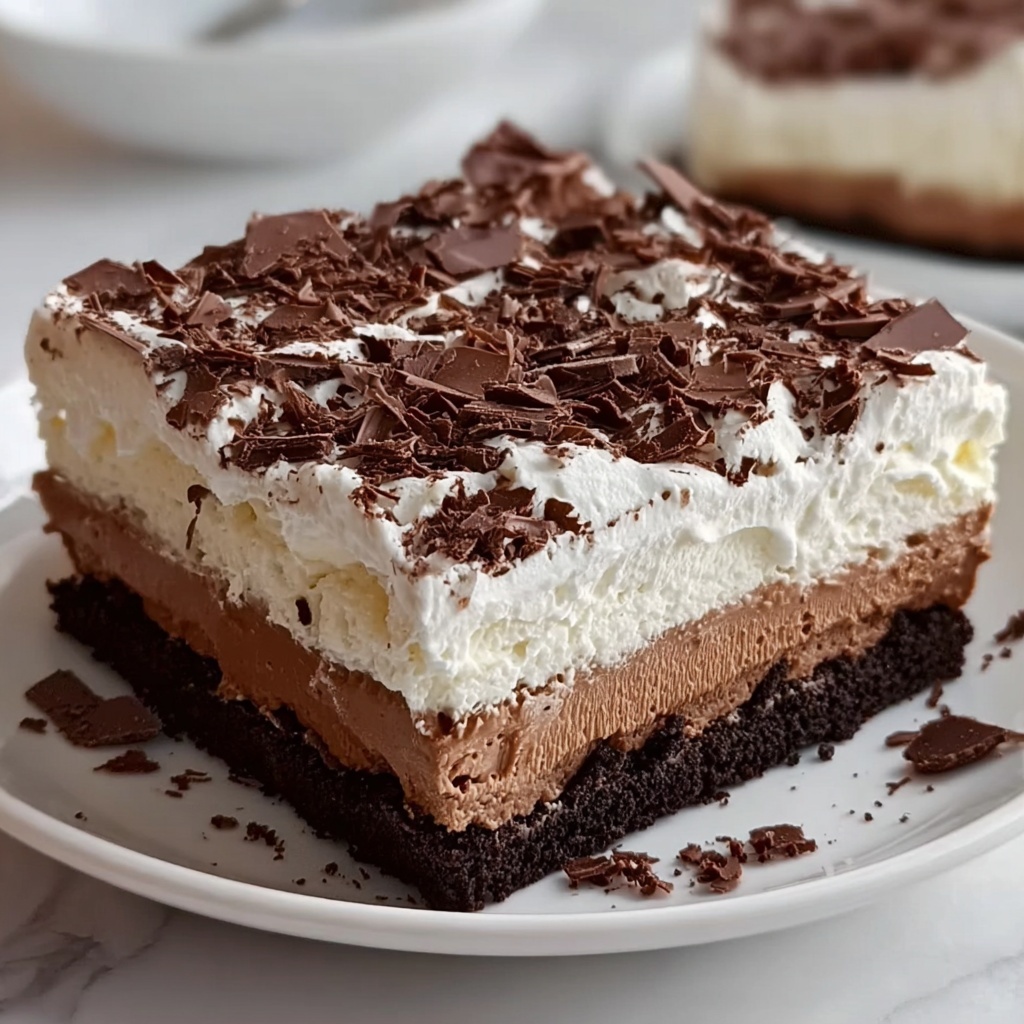
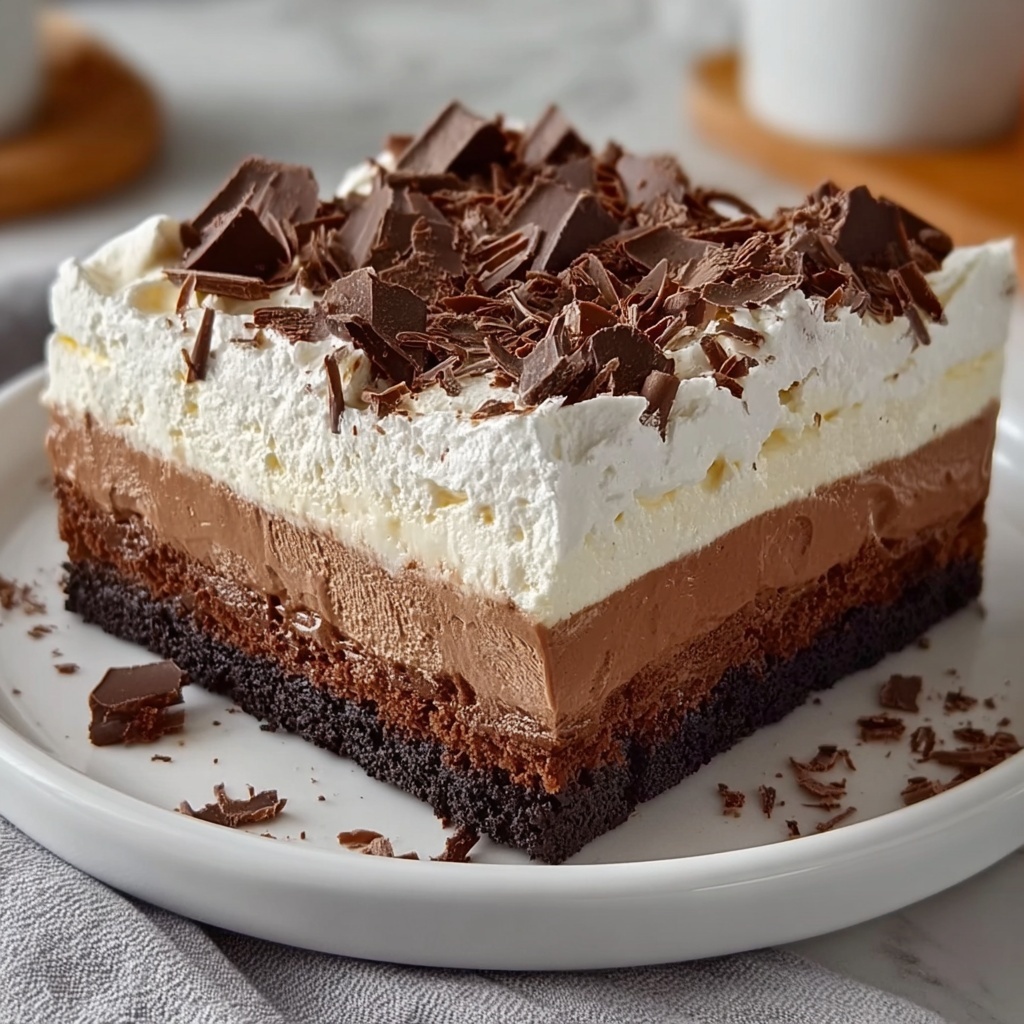
If you’ve ever wanted a dessert that combines rich fudgy brownie goodness with creamy layers of luscious pudding and whipped topping, then the Brownie Refrigerator Cake Recipe is about to become your new favorite go-to treat. It’s a wonderfully indulgent yet surprisingly effortless no-bake delight that layers chocolate and cream into every bite, delivering a party-worthy dessert that feels both nostalgic and elegant. With only a handful of simple ingredients and no oven time beyond the brownie base, this cake transforms everyday pantry staples into something truly special for any occasion.
Ingredients You’ll Need
Every ingredient in this Brownie Refrigerator Cake Recipe plays a vital role, blending rich textures and flavors to create a harmonious finish. From the fudgy brownie base to the light cream cheese layer and silky pudding mix, these essentials are easy to source but packed with purpose.
- Brownie mix: Your base for fudgy, chocolatey depth—choose a good quality mix for the best texture.
- Extra-large egg: Adds structure and moisture to the brownie layer, ensuring it bakes perfectly.
- Cream cheese: Softened for a smooth, tangy layer that balances sweetness beautifully.
- Powdered sugar: Sweetens the cream cheese without grittiness, creating a velvety mouthfeel.
- Whipped topping (two 8 oz. containers): Provides airy lightness to both cream cheese and pudding layers.
- Instant chocolate pudding mix: Adds rich chocolate flavor and thickness to the middle layer.
- Instant vanilla pudding mix: Brings a mellow contrast, enhancing the complexity of the pudding layer.
- Milk: The liquid base for the pudding, bringing everything together with creaminess.
- Grated Hershey bar or chocolate syrup: Finishing touch for visual appeal and extra chocolate kick.
How to Make Brownie Refrigerator Cake Recipe
Step 1: Prepare the Brownie Base
Begin by preheating your oven and preparing the brownie mix according to the package instructions, making sure to use an extra-large egg for that perfect texture and richness. Pour the batter into a 9×13-inch pan and bake as directed. Once baked, allow the brownie layer to cool completely—this is essential for the creamy layers to set perfectly on top without melting or sliding off.
Step 2: Make the Cream Cheese Layer
Once your brownie base has cooled, it’s time to add a luscious cream cheese layer. Beat the softened cream cheese with powdered sugar until completely smooth and creamy. Then, carefully fold in one container of the whipped topping—this fusion creates a light, fluffy texture that contrasts beautifully with the dense brownie base. Spread this mixture evenly over the brownies for a silky foundation for the pudding layers.
Step 3: Prepare the Pudding Layer
Next up is the dreamy pudding layer. In a mixing bowl, whisk together the instant chocolate and vanilla pudding mixes with 3 ½ cups of milk. Stir until the mixture thickens, then let it rest for about five minutes to set up properly. Once ready, spread this creamy pudding layer gently over the cream cheese, creating a smooth, luscious middle that keeps the whole cake moist and indulgent.
Step 4: Final Layer & Garnish
To finish the cake, spread the second container of whipped topping over the pudding layer, adding a cloud-like softness on top. Then, sprinkle grated Hershey’s chocolate or drizzle chocolate syrup across the surface for a beautiful, chocolatey garnish that hints at the rich flavors inside.
Step 5: Chill & Serve
Cover your masterpiece and refrigerate it for at least four hours, though overnight chilling is ideal. This chilling time allows all the layers to meld together into a sliceable, firm-yet-creamy texture. When ready, slice into squares and watch eyes light up as everyone enjoys this decadent, cool, and refreshing dessert.
How to Serve Brownie Refrigerator Cake Recipe
Garnishes
While the grated Hershey’s chocolate and chocolate syrup provide simple elegance, you can get playful with your garnishes—try sprinkling chopped nuts, fresh berries, or a light dusting of cocoa powder to add texture and a pop of color that complements the creamy layers perfectly.
Side Dishes
This cake is a fantastic centerpiece on its own but pairs wonderfully with a scoop of vanilla ice cream or a dollop of freshly whipped cream for extra indulgence. A small cup of coffee or milk can also balance the richness, making each bite even more satisfying.
Creative Ways to Present
Want to impress at a party? Serve the Brownie Refrigerator Cake Recipe in individual clear glasses for a layered parfait look, or cut the cake into bite-sized squares and place them on elegant serving trays with decorative toothpicks for easy snacking. You can even add a drizzle of caramel or sprinkle of sea salt for a gourmet twist.
Make Ahead and Storage
Storing Leftovers
Because this dessert is refrigerated, leftovers should be stored covered in the refrigerator to maintain freshness and prevent drying out. Wrapped tightly, the cake will stay delicious for up to three days, giving you plenty of time to enjoy every creamy, chocolaty bite.
Freezing
If you want to prepare this cake well in advance, it freezes beautifully. Wrap it securely in plastic wrap and again in foil to prevent freezer burn. When well-wrapped, it can last up to one month in the freezer. Thaw it overnight in the refrigerator before serving to preserve its creamy texture.
Reheating
This cake is best enjoyed chilled and does not require reheating. In fact, warming could compromise the delicate layers. Just bring it out of the fridge about 10 minutes before serving if you want it slightly less cold and more flavorful.
FAQs
Can I use homemade brownies for this Brownie Refrigerator Cake Recipe?
Absolutely! If you prefer making brownies from scratch, go for it. Just ensure they fit into the 9×13-inch pan and cool completely before layering. Homemade brownies can add a personalized touch and extra flavor to your cake.
Is it possible to make this dessert gluten-free?
Yes, just use a gluten-free brownie mix and ensure all other ingredients like pudding mix and whipped topping are gluten-free certified. This way, you can safely enjoy the Brownie Refrigerator Cake Recipe without worrying about gluten.
Can I substitute the instant pudding with homemade pudding?
While homemade pudding can work, it needs to be thick enough to hold the layers together. Instant pudding mixes are designed to set firmly, making assembly easier and the final texture more reliable, but a thick homemade pudding made with cornstarch can be a good alternative.
How long does the Brownie Refrigerator Cake stay good in the fridge?
Stored properly in an airtight container, this cake stays fresh and delicious for about three days. Beyond that, the texture and flavor may start to decline, so it’s best enjoyed within that window.
Can I prepare this dessert for a large crowd?
Definitely! The recipe yields 12 to 16 servings, perfect for parties or gatherings. If you need more, simply double the recipe and use a larger pan or multiple pans to accommodate all the layers.
Final Thoughts
If you’re craving a dessert that’s as easy as it is impressive, don’t hesitate to try the Brownie Refrigerator Cake Recipe. It’s a fantastic way to pamper yourself and your loved ones with minimal fuss, combining the best of brownie decadence and creamy indulgence. Once you take that first bite, you’ll understand why this dessert quickly becomes a beloved classic in every kitchen.
“`
Print
Brownie Refrigerator Cake Recipe
- Prep Time: 15 minutes
- Cook Time: 30 minutes
- Total Time: 4 hours 45 minutes (including chilling time)
- Yield: 12-16 servings
- Category: Dessert
- Method: Baking
- Cuisine: American
Description
This Brownie Refrigerator Cake is a luscious layered dessert featuring a rich brownie base topped with a creamy cream cheese layer, smooth chocolate and vanilla pudding, and finished with whipped topping and chocolate garnish. It’s a no-bake, chilled treat that’s perfect for gatherings and easy to prepare ahead of time.
Ingredients
Brownie Layer
- 1 box brownie mix (prepared according to package instructions)
- 1 extra-large egg (or as required by brownie mix)
Cream Cheese Layer
- 1 (8 oz.) package cream cheese, softened
- 1 cup powdered sugar
- 1 (8 oz.) container whipped topping
Pudding Layer
- 1 (3 oz.) package instant chocolate pudding mix
- 1 (3 oz.) package instant vanilla pudding mix
- 3 ½ cups milk
- 1 (8 oz.) container whipped topping
Topping
- 1 Hershey bar, grated or chocolate syrup for drizzling
Instructions
- Prepare the Brownie Base: Preheat the oven and bake the brownie mix according to the package directions using an extra-large egg. Pour the batter into a 9×13-inch pan and bake until done. Allow the brownies to cool completely before proceeding.
- Make the Cream Cheese Layer: In a mixing bowl, beat the softened cream cheese with powdered sugar until smooth and creamy. Gently fold in one container (8 oz.) of whipped topping until well combined. Evenly spread this mixture over the cooled brownie layer.
- Prepare the Pudding Layer: In another bowl, whisk together the instant chocolate pudding mix, instant vanilla pudding mix, and 3 ½ cups of milk until it begins to thicken. Let it sit for 5 minutes to fully set, then spread this pudding mixture evenly over the cream cheese layer.
- Final Layer & Garnish: Spread the remaining 8 oz. container of whipped topping over the pudding layer for a light, fluffy finish. Sprinkle the grated Hershey’s chocolate on top or drizzle with chocolate syrup as desired for extra flavor and decoration.
- Chill & Serve: Cover the cake and refrigerate for at least 4 hours, preferably overnight, to allow all layers to set and flavors to meld. Slice into 12-16 servings and serve chilled.
Notes
- Ensure the brownies are completely cooled before adding the cream cheese layer to prevent melting.
- If you prefer, substitute whipped topping with homemade whipped cream for a fresher taste.
- You can use chocolate syrup instead of grated chocolate for a smoother topping.
- Store leftovers covered in the refrigerator and consume within 3-4 days for optimal freshness.
- For a firmer pudding layer, chill the pudding mixture before spreading.


