
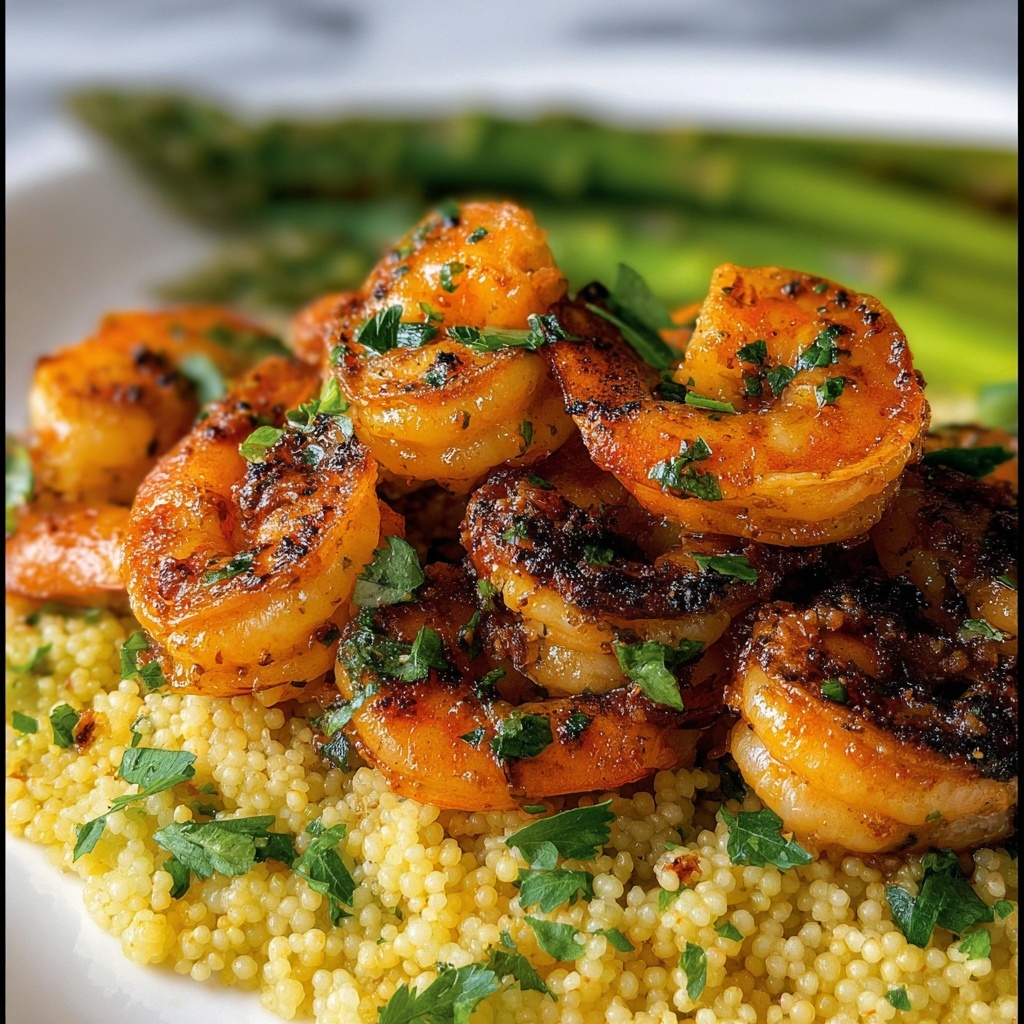
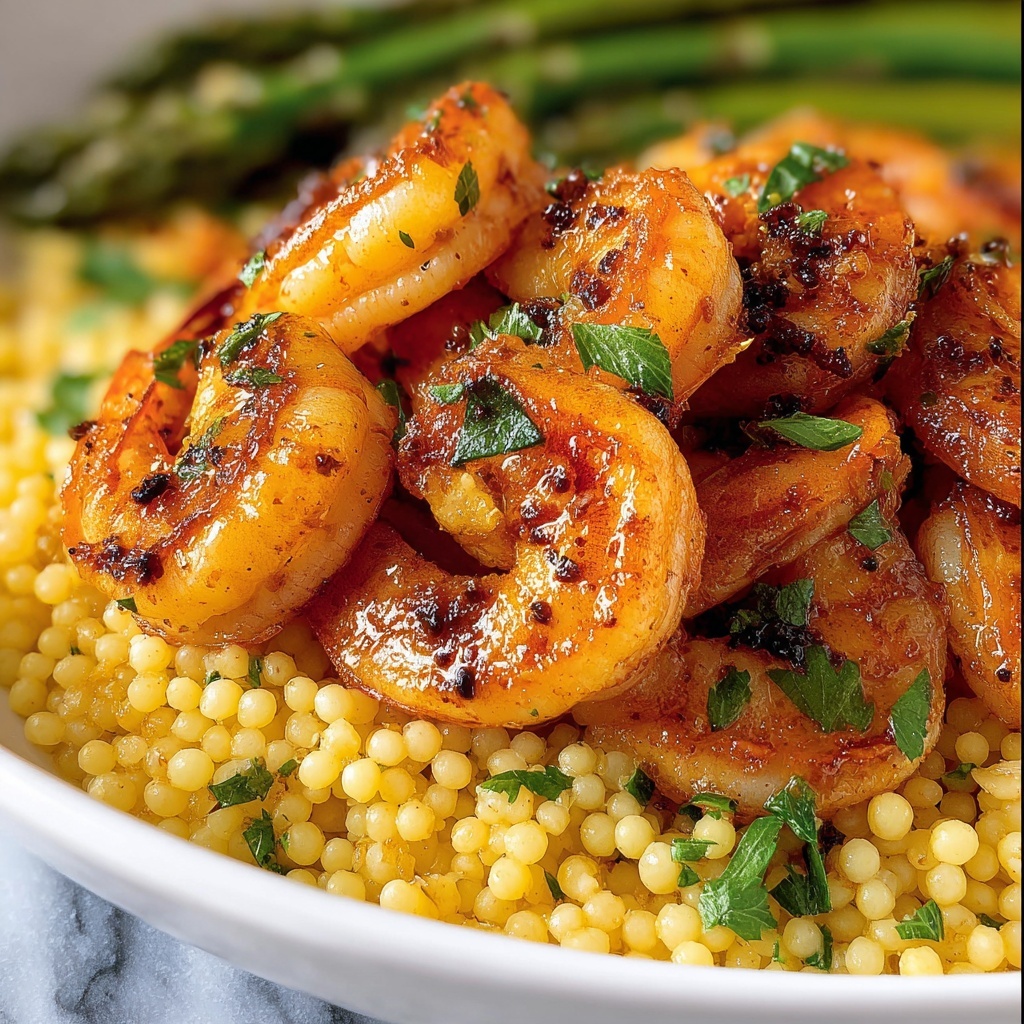
If you’re craving a dish that bursts with tangy zest and buttery crispiness, this Lemon Pepper Shrimp Recipe is going to become your new go-to. It brings together the bright, invigorating punch of lemon pepper seasoning with perfectly cooked shrimp that are golden and crisp on the outside and tender on the inside. Whether you’re whipping it up for a quick weeknight dinner or impressing guests at a casual gathering, this recipe is simple, satisfying, and absolutely delicious.
Ingredients You’ll Need
The magic behind this Lemon Pepper Shrimp Recipe lies in its straightforward ingredients. Each component plays a key role—from the fragrant lemon pepper seasoning to the butter that creates that irresistible richness and crisp finish. These essentials come together to create a balance of flavor, texture, and color that’s both vibrant and comforting.
- All-purpose flour: Acts as the light coating to give the shrimp a crispy outer layer.
- Lemon pepper seasoning: The star spice blend bringing bright citrus notes and peppery warmth.
- Garlic powder: Adds a subtle depth and savory undertone to the shrimp.
- Kosher salt: Enhances all the flavors without overpowering them.
- Shrimp (frozen or fresh): The main ingredient, best if peeled and deveined for easy cooking and eating.
- Butter: Used in two batches, it imparts richness and helps achieve a golden crust.
- Cooking oil (vegetable or olive): Helps the butter combat high heat and ensures even frying.
- Fresh lemon juice: Finished on top for an extra burst of acidity and freshness.
- Vegetable sides, grains, or pasta: Your preferred companions that complete each serving with texture and heartiness.
How to Make Lemon Pepper Shrimp Recipe
Step 1: Prepare the Seasoned Flour Mixture
Begin by combining all-purpose flour, lemon pepper seasoning, garlic powder, and kosher salt in a large bowl. Whisking them together ensures every bit of flour is flavored, so when the shrimp are coated, each bite will be packed with taste and a little kick of peppery citrus.
Step 2: Coat the Shrimp
Next, add the thawed, peeled, and deveined shrimp to your seasoned flour mix. Toss them well until every shrimp wears a light, even coat—that flour coating is key to that crave-worthy crunch.
Step 3: Preheat the Skillet
Heat a large skillet over medium-high heat, then add 1 tablespoon of butter and a splash of oil. The combination helps both flavor and keeps the butter from burning, creating the perfect cooking environment for the shrimp.
Step 4: Cook the Shrimp (First Batch)
Shake off any excess flour and place the shrimp carefully in a single layer in the skillet. Give them room so they don’t steam—let them cook undisturbed for 3-4 minutes, browning beautifully and developing that satisfying crispiness.
Step 5: Flip and Finish Cooking
Once golden, flip the shrimp and cook another 2-3 minutes until fully cooked and just the right shade of brown. Then, remove these beauties and set them aside on a plate while you get ready for the next batch.
Step 6: Repeat with Remaining Shrimp
Add the remaining tablespoon of butter to the skillet, then repeat the process for the rest of the shrimp. This two-batch technique ensures even cooking and that perfect texture.
Step 7: Serve
Plate your cooked shrimp and, if you want, sprinkle on some extra lemon pepper seasoning and a generous squeeze of fresh lemon juice to really brighten the dish. Pair them with your favorite vegetables, grains, or pasta to round out the meal.
How to Serve Lemon Pepper Shrimp Recipe
Garnishes
Garnishing your Lemon Pepper Shrimp Recipe isn’t just about looks—it’s about adding layers of flavor and a fresh touch. A sprinkle of additional lemon pepper seasoning boosts the citrus kick, while fresh herbs like parsley or chives bring a pop of green and subtle freshness. A wedge of lemon on the side invites everyone to add as much zing as they love.
Side Dishes
This shrimp shines best when paired with simple but complementary sides. Think vibrant steamed asparagus, garlic roasted broccoli, or a light, fluffy pilaf. For a cozier twist, serve it atop creamy risotto or alongside buttery noodles tossed with olive oil and herbs. Each side enhances the meal by balancing the tangy, buttery shrimp with mellow textures and flavors.
Creative Ways to Present
Want to jazz up your presentation? Try serving the shrimp skewered for a casual party platter, or spoon them over a fresh green salad with avocado and cherry tomatoes for a colorful, nutritious bowl. Wrapping the shrimp inside a soft tortilla with crisp cabbage slaw and a drizzle of aioli transforms the dish into a lively taco perfect for casual gatherings or quick lunches.
Make Ahead and Storage
Storing Leftovers
If you happen to have any leftovers from your Lemon Pepper Shrimp Recipe, store them in an airtight container in the refrigerator. They’ll stay fresh for up to two days, making them perfect for a quick lunch or dinner the next day.
Freezing
While freshly cooked shrimp are best enjoyed immediately, you can freeze leftover cooked shrimp for up to one month. Place them in a freezer-safe container or bag with as much air removed as possible. When ready, thaw overnight in the refrigerator for the best texture.
Reheating
To reheat your shrimp without sacrificing crispness, use a skillet over medium heat and warm them gently, flipping occasionally. Avoid the microwave as it can turn shrimp rubbery. Adding a small pat of butter while reheating helps restore some of that fresh-cooked flavor and moisture.
FAQs
Can I use frozen shrimp for this recipe?
Absolutely! Frozen shrimp work wonderfully in this Lemon Pepper Shrimp Recipe, just make sure they are fully thawed and patted dry before coating. This helps achieve that perfect crispy coating when cooked.
What if I don’t have lemon pepper seasoning at home?
No worries! You can easily make your own by mixing freshly ground black pepper with lemon zest and a bit of salt. This keeps the dish vibrant and flavorful even if you’re missing the premade seasoning.
Is this recipe suitable for grilling the shrimp instead of pan-frying?
While the recipe is designed for pan-frying to get that crispy flour coating, you can adapt the flavors for grilling by tossing shrimp in a lemon pepper marinade instead. Grilling won’t create the same crunchy texture, but it will provide a fresh, smoky flavor.
Can I make this recipe spicy?
Definitely! Add a pinch of cayenne pepper or a few red pepper flakes to the seasoned flour mixture for a gentle or fiery kick that complements the lemon pepper perfectly.
How can I make this dish gluten-free?
Simply swap the all-purpose flour with a gluten-free flour blend or almond flour. The coating might be slightly different in texture but will still deliver amazing flavor and crispness.
Final Thoughts
Trust me, once you try this Lemon Pepper Shrimp Recipe, it’ll quickly become a favorite in your kitchen. The combination of tangy seasoning, crispy coating, and juicy shrimp creates a dish that’s irresistible and easy to make anytime. So go ahead, gather your ingredients, and dive into the bright, buttery delight that only lemon pepper shrimp can bring!
Print
Lemon Pepper Shrimp Recipe
- Prep Time: 10 minutes
- Cook Time: 20 minutes
- Total Time: 30 minutes
- Yield: 2 servings
- Category: Main Course
- Method: Frying
- Cuisine: American
Description
This Lemon Pepper Shrimp recipe offers a quick and flavorful seafood dish featuring shrimp coated in a zesty lemon pepper seasoned flour mixture, pan-fried to a crispy golden brown. Perfectly complemented by a squeeze of fresh lemon juice, this dish is ideal for an easy yet elegant weeknight dinner or a light meal served alongside your favorite vegetables, grains, or pasta.
Ingredients
Seasoned Flour Mixture
- 1/2 cup (63 g) all-purpose flour
- 3 teaspoons lemon pepper seasoning
- 1 teaspoon garlic powder
- 1 teaspoon kosher salt
Main
- 1 pound (454 g) frozen or fresh shrimp, thawed or peeled and deveined
- 2 tablespoons (28 g) butter, divided
- 1–2 teaspoons cooking oil (vegetable or olive oil, as needed)
- Lemon pepper seasoning, to taste
- Fresh lemon juice, to taste
- Your favorite vegetable sides, grains, or pasta, for serving
Instructions
- Prepare the Seasoned Flour Mixture: In a large bowl, whisk together the all-purpose flour, lemon pepper seasoning, garlic powder, and kosher salt until the mixture is well combined and uniform.
- Coat the Shrimp: Add the thawed, peeled, and deveined shrimp into the seasoned flour mixture. Toss thoroughly to ensure every shrimp is fully coated with the flour mixture for an even, flavorful crust.
- Preheat the Skillet: Place a large skillet over medium-high heat and add 1 tablespoon of butter along with 1 teaspoon of cooking oil. Allow the butter to melt completely and the oil to become hot, ensuring the skillet is ready for frying the shrimp.
- Cook the Shrimp (First Batch): Shake off excess flour from the shrimp to avoid clumps in the pan. Arrange the shrimp in a single layer in the hot skillet without overcrowding. Cook undisturbed for 3-4 minutes until the shrimp develop a crispy, golden-brown exterior.
- Flip and Finish Cooking: Flip the shrimp over carefully and cook for an additional 2-3 minutes on the other side. Ensure shrimp are browned, crisp, and cooked through. Remove cooked shrimp from the skillet and set aside on a plate.
- Repeat with Remaining Shrimp: Add the remaining 1 tablespoon of butter to the skillet. Repeat the cooking process with the remaining shrimp, maintaining the same steps to ensure consistent texture and flavor.
- Serve: Plate the cooked shrimp and, if desired, sprinkle additional lemon pepper seasoning and a squeeze of fresh lemon juice over the top. Serve immediately alongside your favorite vegetable sides, grains, or pasta for a complete meal.
Notes
- Use peeled and deveined shrimp for easier and quicker cooking.
- Be careful not to overcrowd the skillet to ensure shrimp fry evenly and become crispy.
- Adjust lemon pepper seasoning according to your preferred spice level.
- For a dairy-free option, substitute butter with an equal amount of oil.
- Serve with a fresh lemon wedge for extra citrus flavor.
