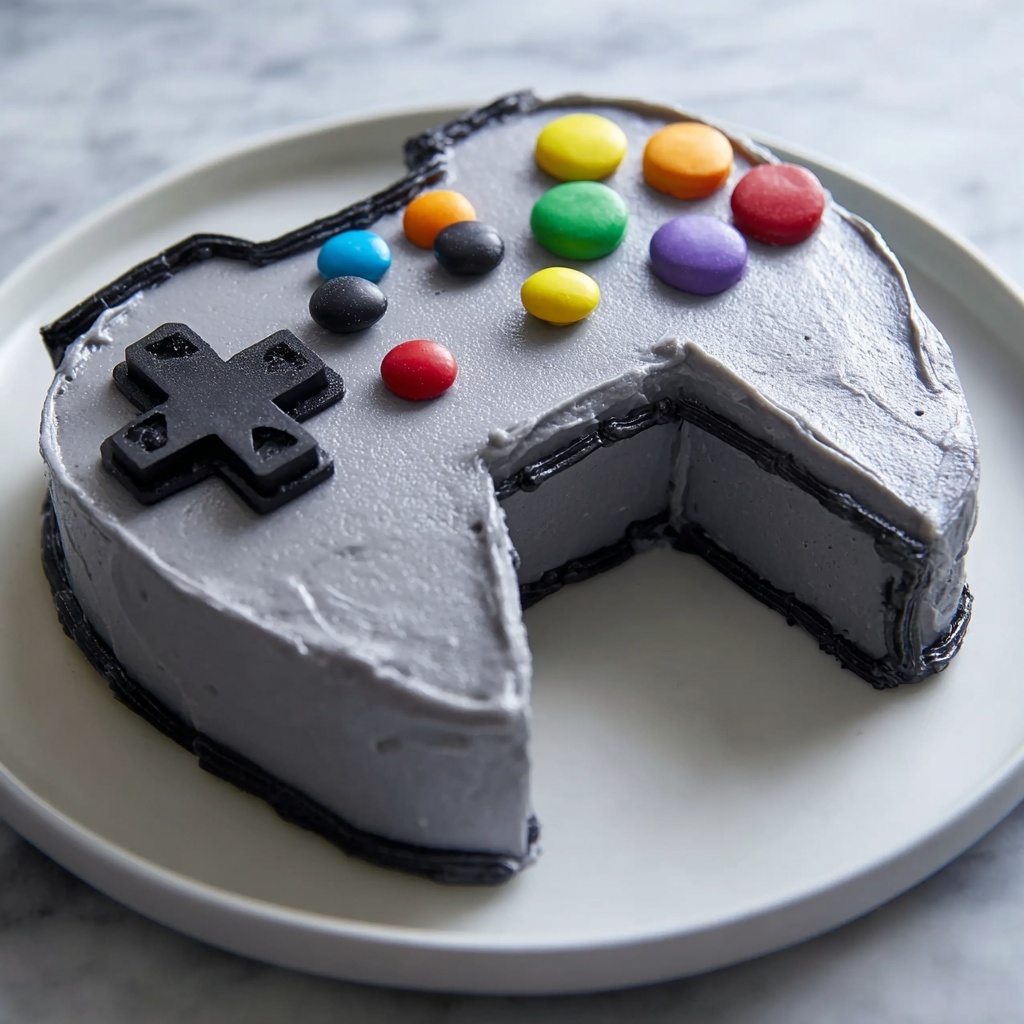
If you are a gamer or simply love impressive cake designs, the Pixel Perfect Game Controller Cake Recipe is an absolute must-try. This cake combines a moist, flavorful base with vibrant, expertly tinted buttercream frosting that brings to life every detail of a classic video game controller. From the shiny candy buttons to the optional licorice cable, this recipe turns baking into a fun, creative adventure that will wow everyone at your next party or gaming night.
Ingredients You’ll Need
The beauty of the Pixel Perfect Game Controller Cake Recipe lies in its straightforward ingredients, each playing a crucial role in making the cake both delicious and visually stunning. These essentials ensure you get the perfect texture, sweetness, and colors to capture that iconic gaming vibe perfectly.
- 2 cups all-purpose flour: Provides the sturdy base and structure of the cake, giving it a soft crumb.
- 1 ½ cups granulated sugar: Adds sweetness and helps the cake to brown beautifully during baking.
- 1 cup unsalted butter, softened: Contributes richness and moisture for a tender texture.
- 4 large eggs: Bind the ingredients together, giving the cake stability and lift.
- 1 cup whole milk: Keeps the cake moist and adds to the tender crumb.
- 2 teaspoons vanilla extract: Infuses warmth and depth of flavor throughout the cake.
- 2 ½ teaspoons baking powder: Ensures the cake rises evenly and stays light.
- ½ teaspoon salt: Balances sweetness and enhances all the flavors.
- 4 cups powdered sugar: The base for smooth, sweet buttercream frosting.
- 2 to 3 tablespoons milk: Adjusts the frosting’s consistency to be perfectly spreadable.
- Food coloring (black, red, blue, green, yellow, purple, gray): Essential for that pixel-perfect, realistic controller look.
- Assorted colored candies: Used to replicate the controller’s colorful buttons, adding fun texture and visual appeal.
- Black licorice strings (optional): A clever touch to mimic those iconic controller cables with edible flair.
How to Make Pixel Perfect Game Controller Cake Recipe
Step 1: Prepare Cooking Equipment
Begin by greasing and lining a 9×13 inch rectangular cake pan with parchment paper. This step ensures your cake won’t stick and comes out cleanly, preserving the perfect shape for the controller carving later.
Step 2: Cream Butter and Sugar
In a large mixing bowl, beat the softened butter together with granulated sugar until the mixture is light and fluffy. This aeration is what will give the cake its tender crumb and lovely rise during baking.
Step 3: Incorporate Eggs and Vanilla
Add the eggs to the butter mixture one at a time, beating well after each addition. Stir in the vanilla extract to infuse a warm, inviting aroma that will fill your kitchen and excite your taste buds.
Step 4: Sift Dry Ingredients
Whisk together the all-purpose flour, baking powder, and salt in a separate bowl. Sifting these ingredients helps distribute them evenly and prevents lumps, ensuring a smooth, consistent batter.
Step 5: Combine Wet and Dry Mixtures
Alternate adding the dry flour mixture and whole milk to the wet batter, starting and ending with the flour. Mix gently until just combined to avoid overworking the batter, which keeps the cake tender and light.
Step 6: Bake the Cake
Pour the batter into your prepared pan and smooth the surface with a spatula. Bake at 350°F for 35 to 40 minutes, or until a toothpick inserted into the center comes out clean—signaling your cake is perfectly baked.
Step 7: Cool the Cake
Allow the cake to cool in the pan for 10 minutes, then transfer it to a wire rack to cool completely. Cooling fully is crucial before carving and frosting to maintain your cake’s shape and prevent melting.
Step 8: Prepare Buttercream Frosting
Beat the softened butter until creamy, then gradually add powdered sugar. Mix in vanilla extract and milk until the frosting is smooth and spreadable. This luscious base is what will bring your game controller to life in vibrant color.
Step 9: Color the Frosting
Divide your frosting into multiple bowls and tint each with your chosen food coloring. Using black, red, blue, green, yellow, purple, and gray will help replicate every component of the controller in striking detail.
Step 10: Shape the Cake
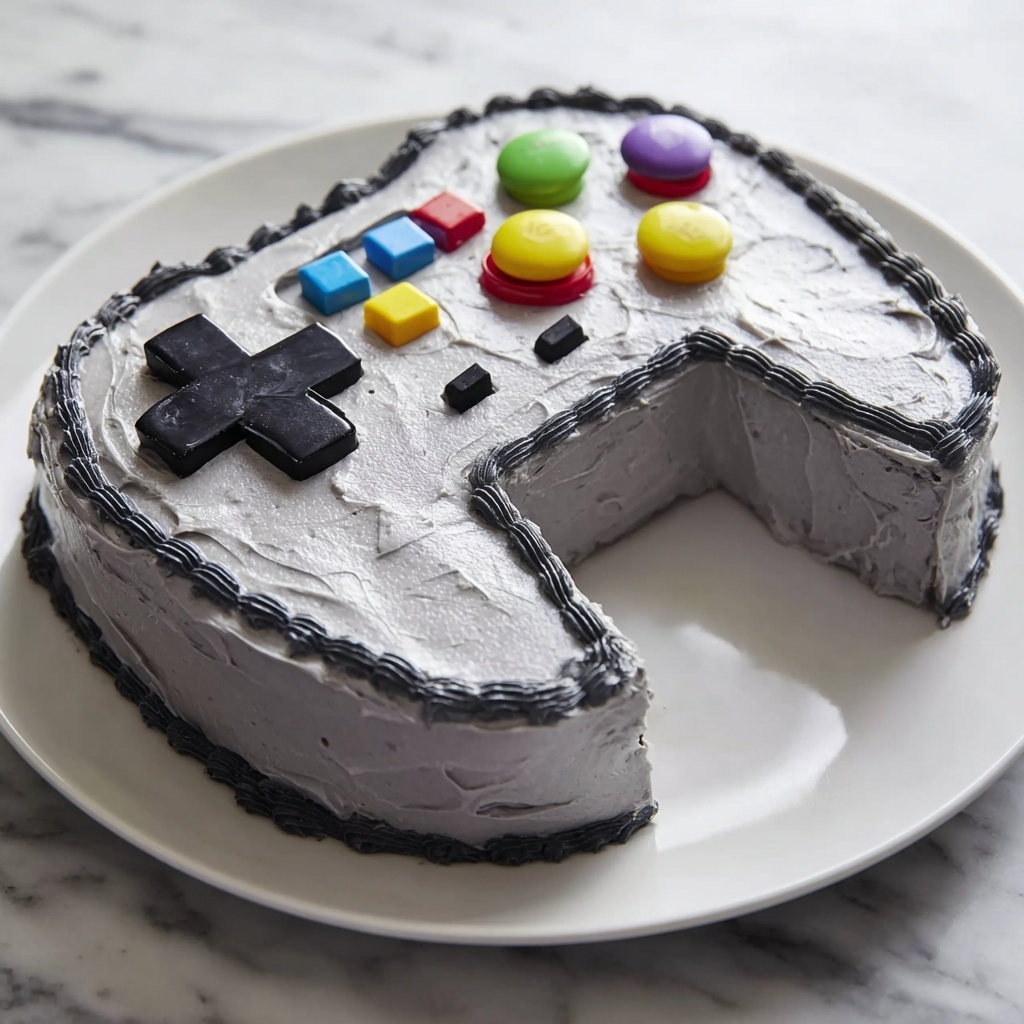
When completely cool, carve the cake into the shape of the game controller with a sharp knife. Taking your time here will ensure the contours and buttons look authentic and pixel perfect.
Step 11: Apply Crumb Coat
Spread a thin gray-colored crumb coat all over the carved cake to seal in crumbs. Chill for 20 minutes to set it, which keeps your final frosting layer smooth and flawless.
Step 12: Complete Frosting and Decoration
Apply a smooth, final layer of frosting to the crumb-coated cake. Use black frosting for piping outlines and intricate details. Decorate the buttons and joysticks with tinted frosting and candies, and add black licorice strings if you want to mimic cables for that extra wow factor.
Step 13: Chill Before Serving
Refrigerate the decorated cake until you are ready to serve. The chilling helps the frosting set, making slicing neat and preserving the vivid colors of your artwork.
How to Serve Pixel Perfect Game Controller Cake Recipe
Garnishes
To elevate the presentation, consider adding extra candy pieces around the cake for a playful touch or edible glitter dust for a subtle sparkle that captures the gaming excitement. Fresh berries or mint leaves can brighten the plate without distracting from the cake’s bold look.
Side Dishes
The cake pairs wonderfully with a scoop of vanilla ice cream or a dollop of whipped cream to balance richness with light creaminess. Fresh fruit platters with vibrant colors can complement the cake’s aesthetic and provide contrast to each sweet bite.
Creative Ways to Present
For a spectacular reveal, present the Pixel Perfect Game Controller Cake Recipe on a gaming-themed platter or atop a stand decorated like a circuit board. You might even surround it with small game cartridges or old-school game handhelds for a nostalgic vibe that amplifies the fun factor.
Make Ahead and Storage
Storing Leftovers
Store any leftover slices in an airtight container in the refrigerator to keep the buttercream fresh and prevent drying out. Properly stored, the cake will stay delicious for up to 4 days, so you can enjoy your game controller masterpiece a little longer.
Freezing
If you want to prepare ahead or save some for later, wrap the carved cake in plastic wrap, then aluminum foil, and freeze. Thaw it overnight in the fridge before serving to maintain that pixel-perfect look and moist texture.
Reheating
This cake is best enjoyed chilled or at room temperature; reheating is not recommended as it can change the texture of the frosting and cake. Just let frozen slices fully thaw at room temperature before serving for the best flavor and feel.
FAQs
Can I use different cake flavors for the Pixel Perfect Game Controller Cake Recipe?
Absolutely! While the classic vanilla base is great for color contrast and flavor, you can try chocolate, red velvet, or even funfetti to customize your cake further. Just keep the texture in mind to ensure it’s still easy to carve.
What kind of food coloring works best for this recipe?
Gel food coloring is ideal because it provides vibrant colors without thinning the frosting. This helps keep the buttercream consistency perfect for piping and spreading.
Can I make this cake gluten-free?
Yes, substituting gluten-free all-purpose flour that includes xanthan gum usually works well. Just be aware the texture might differ slightly, so handle the batter gently and watch the baking time closely.
How do I prevent the cake from crumbling when carving?
Make sure your cake is completely cooled and gently handle it with a sharp knife. Chilling the cake before carving can also firm it up, reducing crumbs and giving you cleaner edges.
Is it necessary to use licorice strings for cables?
Not at all! The licorice strings are a fun optional touch to enhance the realism, but your cake will look fantastic with just the frosting and candy decorations if you prefer to keep it simple.
Final Thoughts
This Pixel Perfect Game Controller Cake Recipe is more than just a dessert; it’s a joyful creative journey for any baking or gaming enthusiast. With its bold design, inviting flavors, and playful details, this cake is a showstopper that’s sure to impress friends and family. So grab your ingredients, put on your baking hat, and craft your own edible tribute to your favorite pastime!
Print
Pixel Perfect Game Controller Cake Recipe
- Prep Time: 20 minutes
- Cook Time: 40 minutes
- Total Time: 1 hour 10 minutes
- Yield: 12 servings
- Category: Dessert
- Method: Baking
- Cuisine: American
- Diet: Vegetarian
Description
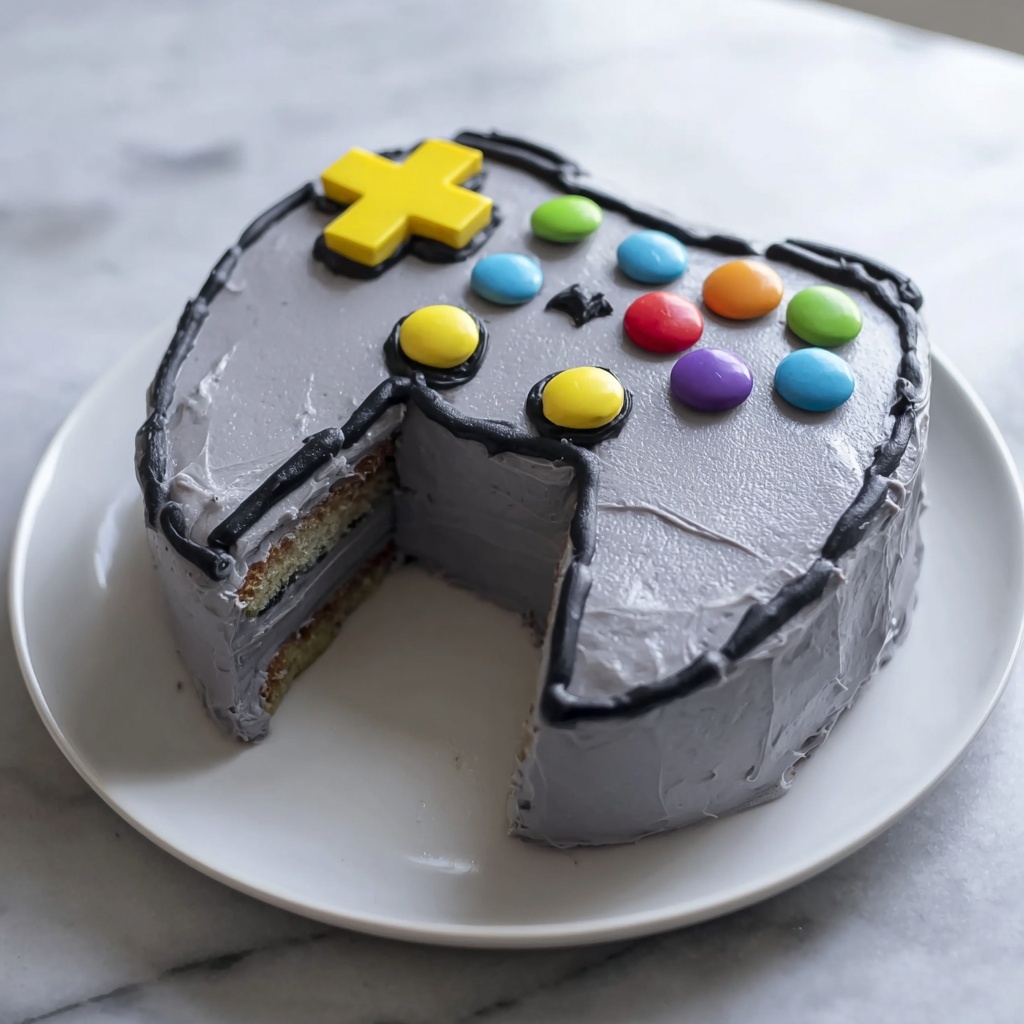
Create a fun and visually stunning Pixel Perfect Game Controller cake that’s perfect for gamers and cake lovers alike. This recipe guides you through baking a moist vanilla cake, crafting colorful buttercream frosting, and decorating with candies and frosting to replicate the look of a classic video game controller. Ideal for parties and special occasions, this cake combines delicious flavors with creative design.
Ingredients
Cake
- 2 cups all-purpose flour
- 1 ½ cups granulated sugar
- 1 cup unsalted butter, softened
- 4 large eggs
- 1 cup whole milk
- 2 teaspoons vanilla extract
- 2 ½ teaspoons baking powder
- ½ teaspoon salt
Buttercream Frosting
- 1 cup unsalted butter, softened
- 4 cups powdered sugar
- 2 to 3 tablespoons milk
- 2 teaspoons vanilla extract
- Food coloring: black, red, blue, green, yellow, purple, and gray
Decoration
- Assorted colored candies for buttons
- Black licorice strings for controller cables (optional)
Instructions
- Prepare Cooking Equipment: Preheat your oven to 350°F (175°C). Grease and line a 9×13 inch rectangular cake pan with parchment paper to prevent sticking and ensure easy removal.
- Cream Butter and Sugar: In a large mixing bowl, beat the softened butter and granulated sugar together until the mixture is light, fluffy, and well combined. This aerates the batter for a tender cake.
- Incorporate Eggs and Vanilla: Add eggs one at a time, beating well after each to incorporate fully. Stir in the vanilla extract to infuse flavor.
- Sift Dry Ingredients: In a separate bowl, whisk together the all-purpose flour, baking powder, and salt until evenly distributed, helping prevent lumps in the batter.
- Combine Wet and Dry Mixtures: Alternate adding the dry ingredients and whole milk to the butter mixture, starting and ending with the flour mixture. Mix gently until just combined to avoid overmixing, which could make the cake tough.
- Bake the Cake: Pour the batter evenly into the prepared pan and smooth the surface with a spatula. Bake for 35 to 40 minutes or until a toothpick inserted into the center comes out clean.
- Cool the Cake: Allow the cake to cool in the pan for 10 minutes, then transfer it to a wire rack to cool completely, which is essential before decorating.
- Prepare Buttercream Frosting: Beat the softened butter until creamy. Gradually add powdered sugar, then mix in vanilla extract and enough milk to reach a smooth, spreadable frosting consistency.
- Color the Frosting: Divide the frosting into several bowls and add different food coloring to each to create black, red, blue, green, yellow, purple, and gray frosting for detailed decorating.
- Shape the Cake: Using a sharp knife, carve the cooled cake into the shape of a classic video game controller carefully, removing excess cake to get the desired outline.
- Apply Crumb Coat: Spread a thin layer of gray-colored buttercream over the carved cake to lock in crumbs and create a smooth base for the final frosting. Refrigerate for 20 minutes to set.
- Complete Frosting and Decoration: Apply a smooth final layer of frosting over the cake. Use black frosting to pipe outlines and intricate details. Decorate the buttons and joysticks with colored frostings and assorted candies. Optionally, add black licorice strings to mimic the controller cables.
- Chill Before Serving: Refrigerate the decorated cake until ready to serve to help the frosting set firmly. Slice carefully and enjoy your pixel-perfect game controller cake!
Notes
- Make sure the cake is completely cooled before frosting to avoid melting the buttercream.
- Use gel food coloring for more vibrant colors without altering the frosting consistency.
- Carving the cake can be easier if the cake is chilled slightly.
- Optional licorice cables add a fun, realistic touch but can be omitted if preferred.
- Store leftover cake in an airtight container in the refrigerator for up to 3 days.


