
“`html
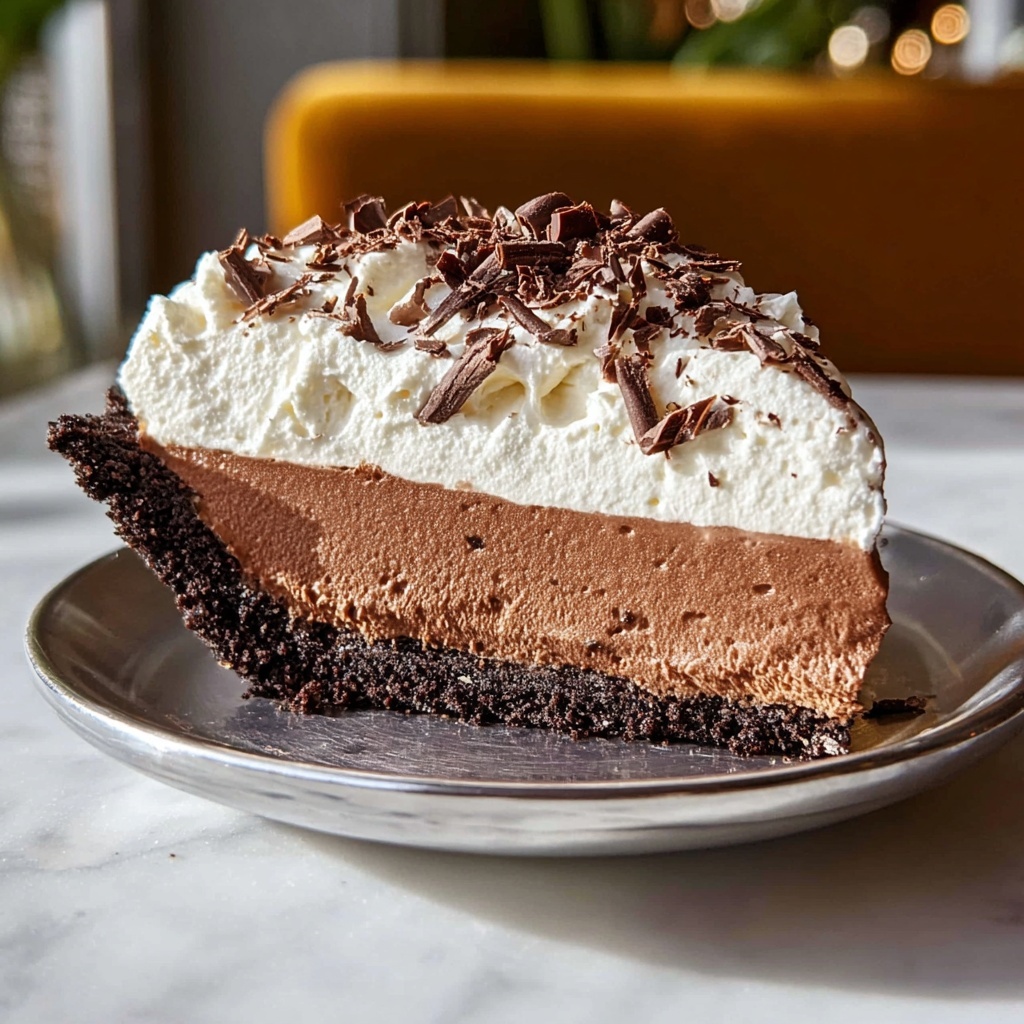
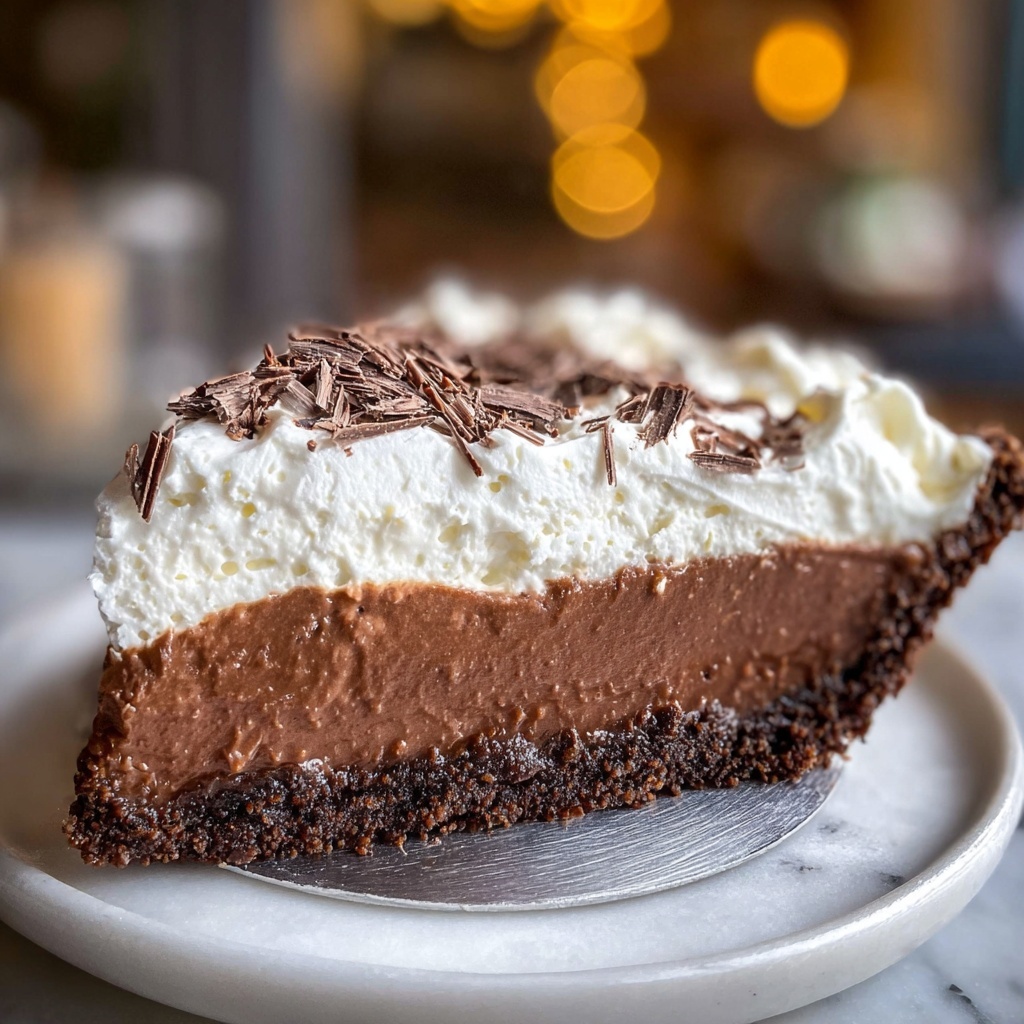
If you’re on the lookout for a dessert that feels like a luxurious treat yet comes together with surprising ease, this Chocolate Mousse Pie Recipe is about to become your new best friend. Picture a luscious, creamy chocolate filling nestled inside a crisp Oreo crust, topped with a cloud of sweetened whipped cream and finished with delicate chocolate shavings—every bite melts in your mouth, delivering rich flavor and airy texture in perfect harmony. Whether it’s a family gathering or a special occasion, this pie promises to impress while keeping things delightfully simple.
Ingredients You’ll Need
Getting the right ingredients is half the magic in baking the perfect Chocolate Mousse Pie Recipe. Each item plays a unique role, contributing to the pie’s irresistibly smooth texture, deep chocolate flavor, and that satisfying contrast of crunchy crust and fluffy mousse.
- Salted butter: Adds richness and helps melt the chocolate base smoothly for that creamy consistency.
- Semi-sweet chocolate chips: Provide a sweet, mellow chocolate flavor that balances perfectly with the bittersweet chips.
- Bittersweet chocolate chips: Bring depth and a slightly intense chocolate kick to the mousse.
- Mini marshmallows: Melt into the chocolate mixture, lending extra creaminess and a subtle sweetness.
- Whole milk: Helps loosen the chocolate mixture to achieve a silky texture.
- Vanilla extract: Enhances the chocolate’s natural flavors with a warm, aromatic note.
- Heavy whipping cream (for mousse): Whipped to stiff peaks to create that light and airy mousse texture.
- Oreo pie crust: A crunchy, chocolatey base that complements the mousse with a delightful contrast.
- Heavy cream (for topping): Sweetened and whipped separately to add a luscious, creamy topping.
- Granulated sugar: Sweetens the whipped cream topping without overpowering the chocolate flavors.
- Chocolate shavings: A beautiful, indulgent garnish adding texture and visual appeal.
How to Make Chocolate Mousse Pie Recipe
Step 1: Melt the Chocolate Base
The foundation of this pie is a smooth chocolate base that’s rich yet airy. Begin by combining diced salted butter, whole milk, semi-sweet and bittersweet chocolate chips, and mini marshmallows in a large saucepan over low heat. Stir patiently and continuously until everything melts into a velvety, creamy mixture. Once glossy and smooth, remove it from heat, stir in the vanilla extract for that extra aromatic kick, and leave it to cool at room temperature for about an hour. This cooling step is crucial—it ensures your mousse will set beautifully.
Step 2: Prepare the Whipped Cream
Next up is whipping the heavy cream that transforms our chocolate base into the airy mousse we all adore. Using an electric mixer, whip 1 3/4 cups of heavy cream in a large bowl until stiff peaks form. This means when you lift your beaters, the cream holds its shape firmly without collapsing. Be mindful not to overwhip, as that can turn your cream into butter, which is the last thing we want here!
Step 3: Fold Cream into Chocolate
Now comes the magic moment where rich meets light. Gently fold the whipped cream into your cooled chocolate mixture using a spatula. The key here is to combine until the mixture is smooth and uniformly colored, but don’t overmix. Preserving the airiness is what gives the mousse that melt-in-your-mouth texture everyone raves about.
Step 4: Fill the Pie Crust
Grab your ready-made Oreo pie crust and pour in the luscious chocolate mousse. Use a spatula to spread it evenly, making sure to fill every corner so each slice gets just the right amount of chocolate goodness with that wonderfully crisp base.
Step 5: Chill the Pie
Patience is key! Transfer the pie to the refrigerator and let it chill for at least 3 hours. This resting time allows the mousse to firm up just perfectly without losing any of its silky charm. It’s the calm before the delicious storm.
Step 6: Make Whipped Cream Topping
While the pie chills, whip together 1 cup of heavy cream with granulated sugar until stiff peaks form. This sweetened whipped cream topping adds a lovely contrast to the intense chocolate mousse and lends a touch of elegance with its soft texture and sugary flavor.
Step 7: Garnish and Serve
Once your mousse pie is chilled and set, spread the sweetened whipped cream topping evenly over the surface. Then generously sprinkle chocolate shavings on top for that final flourish. Chill briefly until ready to slice and serve, and watch as everyone’s eyes light up at your simple yet stunning creation.
How to Serve Chocolate Mousse Pie Recipe
Garnishes
For an extra-special presentation, consider decorating your pie with fresh raspberries, a dusting of cocoa powder, or even a drizzle of caramel or chocolate sauce. These additions not only elevate the look but add delightful layers of flavor that pair beautifully with the creamy mousse.
Side Dishes
Serving slices of this Chocolate Mousse Pie with lightly toasted nuts, a scoop of vanilla bean ice cream, or even a refreshing berry compote brings wonderful balance. These accompaniments play with texture and temperature, enhancing the overall indulgence without overpowering the pie’s star ingredient.
Creative Ways to Present
If you want to wow your guests, try individual mousse servings in mini jars layered with crushed Oreos or topped with whipped cream and a chocolate curl. Alternatively, cut the pie into bite-sized squares for a sophisticated dessert platter that lets everyone sample this decadent treat without feeling overwhelmed.
Make Ahead and Storage
Storing Leftovers
Leftover Chocolate Mousse Pie Recipe is best kept covered in the refrigerator to maintain its fresh, creamy texture. Wrapped tightly with plastic wrap or transferred to an airtight container, it will stay delectable for up to three days, making it perfect for advance prep or enjoying over a few days.
Freezing
You can freeze this pie if you need to prepare ahead for a big occasion. Wrap it securely with plastic wrap and foil to protect against freezer burn. When stored properly, it holds up well for up to one month. Just remember to thaw it in the fridge overnight before serving to preserve its luscious texture.
Reheating
Since this is a chilled dessert, reheating isn’t recommended. The beauty of the Chocolate Mousse Pie Recipe lies in its cool, silky mousse and crisp crust, both best enjoyed fresh from the fridge. If you want to soften it slightly, let it sit at room temperature for 15-20 minutes before serving.
FAQs
Can I use a homemade pie crust instead of an Oreo crust?
Absolutely! While the Oreo crust adds a fun and crunchy chocolate twist, a traditional graham cracker crust or even a regular pie pastry works beautifully with this mousse, allowing you to customize it to your preference or dietary needs.
What’s the best chocolate to use for this recipe?
Semi-sweet and bittersweet chocolate chips strike the perfect balance between sweetness and richness. However, feel free to use high-quality chocolate bars chopped into pieces if you prefer, as that can enhance the depth of flavor.
Can I make this pie vegan or dairy-free?
With some ingredient substitutions—like using dairy-free chocolate, plant-based milk, and whipped coconut cream—you can adapt this Chocolate Mousse Pie Recipe to be vegan. It might take a little experimenting, but the creamy, chocolatey joy is worth it!
How long does the mousse need to chill to set properly?
Chilling the mousse for at least 3 hours is essential to achieve the perfect firm yet airy consistency. If time allows, leaving it overnight can actually enhance the flavor and texture even further.
Can I prepare this pie ahead of time for a party?
Definitely! This pie is a fantastic make-ahead dessert. Prepare it a day or two ahead and keep it chilled until serving. Its flavors meld beautifully over time, making it an effortless choice for entertaining.
Final Thoughts
This Chocolate Mousse Pie Recipe is one of those desserts that feels special but actually fits perfectly into a busy schedule, thanks to its straightforward steps and simple ingredients. It’s a reliable crowd-pleaser with every silken bite delivering rich chocolate delight tempered by a light and airy mousse. I encourage you to make this for your next gathering or whenever you need a little sweet indulgence—it’s bound to become a beloved favorite just like it is in my kitchen!
“`
Print
Chocolate Mousse Pie Recipe
- Prep Time: 20 minutes
- Cook Time: 10 minutes
- Total Time: 3 hours 30 minutes
- Yield: 10 servings
- Category: Dessert
- Method: Stovetop
- Cuisine: American
Description
This decadent Chocolate Mousse Pie combines rich semi-sweet and bittersweet chocolates with fluffy marshmallows to create a luscious, creamy mousse filling set in a crunchy Oreo pie crust. Topped with lightly sweetened whipped cream and chocolate shavings, this indulgent dessert is perfect for special occasions or any chocolate lover’s treat.
Ingredients
Chocolate Base
- 2 Tbsp salted butter, diced
- 1 cup semi-sweet chocolate chips
- 1/2 cup bittersweet chocolate chips
- 2 cups mini marshmallows
- 1/3 cup whole milk
- 1 tsp vanilla extract
Mousse
- 1 3/4 cups heavy whipping cream
Pie Crust
- 1 Oreo pie crust
Whipped Cream Topping
- 1 cup (235ml) heavy cream
- 2 Tbsp (25g) granulated sugar
- Chocolate shavings, for garnish
Instructions
- Melt the Chocolate Base: In a large saucepan over low heat, melt the butter with whole milk, semi-sweet and bittersweet chocolate chips, and mini marshmallows. Stir continuously until the marshmallows are completely melted and the mixture is smooth and creamy. Remove from heat and stir in the vanilla extract. Let cool at room temperature for 1 hour.
- Prepare the Whipped Cream: In a large mixing bowl, whip 1 3/4 cups heavy whipping cream with an electric mixer until stiff peaks form, being careful not to overwhip.
- Fold Cream into Chocolate: Gently fold the whipped cream into the cooled chocolate mixture using a spatula until light, fluffy, and uniform in color while maintaining the airy texture.
- Fill the Pie Crust: Pour the mousse into the Oreo pie crust and spread evenly with a spatula.
- Chill the Pie: Refrigerate the pie for at least 3 hours to allow the mousse to set firmly.
- Make Whipped Cream Topping: In a clean bowl, whip 1 cup heavy cream with granulated sugar until stiff peaks form and it holds its shape smoothly.
- Garnish and Serve: Spread the sweetened whipped cream over the chilled mousse pie, garnish with chocolate shavings, and keep refrigerated until serving. Slice and enjoy.
Notes
- Allow the chocolate base mixture to cool completely before adding whipped cream to ensure the mousse holds its texture.
- Be careful not to overwhip the cream to prevent it from becoming grainy or turning into butter.
- For a deeper chocolate flavor, use high-quality chocolate chips.
- Chilling time is important for mousse to set properly; do not skip the refrigeration step.
- Use a clean, chilled bowl for whipping cream to achieve better volume.


