If you’ve ever craved a perfectly tender, buttery pie crust that’s 100 percent vegan, this Flaky Vegan Pie Crust Recipe is going to become your absolute new favorite. Imagine biting into a crust so delicately layered and crisp, with that satisfying melt-in-your-mouth texture, all without any dairy or animal products. Whether you’re baking a classic apple pie or any other filling your heart desires, this recipe creates the ultimate flaky base that holds everything together beautifully and adds that extra wow factor to your homemade pies.
Ingredients You’ll Need
This Flaky Vegan Pie Crust Recipe is surprisingly simple yet relies on a few key ingredients that each play an essential role in delivering that perfect texture and taste. From the chilled vegan butter that creates buttery layers to the zing of apple cider vinegar balancing the flavors, every item is carefully chosen.
- 80 ml non-dairy milk (chilled): This acts as the base for the vegan buttermilk, giving moisture without sogginess.
- 1 teaspoon apple cider vinegar: Adds that subtle tang and reacts with the milk to mimic buttermilk’s fluffiness.
- 320 g plain flour: The foundation of your crust, providing structure and a tender crumb.
- 235 g vegan block butter (chilled, cubed): Key for creating those flaky layers every bite dreams of.
- 1 teaspoon sea salt: Just enough to highlight and balance all the flavors.
- 2 tablespoons vegan butter (for glazing): Adds a beautiful golden shine and richness to your crust.
- 1 tablespoon granulated sugar (optional): Perfect for sprinkling on top if you want a lightly sweet finish and extra crunch.
How to Make Flaky Vegan Pie Crust Recipe
Step 1: Prepare the Vegan Buttermilk
Start by combining the chilled non-dairy milk with apple cider vinegar in a bowl. Pop it into the freezer for about 10-15 minutes until icy cold. This vegan buttermilk forms the magic liquid that reacts with the flour to achieve an irresistible flaky crust.
Step 2: Ready Your Pie Tin
Lightly grease a 9-inch pie tin with oil or vegan butter, then dust it with a light coating of flour. Knock out any excess flour so the pie tin is just lightly coated—this prevents sticking without making the dough too dry. Adding a round of parchment paper to the base is a great tip to ensure smooth pie removal later.
Step 3: Mix Dry Ingredients
Whether you use a food processor or make it by hand, start by combining the flour and sea salt thoroughly. This ensures even seasoning and lays the groundwork for that flawless pie crust.
Step 4: Incorporate the Vegan Butter
If using a food processor, pulse in the chilled vegan butter cubes until the mixture resembles coarse crumbs. When done by hand, gently rub the butter into the flour with your fingertips, aiming for a crumbly texture with a few larger pieces—this is what creates the flaky layers!
Step 5: Add Cold Vegan Buttermilk
Slowly pour your icy vegan buttermilk in while mixing briefly—just until the dough starts to come together. Overworking here is the enemy of flakiness, so combine quickly and carefully.
Step 6: Chill the Dough
Turn the dough out onto a floured surface, shape it into discs (one large disc for double crust or two separate discs if preferred) and wrap these tightly in plastic wrap. Refrigerate for at least one hour to let the dough rest and the butter chill for maximum flakiness when baked.
Step 7: Roll and Layer Your Dough
After chilling, roll out the dough to about ⅛ inch thickness. Fold and roll it about four times to create beautiful layers, dusting with flour as needed to prevent sticking. This folding technique builds the flaky texture we all love in a pie crust.
Step 8: Fit and Crimp the Crust
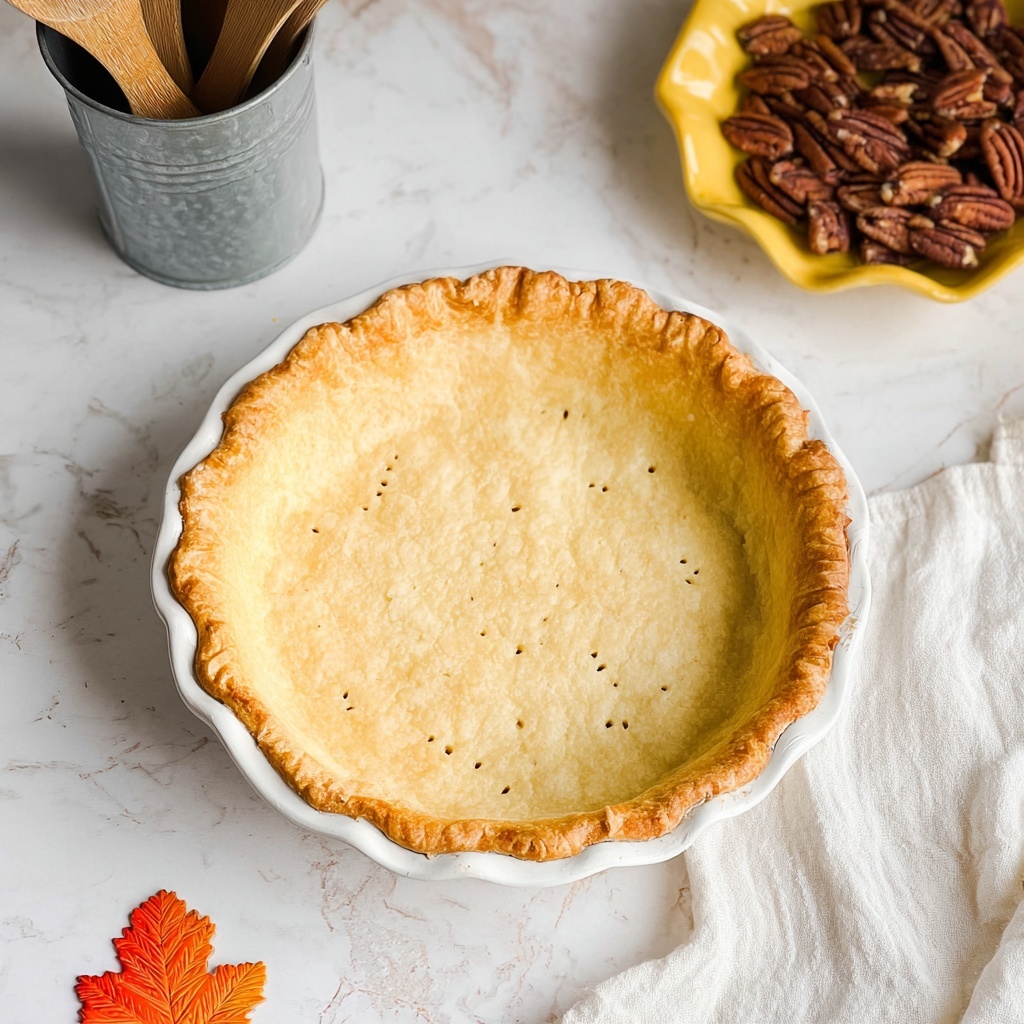
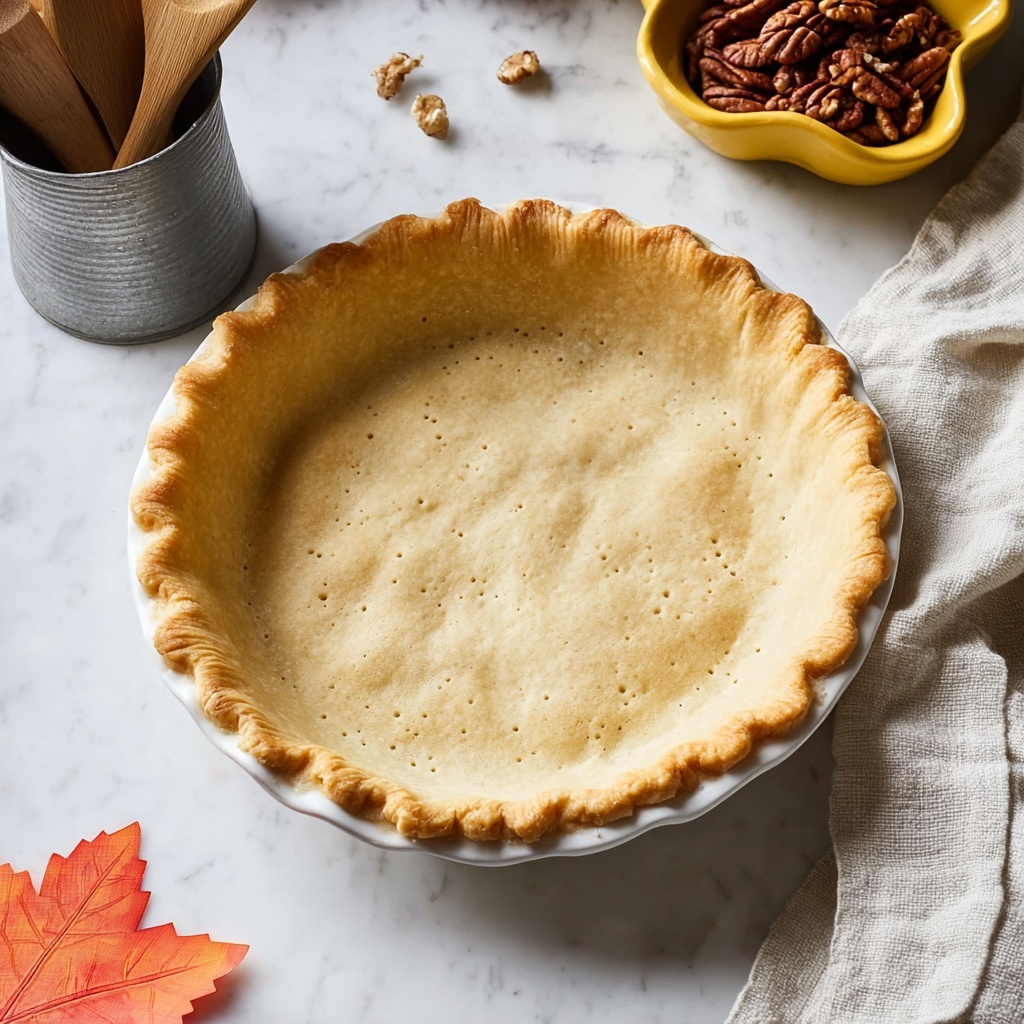
Carefully transfer the rolled dough into your prepared pie tin without stretching it. Trim excess edges and use a fork to gently crimp the sides while piercing a few holes in the base to let steam escape, avoiding a soggy bottom.
Step 9: Add Fillings or Blind Bake
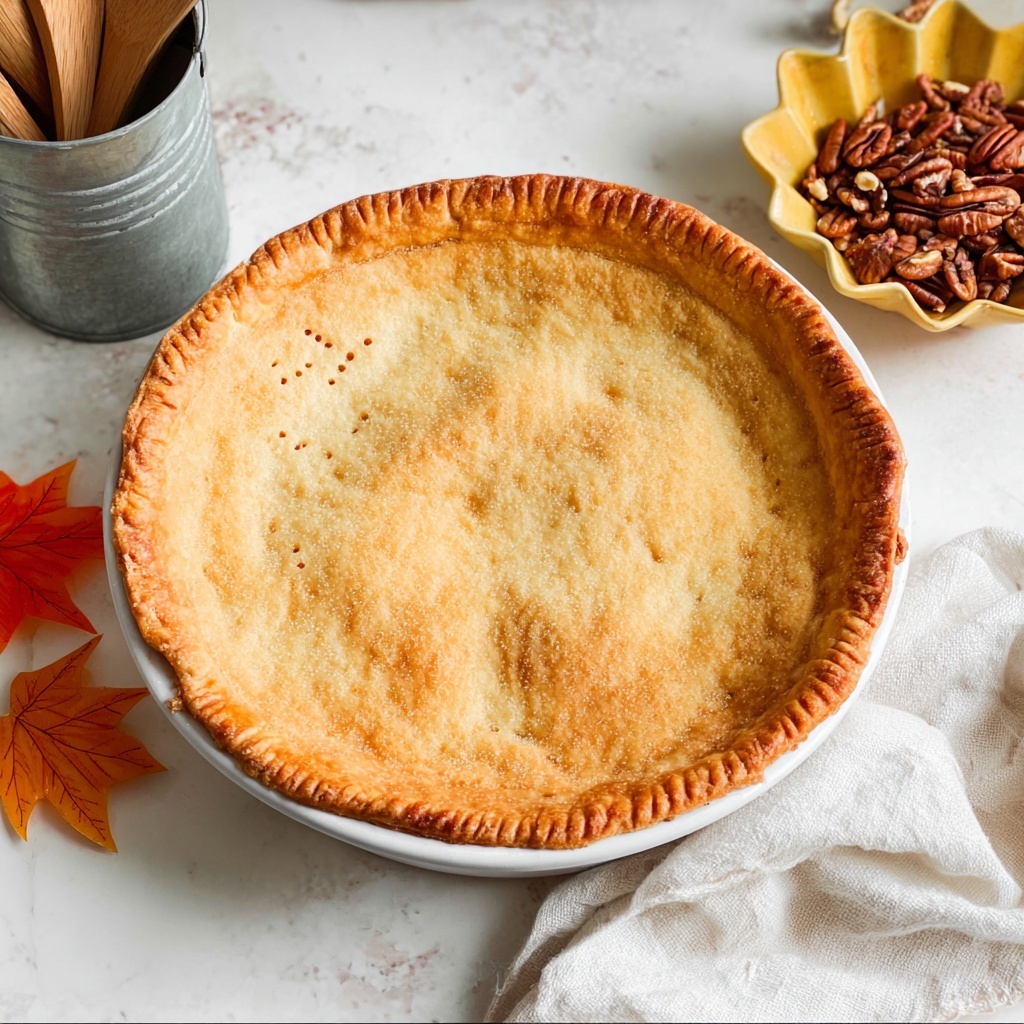
For pies with fillings baked inside, simply add your filling and cover with a second crust, brushing the top with melted vegan butter and optional sugar for a golden, crunchy finish. If your filling does not require baking, blind bake the crust by lining it with parchment and weights, then bake until golden before adding your filling.
How to Serve Flaky Vegan Pie Crust Recipe
Garnishes
Once your pie is out of the oven, a light dusting of powdered sugar or a sprinkle of cinnamon sugar on warm crust edges adds an extra layer of charm and flavor that makes every bite feel special.
Side Dishes
Serve your pie alongside a scoop of vegan vanilla ice cream or a dollop of coconut cream whipped to soft peaks for a luscious contrast. Fresh fruit or a simple spring salad also complements sweet or savory pies wonderfully.
Creative Ways to Present
Why not turn your flaky vegan pie crust into adorable mini hand pies for a charming presentation? Or cut out fun shapes from leftover dough as pie decorations, adding personality and a playful touch to your baked masterpiece.
Make Ahead and Storage
Storing Leftovers
If you have any leftover baked pie crust, wrap it tightly in plastic wrap and store it in the fridge for up to three days. It’s a perfect base for a quick snack or an impromptu mini-pie treat.
Freezing
The dough freezes beautifully! Wrap your prepared and shaped dough discs in plastic wrap and pop them in an airtight container or ziplock bag. They’ll keep perfectly for up to three months—just thaw in the fridge overnight before rolling and baking.
Reheating
To refresh your baked crust, gently warm it in the oven at 175°C (350°F) for 5 to 10 minutes. This brings back that lovely crisp texture and buttery aroma, making every slice feel freshly baked.
FAQs
Can I make this pie crust without a food processor?
Absolutely! This Flaky Vegan Pie Crust Recipe works wonderfully by hand as well. The key is to rub the vegan butter into the flour until crumbly and not to overwork the dough to maintain the flaky layers.
What type of vegan butter is best for this recipe?
Choose a good-quality, firm vegan block butter that’s meant for baking. Its high fat content helps create those tender, flaky layers, so avoid softer spreads that can make the dough greasy or tough.
Why is the vinegar included in the recipe?
The apple cider vinegar reacts with the non-dairy milk to mimic traditional buttermilk, giving the dough a slight tang and helping tenderize the gluten, which creates a more tender and flaky pie crust.
Can I use gluten-free flour instead of plain flour?
While this recipe is designed for plain flour, you can experiment with gluten-free blends. Just keep in mind that texture may vary, and you might need to adjust liquid amounts or use binding agents to get a similar flaky result.
How do I avoid the crust shrinking while baking?
Make sure not to stretch the dough when lining your pie tin and chill it well before baking. Blind baking with pie weights helps hold the shape and prevents shrinkage, giving you that perfect crust every time.
Final Thoughts
This Flaky Vegan Pie Crust Recipe is an absolute game-changer for anyone looking to bake delicious pies without dairy or eggs. It’s simple, reliable, and delivers that dreamy flaky texture we all crave, making it a must-have recipe in your baking arsenal. I encourage you to try it out—once you taste how perfectly buttery and flaky it is, you’ll be reaching for it every time you bake.
Print
Flaky Vegan Pie Crust Recipe
- Prep Time: 20 minutes
- Cook Time: 35 minutes
- Total Time: 2 hours 55 minutes
- Yield: Enough for a 9-inch double pie crust (10 servings)
- Category: Dessert
- Method: Baking
- Cuisine: American
- Diet: Vegan
Description
This flaky vegan pie crust recipe delivers a tender, buttery crust without any dairy or eggs, ideal for both sweet and savory pies. Made with chilled vegan butter and a touch of vegan buttermilk, it achieves a perfect flaky texture and can be prepared with either a food processor or by hand. The crust can be blind-baked or baked with fillings, making it versatile for various pie recipes.
Ingredients
Vegan Buttermilk
- 80 ml non-dairy milk (chilled)
- 1 teaspoon apple cider vinegar
Pie Crust
- 320 g plain flour
- 235 g vegan block butter (chilled, cut into cubes)
- 1 teaspoon sea salt
For Glazing and Optional
- 2 tablespoons vegan butter (for glazing)
- 1 tablespoon granulated sugar (optional)
Instructions
- Prepare Vegan Buttermilk: Combine chilled non-dairy milk and apple cider vinegar in a bowl. Place the bowl in the freezer for 10-15 minutes until the mixture is icy cold to mimic traditional buttermilk.
- Prepare Pie Tin: Lightly grease a 9-inch pie tin with oil or vegan butter. Dust with flour and gently tap out any excess, leaving a light coating. Optionally, add a parchment round to the base.
- Make Dough Using Food Processor: Add flour and sea salt to the food processor and pulse for about a minute until mixed. Add cold vegan butter cubes and pulse until the mixture is roughly combined, about 20 seconds. Slowly pour in the icy vegan buttermilk while pulsing, incorporating the liquid in 5-10 seconds without overmixing.
- Make Dough by Hand: In a large bowl, combine flour and sea salt. Add cold vegan butter cubes and rub in with fingertips using the rubbing-in method until mixture is crumbly but with some lumps. Gradually add vegan buttermilk in two parts, bringing the dough together carefully with hands. If the dough feels too wet, add a few tablespoons more flour. Shape dough into two discs for double crust or one disc for single. Wrap discs in plastic wrap and chill in the fridge for at least 1 hour.
- Preheat Oven: Set your oven to fan 190°C (374°F) or conventional 210°C (410°F). Preheat an aluminum baking tray or sheet inside.
- Roll Out Dough: Remove dough from fridge and let sit at room temperature for 5 minutes. For double crust, divide dough into two portions, reserving the larger part for the bottom. On a floured surface, roll dough to about 1/8 inch thickness. Fold dough over and roll again 4 times, dusting with flour as needed, then roll out once final time to a circumference larger than the pie tin.
- Place Dough in Pie Tin: Carefully lift rolled dough onto the pie tin using your rolling pin. Gently press dough into the base and sides without stretching. Trim excess dough around edges with scissors. Crimp edges by pressing with a fork. Pierce holes in the base with a fork.
- Add Filling and Top Crust (if applicable): For baked fillings, roll out second dough disc. Add your pie filling (e.g., apple or cherry), place top crust over filling, trim edges, and crimp to seal. Melt vegan butter and brush over top crust. Sprinkle with granulated sugar.
- Blind-Bake Crust (if needed): For unbaked fillings, cut parchment paper circle slightly larger than pie tin and scrunch it. Place parchment on dough, fill with pie weights or dried pulses. Place pie on preheated baking tray and par-bake for 20 minutes. Remove parchment and weights, then continue baking 15-20 minutes until golden. Cool completely before removing from tin.
- Storage: Freeze uncooked dough in an airtight container for up to 3 months. Thaw overnight in the fridge before use. Alternatively, wrap dough tightly and refrigerate up to 3 days prior to baking.
Notes
- This recipe makes enough for a 9-inch double pie crust. For a single bottom crust, make ¾ of the recipe.
- Do not overmix dough to maintain flakiness; leaving lumps of butter is beneficial.
- Rolling and folding the dough multiple times improves texture and layering.
- Blind-baking is essential for pies with unbaked fillings to prevent soggy crusts.
- Use vegan butter to keep the crust entirely plant-based.


