
“`html
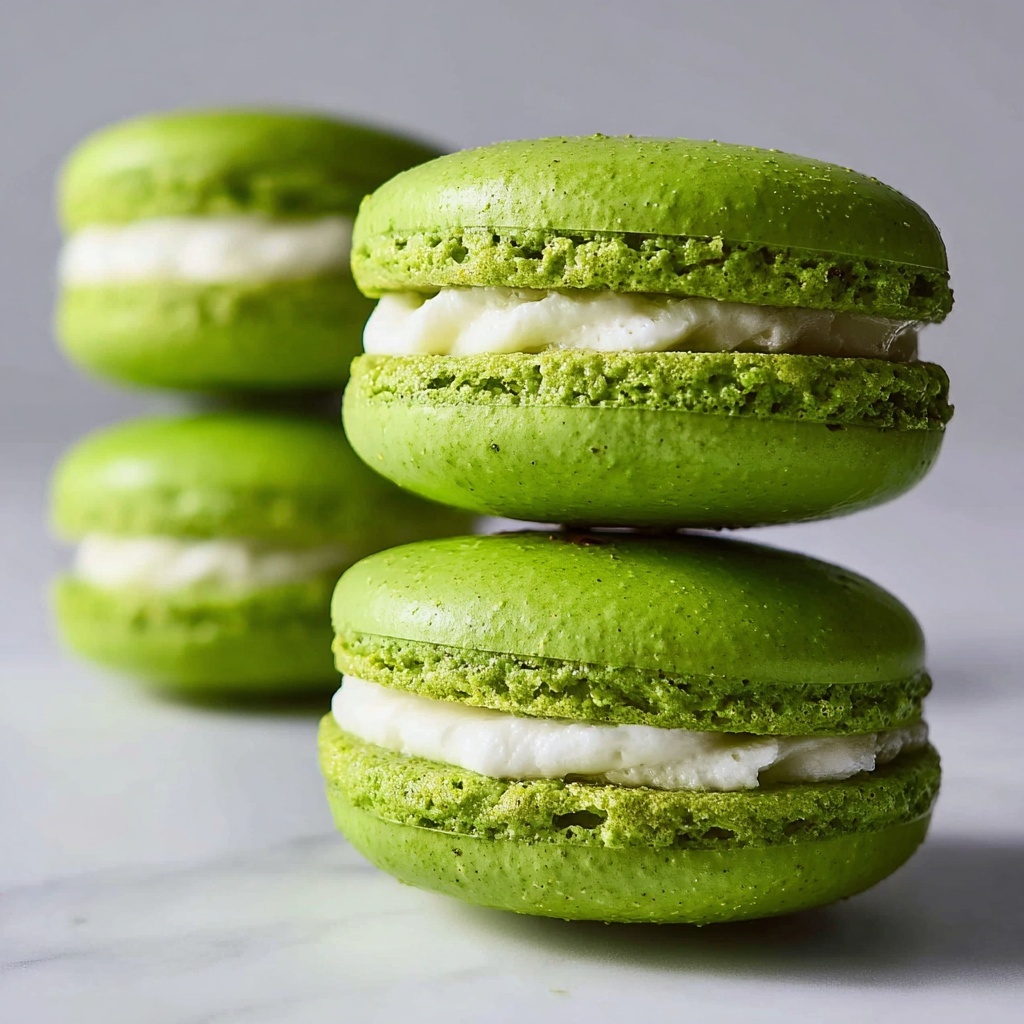
If you are looking to add a splash of color and a burst of happiness to your dessert lineup, the Green Whoopie Pies: 7 Irresistible Treats for Joyful Moments Recipe is your go-to! These charming, vibrant green treats are not only a feast for the eyes but also a delightful mix of rich cocoa and creamy filling that make every bite feel like a celebration. Whether it’s a casual get-together or a special occasion, these whoopie pies bring warmth, fun, and irresistible sweetness that everyone will adore.

Ingredients You’ll Need
These ingredients are delightfully simple yet crucial in crafting the perfect texture and vivid green color that make these whoopie pies stand out. Each one plays a special role in balancing flavor, richness, and that signature look.
- 1 cup all-purpose flour: Provides the tender base for the whoopie pies to have just the right soft crumb.
- 1/2 cup cocoa powder: Adds a deep chocolate flavor that complements the sweetness perfectly.
- 1 tsp baking soda: Helps the whoopie pies rise and become wonderfully fluffy.
- 1/4 tsp salt: Enhances all the other flavors without overpowering them.
- 1/2 cup unsalted butter, softened: Gives the cakes richness and moisture essential for that melt-in-your-mouth feel.
- 1 cup granulated sugar: Sweetens the pies just right without being cloying.
- 1 large egg: Binds everything together and adds to the cake’s structure.
- 1 tsp vanilla extract: Lends a warm, inviting aroma and flavor boost.
- 1/2 cup milk: Keeps the batter smooth and helps achieve a tender crumb.
- Green food coloring: Creates the eye-catching green hue that makes these whoopie pies truly unique.
- 1 cup powdered sugar: Essential for the sweet, creamy filling that pairs perfectly with the chocolate cake.
- 1/2 cup cream cheese, softened: Adds richness and tang to the filling, balancing the sweetness.
- 1/4 cup unsalted butter, softened: Makes the filling luxuriously smooth and creamy.
- 1 tsp vanilla extract for filling: Enhances the flavor of the frosting with a touch of warmth.
How to Make Green Whoopie Pies: 7 Irresistible Treats for Joyful Moments Recipe
Step 1: Prep and Dry Ingredients
Start by preheating your oven to 350°F (175°C) to get it just right for baking. Then, whisk together the flour, cocoa powder, baking soda, and salt in a bowl—this dry mix creates the chocolatey base for your whoopie pies and ensures an even rise when baked.
Step 2: Cream Butter and Sugar
In a separate bowl, beat the softened butter and sugar until the mixture turns creamy and light. This step is key to creating a tender, tender crumb by incorporating air into the batter, making the cakes fluffy and soft.
Step 3: Mix in Egg and Vanilla
Add the egg and vanilla extract to your creamed butter and sugar, then mix thoroughly. The egg binds the ingredients while the vanilla adds rich aroma and flavor that will become the heart of your whoopie pies.
Step 4: Combine Dry Ingredients and Milk
Gradually add the dry ingredient mixture to the wet ingredients, alternating with the milk. This alternation keeps the batter smooth and prevents lumps, while the milk ensures the cakes stay moist and tender.
Step 5: Add Green Food Coloring
Stir in the green food coloring gently until you reach the perfect vibrant shade you desire. This green tint is what sets these whoopie pies apart, inviting smiles before the first bite even happens.
Step 6: Bake the Whoopie Pies
Drop spoonfuls of the batter onto a baking sheet lined with parchment paper or a silicone mat, spacing them evenly so they don’t stick together. Bake for 10 to 12 minutes until the cakes spring back lightly when touched and a toothpick inserted comes out clean. Let them cool completely to hold their shape when filled.
Step 7: Prepare the Filling
Beat together cream cheese, butter, powdered sugar, and vanilla extract until smooth and creamy. This luscious filling brings the perfect balance of creamy sweetness and slight tang, creating the iconic whoopie pie finish.
Step 8: Assemble Your Green Whoopie Pies: 7 Irresistible Treats for Joyful Moments Recipe
Spread the creamy filling on the flat side of one cooled cake and sandwich it with another. Press gently to spread the filling evenly and form a neat green and chocolate delight. Repeat until all are assembled, then enjoy that magical moment!
How to Serve Green Whoopie Pies: 7 Irresistible Treats for Joyful Moments Recipe
Garnishes
Create an even more festive presentation by dusting your green whoopie pies lightly with powdered sugar or adding a sprinkle of mini chocolate chips on top of the filling before sandwiching. Edible gold stars or colored sprinkles also add extra flair for celebrations.
Side Dishes
Pair your whoopie pies with a cup of aromatic coffee or a refreshing glass of cold milk for a classic combo. For a brunch or party spread, fresh berries or fruit salad bring a juicy brightness that contrasts beautifully with the rich chocolate and cream cheese filling.
Creative Ways to Present
Serve these treats stacked on a decorative cake stand or wrap each whoopie pie in clear cellophane tied with a colorful ribbon for delightful gift-giving. You could also create a whoopie pie bar where guests decorate their own with different frosting tips or toppings for a fun interactive twist.
Make Ahead and Storage
Storing Leftovers
If you have any leftovers from your Green Whoopie Pies: 7 Irresistible Treats for Joyful Moments Recipe, store them in an airtight container at room temperature for up to two days to keep their softness fresh. For longer storage, refrigeration will keep the filling from spoiling but may slightly firm up the cakes.
Freezing
These tasty treats freeze wonderfully! Wrap each whoopie pie individually in plastic wrap and place them in a freezer-safe container or bag. They can be frozen for up to two months. Just thaw them overnight in the refrigerator before serving for best texture and flavor.
Reheating
If you prefer your whoopie pies a bit warm, pop them in the microwave for 10 to 15 seconds. This will soften the filling and refresh the cake’s tenderness without making it soggy, perfect for that just-baked feeling anytime.
FAQs
Can I make these whoopie pies without food coloring?
Absolutely! While the green hue makes this version special, you can skip the food coloring and enjoy a classic chocolate whoopie pie with cream cheese filling. The flavor remains exceptional either way.
What kind of cocoa powder is best to use?
Natural unsweetened cocoa powder works best for this recipe as it provides rich chocolate flavor. Avoid Dutch-processed cocoa unless you adjust the baking soda, as it reacts differently with leavening agents.
Can I substitute the cream cheese in the filling?
You can swap cream cheese for mascarpone or a whipped buttercream if preferred, but cream cheese gives that signature tang and creaminess that perfectly balances the sweetness of the pies.
How do I know when the whoopie pies are done baking?
The cakes should be springy to the touch and a toothpick inserted in the center should come out clean or with just a few moist crumbs. Overbaking can make them dry, so keep a close eye after 10 minutes.
Are these whoopie pies suitable for freezing and preparing in advance?
Yes! Green Whoopie Pies: 7 Irresistible Treats for Joyful Moments Recipe freezes very well, making them perfect for preparing ahead of time and enjoying whenever the craving hits.
Final Thoughts
There’s nothing quite like the joy of biting into a perfectly soft, vibrantly green whoopie pie with rich chocolate and creamy filling. I truly hope you give the Green Whoopie Pies: 7 Irresistible Treats for Joyful Moments Recipe a try—it’s a heartwarming treat that always inspires smiles and creates happy moments. Ready your apron and make some magic happen in your kitchen today!
“`
Print
Green Whoopie Pies: 7 Irresistible Treats for Joyful Moments Recipe
- Prep Time: 15 minutes
- Cook Time: 12 minutes
- Total Time: 32 minutes
- Yield: 12 servings
- Category: Dessert
- Method: Baking
- Cuisine: American
Description
Delight in these vibrant Green Whoopie Pies, featuring a rich cocoa-flavored cake paired with a creamy, luscious green-colored cream cheese filling. Perfect for joyful gatherings and festive occasions, these treats combine soft textures with a hint of sweetness, enhanced by a playful pop of color.
Ingredients
For the Cake:
- 1 cup all-purpose flour
- 1/2 cup cocoa powder
- 1 tsp baking soda
- 1/4 tsp salt
- 1/2 cup unsalted butter, softened
- 1 cup granulated sugar
- 1 large egg
- 1 tsp vanilla extract
- 1/2 cup milk
- Green food coloring, as needed
For the Filling:
- 1 cup powdered sugar
- 1/2 cup cream cheese, softened
- 1/4 cup unsalted butter, softened
- 1 tsp vanilla extract
Instructions
- Preheat Oven: Preheat your oven to 350°F (175°C) to ensure it’s at the right temperature for baking the whoopie pies evenly.
- Mix Dry Ingredients: In a medium bowl, whisk together the all-purpose flour, cocoa powder, baking soda, and salt to evenly distribute the leavening agents and cocoa.
- Cream Butter and Sugar: In a separate large bowl, beat the softened unsalted butter and granulated sugar together until the mixture turns light and creamy, creating a smooth base for your batter.
- Add Egg and Vanilla: Incorporate the large egg and vanilla extract into the butter-sugar mixture, mixing thoroughly to combine flavors and improve texture.
- Combine Wet and Dry Ingredients: Gradually add the dry ingredient mixture to the wet ingredients in batches, alternating with the milk, to maintain a smooth batter without overmixing.
- Add Green Food Coloring: Stir in green food coloring a few drops at a time until your desired vibrant green shade is reached, giving your whoopie pies their signature look.
- Form Pies on Baking Sheet: Using a spoon or cookie scoop, drop spoonfuls of batter onto a baking sheet lined with parchment paper, spacing them about 2 inches apart to allow for spreading.
- Bake: Place the baking sheet in the preheated oven and bake for 10-12 minutes, then remove and allow the cakes to cool completely on a wire rack before assembling.
- Prepare Filling: In a mixing bowl, beat together the softened cream cheese, softened butter, powdered sugar, and vanilla extract until smooth and creamy, ensuring there are no lumps.
- Assemble Whoopie Pies: Spread a generous amount of the cream cheese filling on the flat side of one cake and sandwich with a second cake, pressing lightly to adhere.
Notes
- Ensure butter and cream cheese are softened to room temperature for an easier and smoother mixing process.
- You can adjust the amount of green food coloring to get lighter or more vibrant green shades.
- For even baking, rotate the baking sheet halfway through baking.
- Store assembled whoopie pies refrigerated in an airtight container for up to 3 days.
- Allow cakes to cool fully before assembling to prevent filling from melting.


