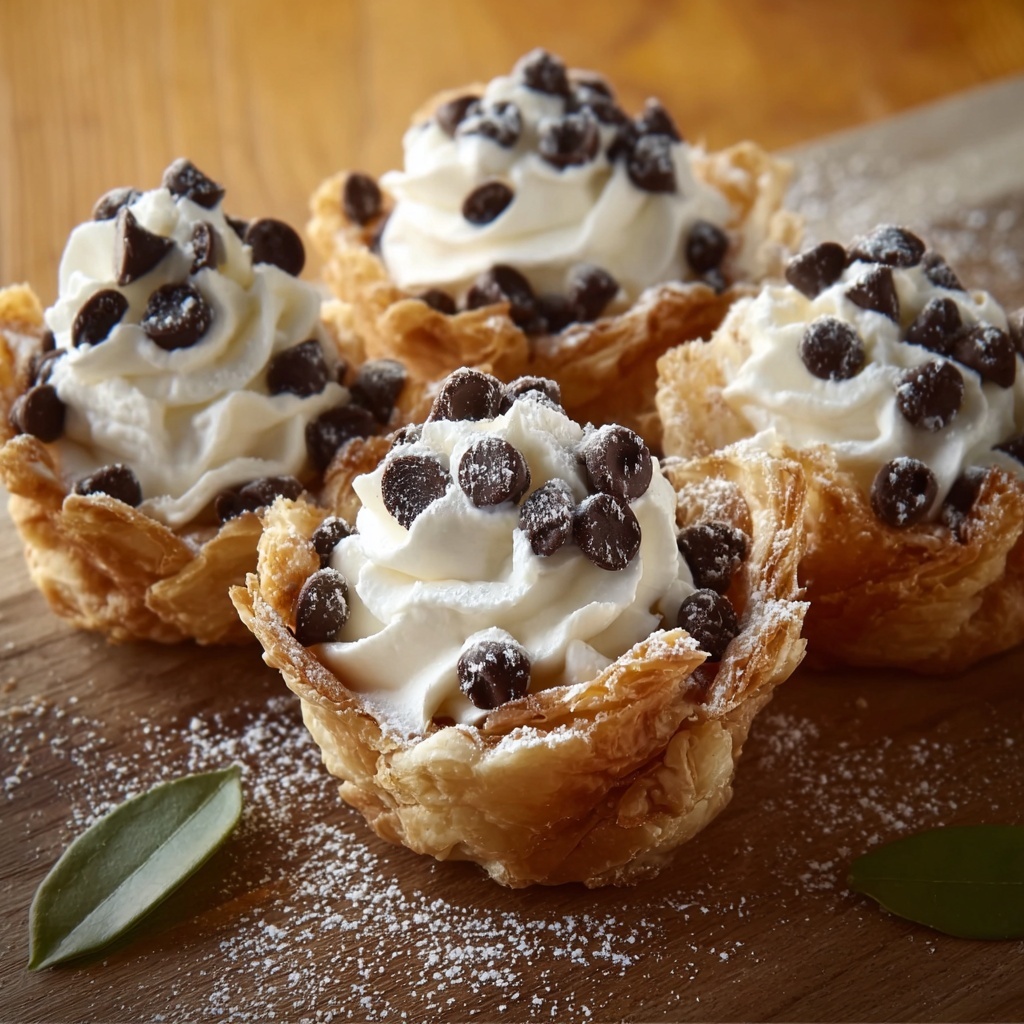
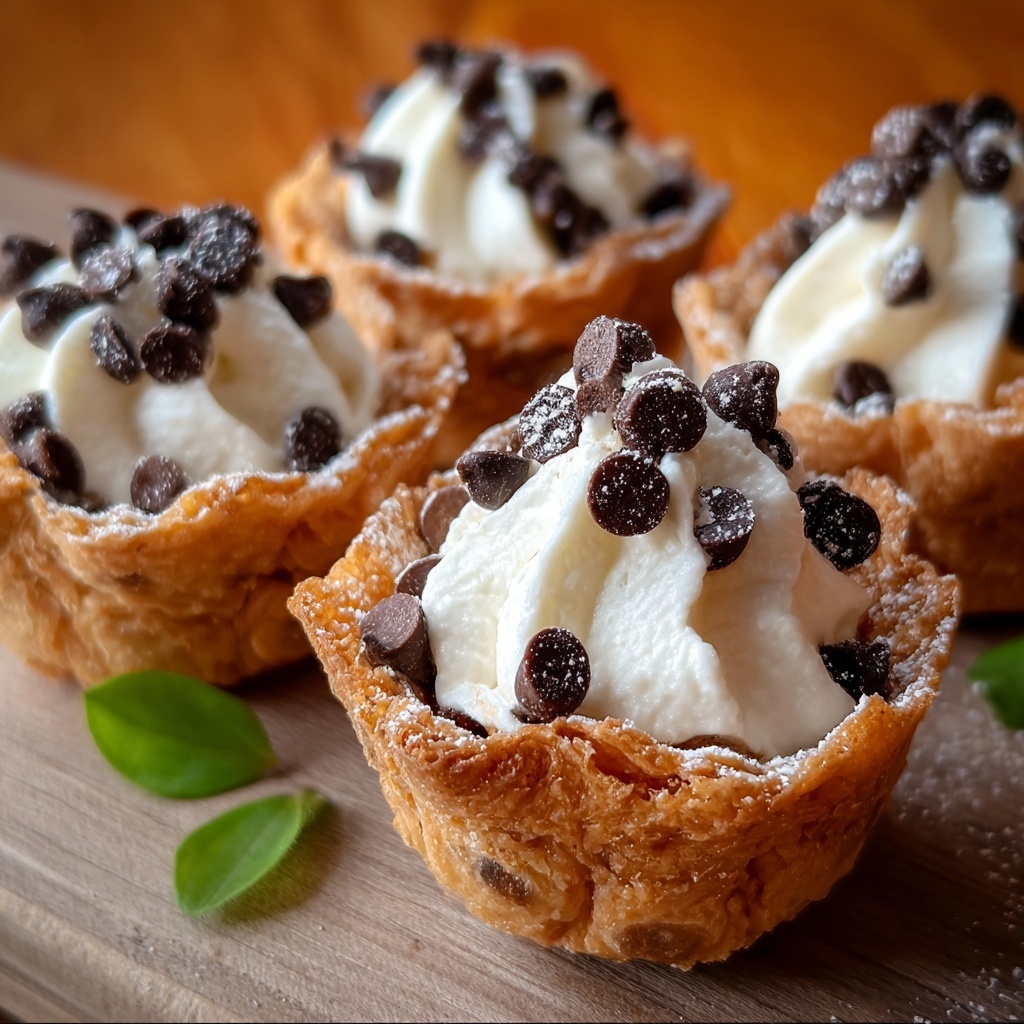
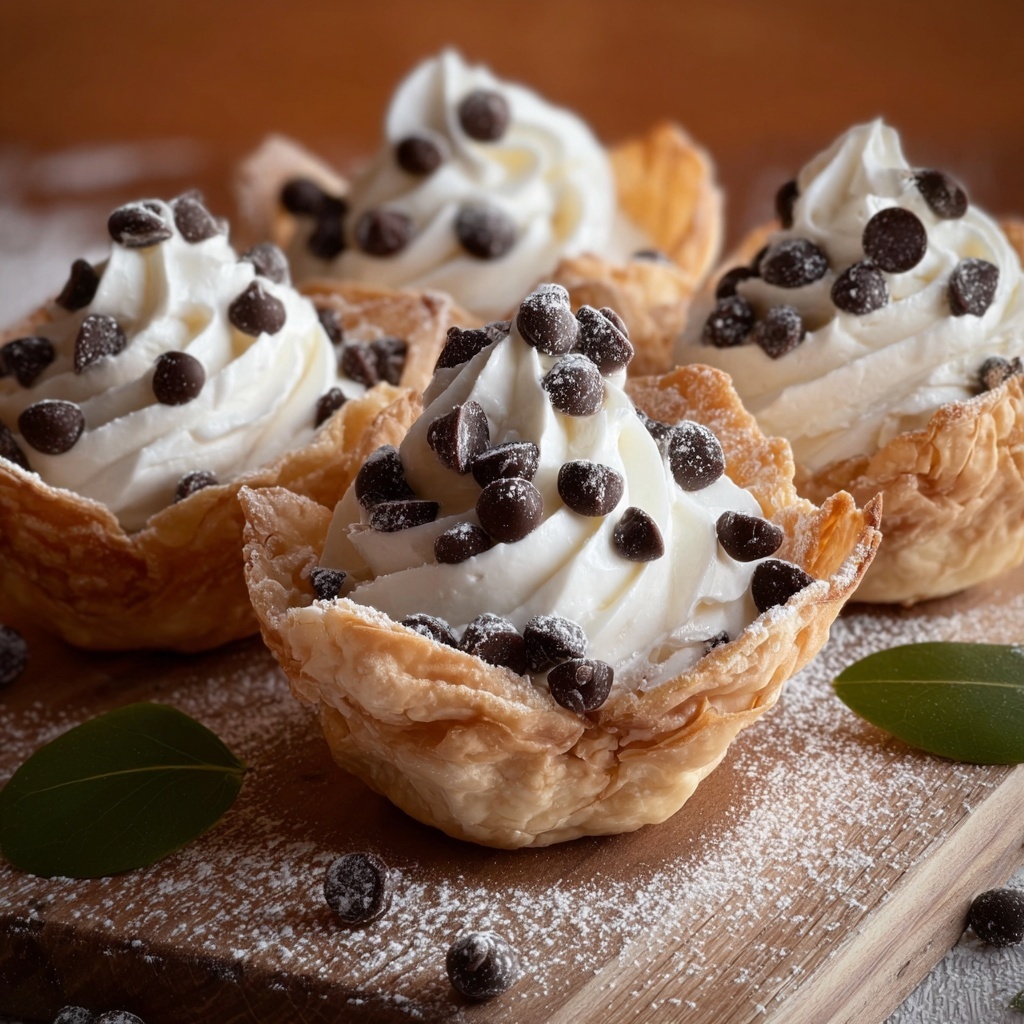
If you adore traditional cannoli but are looking for a fun, fresh way to enjoy those luscious flavors, you’re going to love this twist. Cannoli Cups: A Delicious Twist on a Classic Italian Dessert Recipe takes everything you love about that creamy ricotta filling and crisp shell and reimagines it in convenient, bite-sized cups. These golden pastry cups are easy to make and perfect for impressing guests without fuss, delivering the perfect balance of sweet, creamy, and crunchy in every bite. Whether for a casual get-together or a festive celebration, these Cannoli Cups offer a charming new way to enjoy an Italian favorite that’s both elegant and irresistible.
Ingredients You’ll Need
The beauty of this recipe lies in its simplicity and the quality of each ingredient. Each one plays a key role—from the creamy ricotta that creates the signature filling, to the cinnamon-sugar kiss on the crusts that add a warm depth of flavor. When combined, these ingredients work harmoniously to deliver a dessert that feels both classic and innovative.
- Whole milk ricotta cheese: Provides a rich, creamy base for an authentically smooth filling.
- Confectioners’ sugar: Adds gentle sweetness and a velvety texture to the ricotta blend.
- White sugar (or Stevia): Balances the flavors with a touch of sweetness and enhances caramelization on the crust.
- Vanilla extract: Infuses the filling with warm, fragrant notes to elevate the taste.
- Mini semisweet chocolate chips: Sprinkle on top for a delightful pop of chocolate in every bite.
- Pillsbury refrigerated pie crusts: Save time while providing a flaky, buttery shell that holds the filling perfectly.
- Sugar and cinnamon: A classic combo that’s pressed into the crust to add sweetness and spicy warmth.
- Flour for dusting: Keeps your workspace smooth and prevents the dough from sticking when rolling out the crust.
How to Make Cannoli Cups: A Delicious Twist on a Classic Italian Dessert Recipe
Step 1: Prepare Your Oven and Filling
Start by preheating your oven to 425°F (220°C) to ensure it’s hot and ready for baking those beautiful pastry cups. While the oven warms up, mix together the ricotta cheese, confectioners’ sugar, white sugar, and vanilla extract in a bowl. Using an electric mixer helps to achieve a fabulously smooth and creamy texture. Once mixed, transfer the filling to a freezer bag and pop it in the fridge to chill. This step allows the flavors to meld perfectly while you work on the crusts.
Step 2: Season and Roll Out the Pie Crusts
Next, roll out your pie crusts on a floured surface. Sprinkle cinnamon and sugar generously on one side of each crust, then lightly press them in with a rolling pin. This step ensures each bite has that signature sweet and spicy coating that makes these Cannoli Cups shine. It’s a simple touch that elevates the flavor profile beautifully.
Step 3: Cut and Shape the Cups
Using a biscuit cutter, cut circles out of the dough. Then, gently press these circles into an ungreased cupcake pan to form the cups. To avoid overly puffed bottoms, prick the centers of each cup lightly with a fork. This clever trick helps the crust bake evenly while maintaining its perfect cup shape for holding the luscious filling.
Step 4: Bake Until Golden Brown
Place the pans in the preheated oven and bake for 8 to 10 minutes, until the cups have turned a gorgeous golden brown. That flakey, golden hue is the sign that your shells are crisp and ready to hold the rich filling inside. Remove them from the oven and allow the cups to cool completely before adding the ricotta mixture.
Step 5: Fill and Garnish Your Cannoli Cups
Once the cups are cool, snip a small piece off the corner of your chilled ricotta mixture bag and use it like a piping bag to fill each pastry cup generously. Top them with mini semisweet chocolate chips and a light dusting of powdered sugar for that extra pop of texture and sweetness. The contrast between the creamy filling and crispy cups is what makes Cannoli Cups: A Delicious Twist on a Classic Italian Dessert Recipe such a crowd-pleaser.
How to Serve Cannoli Cups: A Delicious Twist on a Classic Italian Dessert Recipe
Garnishes
Feel free to get creative with your garnishes to suit your mood or occasion. Beyond the classic chocolate chips and powdered sugar, try adding candied orange peel or crushed pistachios for a colorful, nutty crunch. Fresh mint leaves also add a refreshing hint of color and aroma, making each cup feel even more special.
Side Dishes
While these Cannoli Cups shine perfectly on their own, they also pair beautifully with light, complementary desserts. Consider serving alongside fresh berries or a scoop of vanilla bean gelato to complete an elegant Italian-themed dessert spread. A simple espresso or cappuccino can also balance the sweetness beautifully and round out your meal.
Creative Ways to Present
Presentation is everything, especially when sharing the joy of Cannoli Cups: A Delicious Twist on a Classic Italian Dessert Recipe. Try displaying them on a tiered dessert stand for a dramatic effect. You can also place each cup in decorative cupcake liners or on small dessert plates with a drizzle of chocolate or caramel sauce for an extra-special touch that guests will adore.
Make Ahead and Storage
Storing Leftovers
If you happen to have any leftovers, store the ricotta filling separately in an airtight container in the refrigerator for up to three days. The shell cups are best kept at room temperature in a sealed container to maintain their crispness, but try to fill them close to serving time to avoid sogginess.
Freezing
You can freeze the unfilled pastry cups by placing them in a single layer on a baking sheet until solid, then transferring them to a freezer-safe container. When ready to enjoy, thaw and fill just before serving. The ricotta filling does not freeze well, so it’s best to prepare it fresh.
Reheating
To bring back the crispness of the cups after storage or freezing, warm them briefly in a preheated oven at 350°F (175°C) for about 3–5 minutes. Cool slightly before filling. Avoid microwaving as it can make the shells soft and soggy.
FAQs
Can I use low-fat ricotta cheese instead of whole milk ricotta?
While low-fat ricotta will work, the filling might be less creamy and rich. Whole milk ricotta gives that authentic, luscious texture that makes Cannoli Cups so indulgent.
Is there a way to make these cannoli cups gluten-free?
Absolutely! Use gluten-free pie crusts available in most stores or make your own from gluten-free flour to replace the refrigerated pie crusts. Just make sure to adjust baking time if needed.
Can these be made in advance for a party?
You can prepare the filling and bake the cups a day or two ahead. To keep the cups crispy, store them separately and fill just an hour before serving for the best texture.
What if I don’t have a biscuit cutter?
No worries! Use a glass or a round cookie cutter of similar size. The goal is to cut uniform circles that fit nicely into cupcake pans to create perfect little cups for filling.
Can I add other flavors to the ricotta filling?
Definitely! Consider adding a splash of lemon zest or a bit of chocolate liqueur for a fun twist. Just be careful not to overpower the delicate vanilla and ricotta flavors that make these cups a delight.
Final Thoughts
If you’re craving something that’s both charmingly familiar and excitingly new, don’t hesitate to whip up these Cannoli Cups: A Delicious Twist on a Classic Italian Dessert Recipe. They bring the best of Italy’s beloved dessert tradition into a form that’s easy to share, hard to put down, and guaranteed to brighten up any occasion. Once you taste these, they’ll quickly become one of your go-to recipes to delight family and friends with a sweet, crunchy bite of happiness.
Print
Cannoli Cups: A Delicious Twist on a Classic Italian Dessert Recipe
- Prep Time: 15 minutes
- Cook Time: 10 minutes
- Total Time: 30 minutes
- Yield: 12 servings
- Category: Dessert
- Method: Baking
- Cuisine: Italian
Description
Cannoli Cups offer a modern, easy, and delicious twist on the classic Italian cannoli dessert. Using flaky pie crust shaped into mini pastry cups and filled with a smooth, sweet ricotta cream, these bite-sized treats are perfect for parties or a delightful after-dinner dessert.
Ingredients
Ricotta Filling
- 1 (15 oz) container whole milk ricotta cheese
- 1/2 cup confectioners’ sugar
- 2 tablespoons white sugar (or substitute with Stevia)
- 1 teaspoon vanilla extract
- 1/4 cup mini semisweet chocolate chips
Pastry Cups
- 2 Pillsbury refrigerated pie crusts
- 3 tablespoons sugar
- 1 teaspoon cinnamon
- Flour for dusting surface
Instructions
- Preheat Oven: Set your oven to 425°F (220°C) to prepare for baking the pastry cups.
- Prepare Ricotta Filling: In a mixing bowl, combine the ricotta cheese, confectioners’ sugar, white sugar, and vanilla extract. Use an electric mixer to beat until smooth and creamy. Transfer this mixture into a one-gallon freezer bag and refrigerate to chill.
- Prepare Pie Crust: Roll out the refrigerated pie crusts on a floured surface. Sprinkle one side of each crust evenly with the sugar and cinnamon mixture. Use a rolling pin to gently press the sugar and cinnamon into the dough to ensure it sticks well.
- Cut and Shape Cups: Using a biscuit cutter, cut circles out of the prepared pie crust. Press each circle gently but firmly into the wells of an ungreased cupcake pan to form mini pastry cups.
- Prick Bottoms: Lightly prick the bottom of each pastry cup with a fork. This step prevents excessive rising during baking and keeps the shape intact.
- Bake Pastry Cups: Place the cupcake pan in the preheated oven and bake the cups for 8-10 minutes, or until they turn golden brown. Remove them from the oven and allow them to cool completely.
- Fill Cups: Once the pastry cups have cooled, cut a small corner off the refrigerated ricotta-filled bag. Pipe the ricotta mixture carefully into each cup until filled.
- Garnish: Sprinkle mini semisweet chocolate chips over the filled cups and dust lightly with powdered sugar for an elegant finish.
- Serve and Store: The ricotta filling can be stored in the refrigerator for up to 3 days before use. For best taste and texture, fill the cups about 1 hour before serving. For an even thicker filling, strain the ricotta through cheesecloth overnight to remove excess moisture.
Notes
- For a thicker and creamier filling, strain the ricotta cheese overnight using cheesecloth to remove excess water.
- The ricotta filling can be prepared up to 3 days in advance and stored in the fridge for convenience.
- Use a biscuit cutter slightly smaller than the cupcake tin wells for easy shaping of the cups.
- Be sure not to grease the cupcake pan to help the pastry crust stick and hold shape.
- Filling the cups shortly before serving keeps the pastry crisp and prevents sogginess.
