
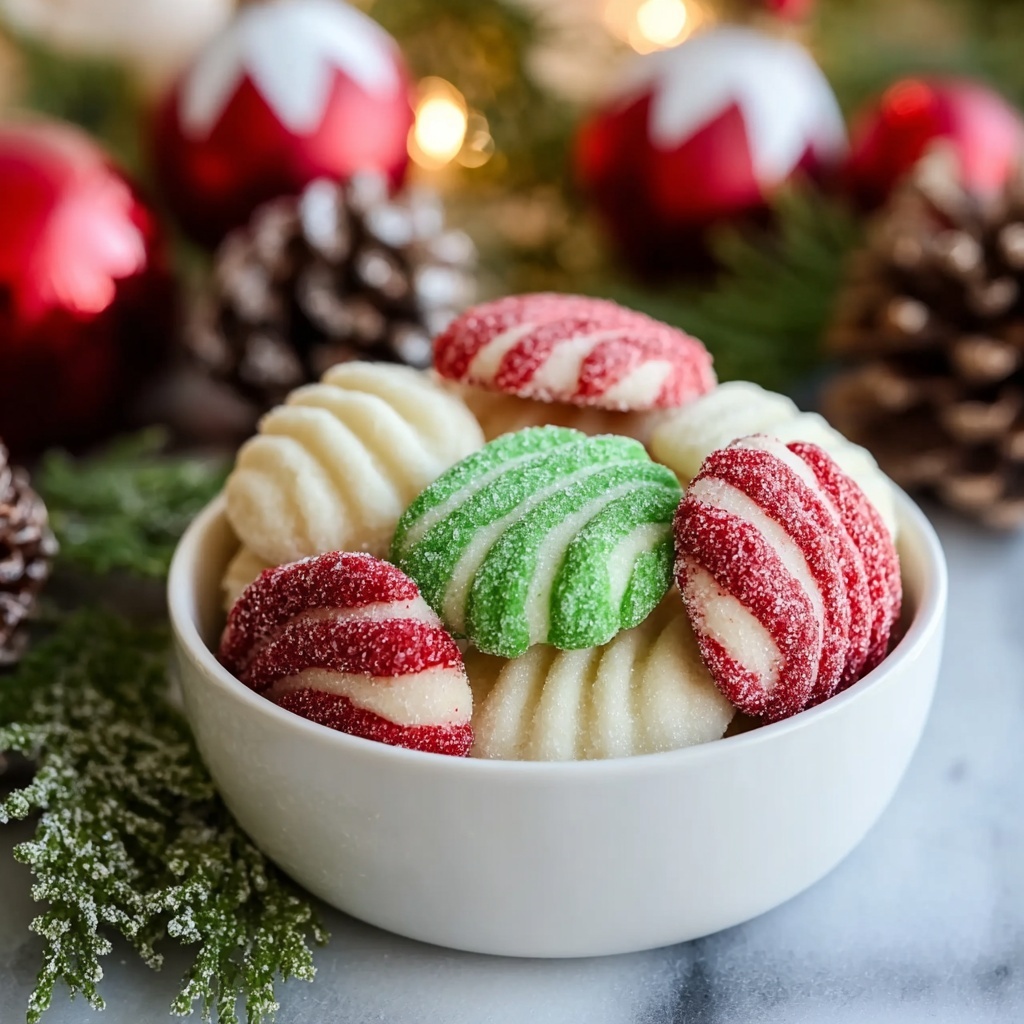
If you’re searching for a charming, deliciously refreshing treat to brighten up your holiday festivities, this Christmas Mints Recipe is exactly what you need. Bursting with peppermint flavor and a delightful melt-in-your-mouth texture, these festive mints blend classic colors and nostalgic taste perfectly. Whether you’re gifting them or sneaking a few while wrapping presents, these mints will quickly become a beloved holiday staple that’s as joyful to make as they are to enjoy.

Ingredients You’ll Need
This Christmas Mints Recipe relies on a handful of simple, everyday ingredients, each essential to achieving that perfect creamy and sweet peppermint flavor. From the richness of cream cheese to the sparkle of red and green food coloring, every element plays a vital role in creating these charming holiday treats.
- Granulated sugar: Used for coating the mints, it adds a slight crunch and festive sparkle.
- Cream cheese, room temperature: Provides the creamy base that makes the mints soft and smooth.
- Unsalted butter, room temperature: Adds richness and helps bind the dough perfectly.
- Light/clear corn syrup: Gives a subtle sweetness and helps keep the mints chewy.
- Peppermint extract: The star flavor, infusing each mint with refreshing holiday cheer.
- Powdered sugar: The bulk of the dough, balancing texture and sweetness.
- Green liquid food coloring: For vibrant, festive green mints.
- Red liquid food coloring: Adds classic holiday red to half your batch of mints.
How to Make Christmas Mints Recipe
Step 1: Prepare the baking tray and sugar
Start by lining a large rimmed baking tray with parchment paper—it’s going to make your life easier when transferring the mints later. Then, pour your granulated sugar into a small bowl; this is what you’ll use to coat the mints for that perfect, slightly crunchy finish.
Step 2: Beat together the base ingredients
In a large mixing bowl, use a handheld mixer on low speed to blend the cream cheese, unsalted butter, corn syrup, and peppermint extract. Give it about one full minute or until it’s nice and smooth—this creamy mixture is what makes your mints so delightfully soft.
Step 3: Incorporate powdered sugar
Slowly add 4 1/4 cups of powdered sugar, half a cup at a time, while continuing to mix on low. The dough will get thicker fast, so switch to a spatula or wooden spoon once it’s too dense for the mixer. Mixing by hand gives you more control to get the perfect texture.
Step 4: Divide and dust the dough
Sprinkle a clean surface with 1/4 cup powdered sugar and turn your dough out onto it. Divide the dough equally into three parts—this is the first step toward creating those signature red, green, and white mints we all adore.
Step 5: Color the dough
Create shallow wells in two portions and add red food coloring to one, green to the other, leaving one portion plain white. Knead each ball carefully to blend in color evenly. If the dough feels sticky, sprinkle in extra powdered sugar little by little—it’s all about that perfect non-sticky consistency.
Step 6: Roll dough into ropes
Roll each colored dough ball into an 18-inch long rope about 1 inch thick. This step preps the dough for cutting and helps maintain that classic shape of your Christmas mints.
Step 7: Cut and roll the mints
Slice each rope into 1/2-inch pieces and roll these small slices between your palms to form neat little balls. These bite-sized treats are irresistibly cute already!
Step 8: Coat with granulated sugar
Drop 2 to 3 mint balls at a time into the granulated sugar bowl, tossing them gently to coat evenly. This sweet coating is a lovely contrast to the creamy inside and adds a festive sparkle to each mint.
Step 9: Flatten and decorate
Arrange the sugar-coated balls on your tray, then gently press each one with the tip of a fork to flatten it into a disc—this not only creates a charming striped pattern but also sets the perfect texture for bite-sized enjoyment.
Step 10: Let the mints set
Allow your mints to rest at room temperature for up to 24 hours. This resting time lets them set and dry, finishing their texture and making them easy to store or share.
How to Serve Christmas Mints Recipe
Garnishes
You can sprinkle a little extra granulated sugar or edible glitter on top for added sparkle. Fresh sprigs of peppermint or holly on the serving plate add a beautiful, aromatic touch that complements the mints perfectly.
Side Dishes
These mints pair wonderfully with warm beverages like hot cocoa, coffee, or spiced tea. They can also be served alongside holiday cookies or small finger sandwiches for an elegant festive platter everyone will love.
Creative Ways to Present
Consider wrapping your Christmas mints in colorful cellophane tied with a satin ribbon for charming gift favors. Alternatively, arrange them in a decorative glass jar layered by color for a striking holiday centerpiece that’s both attractive and edible.
Make Ahead and Storage
Storing Leftovers
Keep your leftover Christmas mints in an airtight container at room temperature. They’ll stay fresh for up to two weeks, maintaining their delightful flavor and texture without any fuss.
Freezing
For longer storage, freeze the mints in a single layer on a baking sheet, then transfer to a freezer-safe container. They can last for up to three months and thaw quickly at room temperature when you’re ready to enjoy them again.
Reheating
No reheating is necessary for these mints—their creamy texture and peppermint zing are perfect chilled or at room temperature. Just make sure they are thawed fully if frozen before serving.
FAQs
Can I use another extract instead of peppermint?
Absolutely! While peppermint is classic for Christmas mints, you can experiment with vanilla, almond, or even citrus extracts to create your own unique flavors.
Why do the mints need to sit for 24 hours?
Letting the mints set allows them to dry and firm up, ensuring they hold their shape and develop their perfect texture before serving or packaging.
What if my dough is too sticky after adding food coloring?
Simply add powdered sugar gradually until it reaches a non-sticky consistency, which will make rolling and shaping much easier.
Can I make smaller batches?
Definitely! Just halve or quarter the ingredients as needed—you can easily scale the recipe to suit your holiday gathering size.
How long do these Christmas mints last?
Stored properly in an airtight container at room temperature, they should stay fresh for up to two weeks.
Final Thoughts
Making this Christmas Mints Recipe is one of those joyous kitchen moments that feels like a real holiday treat. Simple ingredients, easy steps, and the unforgettable taste of peppermint wrapped in bright festive colors make these mints a must-try. Trust me, once you’ve made them, you’ll want to share them with everyone on your list. So get rolling, and let these charming candies sweeten your Christmas season!
Print
Christmas Mints Recipe
- Prep Time: 30 minutes
- Cook Time: 0 minutes
- Total Time: 30 minutes plus up to 24 hours setting time
- Yield: Approximately 100 mints
- Category: Confectionery
- Method: No-Cook
- Cuisine: American
Description
These festive Christmas Mints are a delightful no-bake holiday treat featuring creamy, peppermint-flavored dough in traditional red, green, and white colors. Coated with granulated sugar and beautifully striped with a fork, these mints are perfect for sharing during the holidays or gifting to friends and family.
Ingredients
Base Ingredients
- 1/3 cup granulated sugar
- 4 ounces cream cheese, room temperature
- 2 tablespoons unsalted butter, room temperature
- 2 tablespoons light/clear corn syrup (such as Karo)
- 1 teaspoon peppermint extract
- 4 1/4 – 5 cups powdered sugar, divided
- 6 drops green liquid food coloring
- 6 drops red liquid food coloring
Instructions
- Prepare Baking Tray: Line a large rimmed baking tray with parchment paper to prevent sticking and set aside. Place the granulated sugar in a small bowl for coating the mints later.
- Mix Base Dough: In a large mixing bowl, use a handheld mixer on low speed to beat the cream cheese, unsalted butter, corn syrup, and peppermint extract together for about 1 minute until the mixture is smooth and creamy.
- Add Powdered Sugar Gradually: Slowly add 4 1/4 cups of powdered sugar in increments of 1/2 cup, mixing on low speed. As the dough thickens and becomes difficult to mix, switch to a spatula or wooden spoon and knead the mixture by hand to fully incorporate the powdered sugar.
- Prepare Dough Surface: On a clean surface, lay a piece of parchment paper and sprinkle it with 1/4 cup powdered sugar. Turn the dough out onto this surface and divide it evenly into three portions.
- Color the Dough: Make a shallow well in two of the dough portions. Add red food coloring to one and green food coloring to the other, leaving the third portion white. Knead each dough ball gently to evenly distribute the color. If the dough becomes sticky, add up to an additional 1/4 cup powdered sugar gradually until it reaches a workable consistency.
- Roll the Dough Ropes: Roll each colored dough ball into a long rope approximately 18 inches in length and 1 inch thick.
- Slice and Shape: Cut each rope into 1/2-inch thick slices. Roll each slice between your palms into small balls.
- Coat with Granulated Sugar: Drop 2 to 3 balls at a time into the bowl of granulated sugar and toss to coat them evenly. Place the coated mints on the prepared baking tray.
- Create Striped Pattern: Using the tip of a fork, gently press down on each sugar-coated ball to flatten it into a disc. This creates a decorative striped pattern on top of the mints.
- Set and Dry: Let the mints sit at room temperature on the tray for up to 24 hours to allow them to set and dry completely before serving or packaging.
Notes
- Be sure the cream cheese and butter are softened to room temperature for easier mixing.
- If the dough becomes too sticky after adding food coloring, gradually add more powdered sugar until manageable.
- The setting time may vary depending on humidity; longer drying ensures firmer mints.
- This recipe does not require baking, making it perfect for quick holiday treats.
- Store mints in an airtight container at room temperature for up to one week.


