
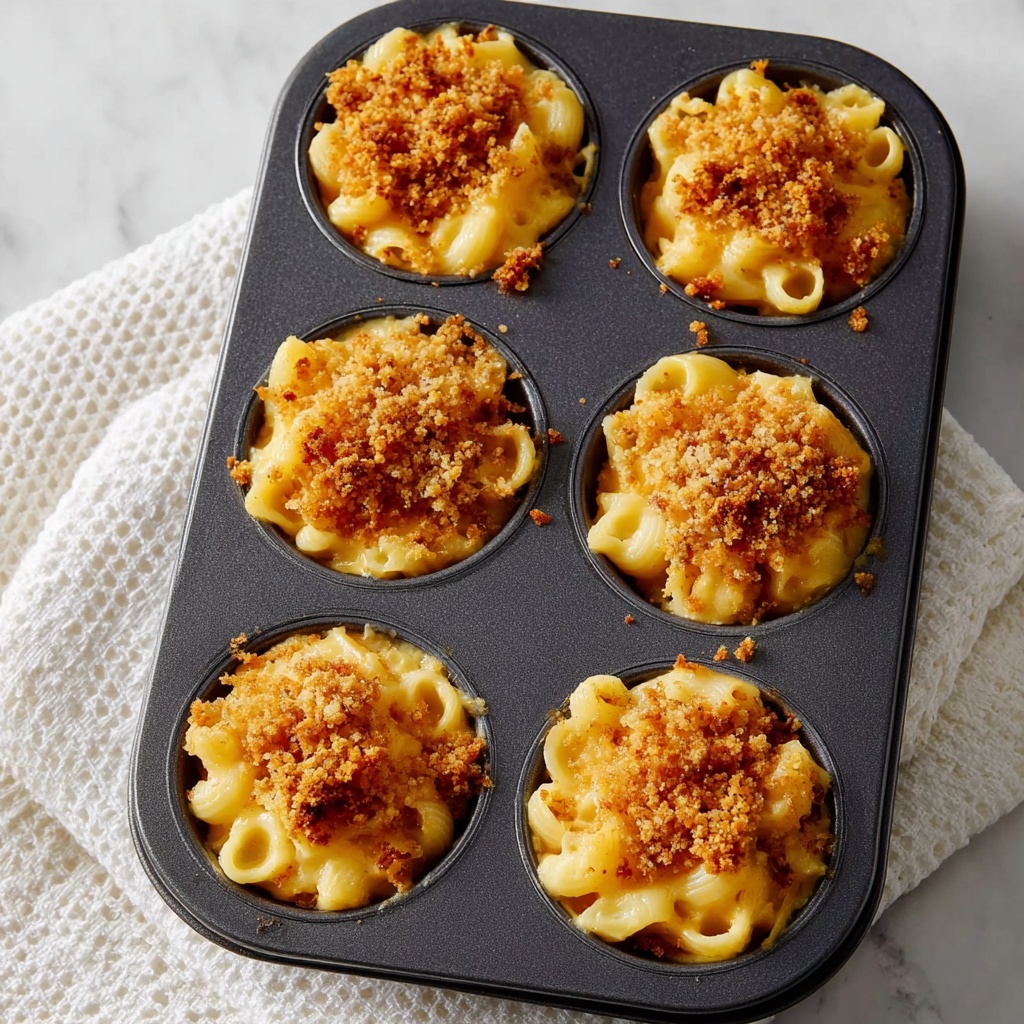
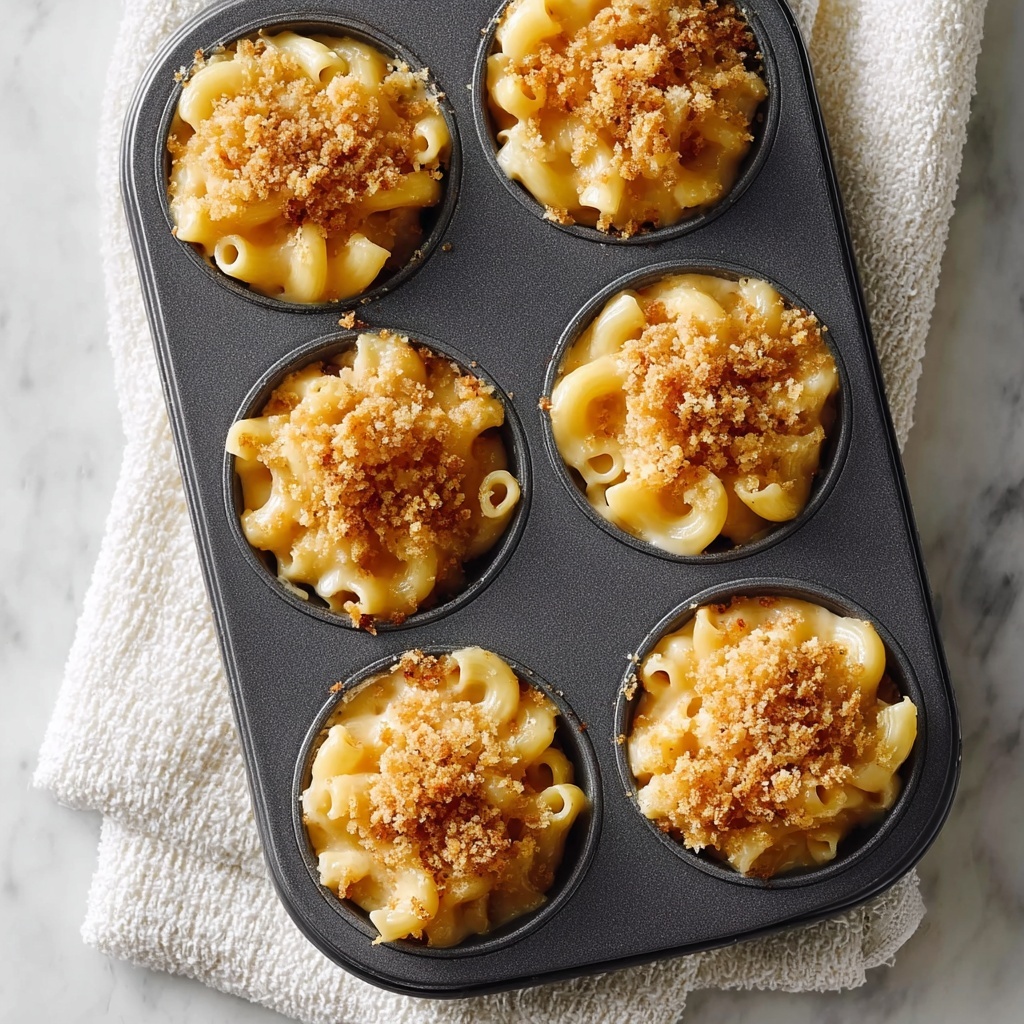
If you adore comfort food with a fun twist, you are going to fall head over heels for this Crispy Baked Mac & Cheese Cups Recipe. Imagine all the creamy, cheesy goodness of classic mac and cheese, perfectly portioned into crispy, golden little cups that are as delightful to bite into as they are to look at. These irresistible bites combine the best of tender pasta, rich cheddar, and crunchy breadcrumb topping for a snack or side dish that’s sure to steal the show at any meal. Whether you’re serving hungry kids, party guests, or simply treating yourself, this recipe is a guaranteed winner that turns a timeless favorite into a handheld feast.
Ingredients You’ll Need
These ingredients are straightforward but absolutely essential, each playing a crucial role in crafting the perfect balance of creaminess, sharpness, and crunch that makes this dish shine. From the familiar elbow macaroni and cheddar cheese to the subtle seasoning and topping, every component contributes to the texture and flavor that makes this recipe irresistible.
- 2 cups elbow macaroni (uncooked): The classic pasta shape that holds the cheese sauce beautifully.
- 2 cups sharp cheddar cheese (shredded): Adds a bold, tangy richness that’s the heart of the dish.
- 1 cup whole milk: Creates a creamy, smooth sauce without overpowering the cheese’s flavor.
- 2 tablespoons all-purpose flour: The thickening agent for the cheese sauce.
- 3 tablespoons unsalted butter: For a velvety base that makes the sauce silky and flavorful.
- 1/2 teaspoon salt: Enhances all the flavors naturally without being too salty.
- 1/4 teaspoon black pepper: A gentle kick that balances the richness.
- 1/2 cup breadcrumbs: Crucial for that irresistible crispy topping.
- 1 large egg: Binds everything together for firm, easy-to-handle cups.
- 1/4 cup grated Parmesan cheese (optional): Adds an extra layer of savory flavor and browning on top.
How to Make Crispy Baked Mac & Cheese Cups Recipe
Step 1: Prepare Your Oven and Muffin Tin
Start by preheating your oven to 375°F (190°C). Next, give a generous greasing to a 12-cup muffin tin to ensure your mac & cheese cups release easily after baking. This little prep goes a long way to keep your servings pretty and perfect.
Step 2: Cook the Pasta
Boil the elbow macaroni in salted water until just al dente. This means the pasta should be tender but still have a bit of bite since it will cook further in the oven. Once done, drain well and set aside so it’s ready to soak up that cheesy sauce.
Step 3: Make the Cheese Sauce
In a saucepan over medium heat, melt the butter. Whisk in the flour and cook for about one minute to remove the flour’s raw taste. Then, gradually whisk in the whole milk, stirring constantly until the sauce thickens beautifully. This step is where the magic starts to happen.
Step 4: Combine Cheese, Seasonings, and Pasta
Remove the sauce from heat and stir in the sharp cheddar cheese until melted and smooth. Add salt and black pepper to taste. Then, mix in the cooked pasta along with a beaten egg, which helps bind the ingredients so your mac & cheese cups hold their shape after baking.
Step 5: Fill the Muffin Tin
Spoon the mac & cheese mixture into the prepared muffin cups. Press down gently to compact each portion so every bite is packed with cheesy goodness and forms a sturdy cup.
Step 6: Add the Crispy Topping
Mix the breadcrumbs with a tablespoon of melted butter, giving them a buttery crunch once baked. Sprinkle this mixture evenly over each cup. If you love extra cheesiness and a golden crust, sprinkle some grated Parmesan cheese on top as well.
Step 7: Bake to Perfection
Place the muffin tin in the oven and bake for 20 to 25 minutes until the tops are beautifully golden and bubbly. This bake time crisps up the breadcrumbs while keeping the inside creamy and smooth.
Step 8: Cool and Remove
Allow the baked mac & cheese cups to cool for 5 to 10 minutes before carefully removing them from the muffin tin. This resting time lets them firm up, making them easier to handle and enjoy.
How to Serve Crispy Baked Mac & Cheese Cups Recipe
Garnishes
Fresh garnishes can elevate your mac & cheese cups to the next level. Try scattering chopped fresh parsley or chives on top for a pop of color and freshness. A light drizzle of hot sauce or a sprinkle of smoked paprika adds an exciting flavor twist that balances the rich cheese.
Side Dishes
These mac & cheese cups make a fantastic complement to a fresh, crisp salad or roasted vegetables. Serve them alongside grilled meats or a smoky barbecue for a crowd-pleasing spread that offers both indulgence and balance. They also shine at parties as finger food or appetizers.
Creative Ways to Present
For an eye-catching presentation, arrange the mac & cheese cups on a rustic wooden board with small dipping bowls of ketchup, ranch dressing, or spicy mustard. You can also serve them in mini cupcake liners for an extra festive vibe at gatherings or kids’ lunchboxes.
Make Ahead and Storage
Storing Leftovers
Once completely cooled, store any leftovers in an airtight container in the refrigerator for up to 3 days. Keeping them covered well maintains their moisture without sacrificing the crispy topping too much.
Freezing
If you want to enjoy these bites later, you can freeze them individually on a baking sheet first. Once frozen, transfer to a freezer-safe bag or container. They’ll keep well for up to 2 months, making them perfect for quick meals or snacks whenever the craving hits.
Reheating
To reheat, bake the frozen or refrigerated mac & cheese cups in a preheated 350°F (175°C) oven for about 10 to 15 minutes. This method refreshes the crispy topping while warming the filling thoroughly. Avoid microwaving if possible, as it can make the topping soggy.
FAQs
Can I use a different type of cheese?
Absolutely! Sharp cheddar is classic, but feel free to experiment with gouda, Monterey Jack, or even a mix of cheeses for deeper flavor. Just remember to choose cheeses that melt well for that creamy texture.
Is there a gluten-free version of this recipe?
Yes, you can substitute regular elbow macaroni with a gluten-free pasta, and use gluten-free breadcrumbs. The rest of the recipe stays the same, so you won’t miss out on that crispy, cheesy goodness.
Can these mac & cheese cups be made dairy-free?
To make a dairy-free version, swap the butter for a plant-based alternative, use non-dairy milk like oat or almond, and choose dairy-free cheese substitutes. The texture might vary slightly, but they’ll still be tasty!
How do I prevent the mac & cheese from drying out?
Making sure your cheese sauce is creamy and not too thick before mixing with pasta helps retain moisture. Also, don’t overbake; just aim for golden tops and bubbly edges to keep them perfectly moist inside.
Can I add extras like bacon or veggies?
Definitely! Stir in cooked bacon bits, sautéed mushrooms, or steamed broccoli into the mac & cheese mixture before baking for added flavor and texture. This recipe is very adaptable and can be dressed up in many delicious ways.
Final Thoughts
Now that you’ve got all the secrets to making these delightful Crispy Baked Mac & Cheese Cups Recipe, there’s no excuse not to whip up a batch. They are fun, addictive, and perfect comfort food with a crispy edge that keeps everyone coming back for more. Go ahead and try this recipe — your taste buds will thank you!
Print
Crispy Baked Mac & Cheese Cups Recipe
- Prep Time: 15 minutes
- Cook Time: 30 minutes
- Total Time: 45 minutes
- Yield: 12 cups
- Category: Appetizer
- Method: Baking
- Cuisine: American
Description
These Crispy Baked Mac & Cheese Cups are a delicious twist on classic macaroni and cheese, featuring a creamy cheddar sauce baked into individual portions with a crunchy breadcrumb topping. Perfect for parties, snacks, or a comforting meal with a satisfying crispy crust.
Ingredients
Pasta
- 2 cups elbow macaroni (uncooked)
Cheese Sauce
- 2 cups sharp cheddar cheese (shredded)
- 1 cup whole milk
- 2 tablespoons all-purpose flour
- 3 tablespoons unsalted butter
- 1/2 teaspoon salt
- 1/4 teaspoon black pepper
- 1 large egg
Topping
- 1/2 cup breadcrumbs
- 1 tablespoon melted butter (for mixing with breadcrumbs)
- 1/4 cup grated Parmesan cheese (optional)
Instructions
- Preheat and Prepare Muffin Tin: Preheat your oven to 375°F (190°C) and generously grease a 12-cup muffin tin to prevent sticking.
- Cook Macaroni: Boil the elbow macaroni in salted water until al dente, then drain and set aside to cool slightly.
- Make Cheese Sauce: In a saucepan over medium heat, melt the unsalted butter. Whisk in the flour and cook for 1 minute to form a roux. Gradually whisk in whole milk and cook until the mixture thickens to a creamy consistency.
- Add Cheese and Seasoning: Stir in the sharp cheddar cheese, salt, and black pepper until the cheese melts and the sauce is smooth. Remove the sauce from heat and mix in the cooked macaroni and beaten egg thoroughly.
- Fill Muffin Tin: Spoon the macaroni and cheese mixture into the prepared muffin tin cups, pressing gently to compact each portion evenly.
- Prepare Topping: Combine the breadcrumbs with a tablespoon of melted butter and sprinkle this mixture evenly over each mac and cheese cup. Optionally, sprinkle grated Parmesan cheese on top for extra flavor.
- Bake: Bake the cups in the preheated oven for 20 to 25 minutes, until they turn golden brown and start bubbling.
- Cool and Serve: Let the mac and cheese cups cool in the tin for 5 to 10 minutes before carefully removing them. Serve them warm for the best taste and texture.
Notes
- You can substitute whole milk with 2% milk for a slightly lighter version.
- For a gluten-free option, use gluten-free flour and breadcrumbs.
- Add cooked bacon bits or chopped herbs like parsley for extra flavor variations.
- Make sure to grease the muffin tin well to easily remove the cups after baking.
- These cups can be reheated in the oven or microwave for a quick snack.


