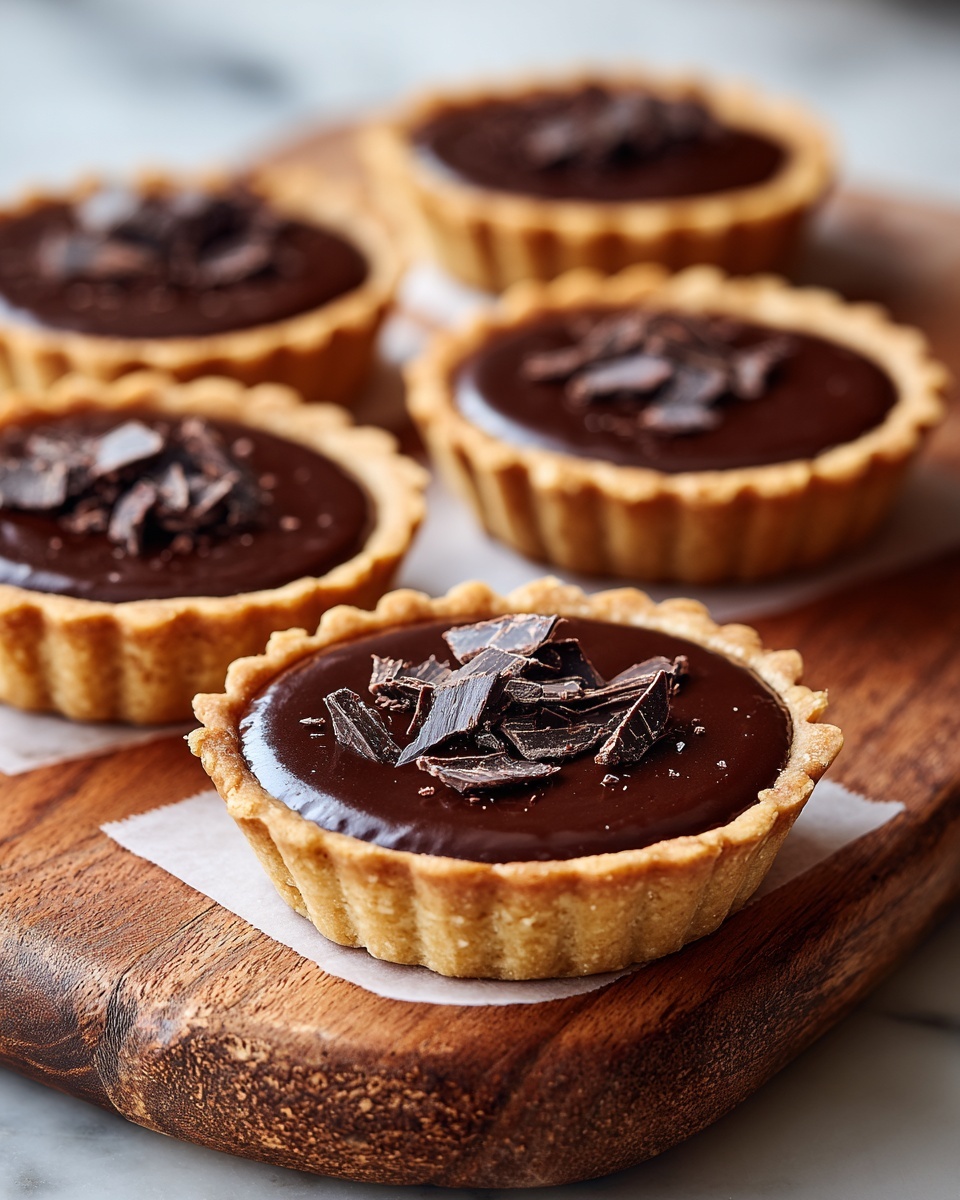
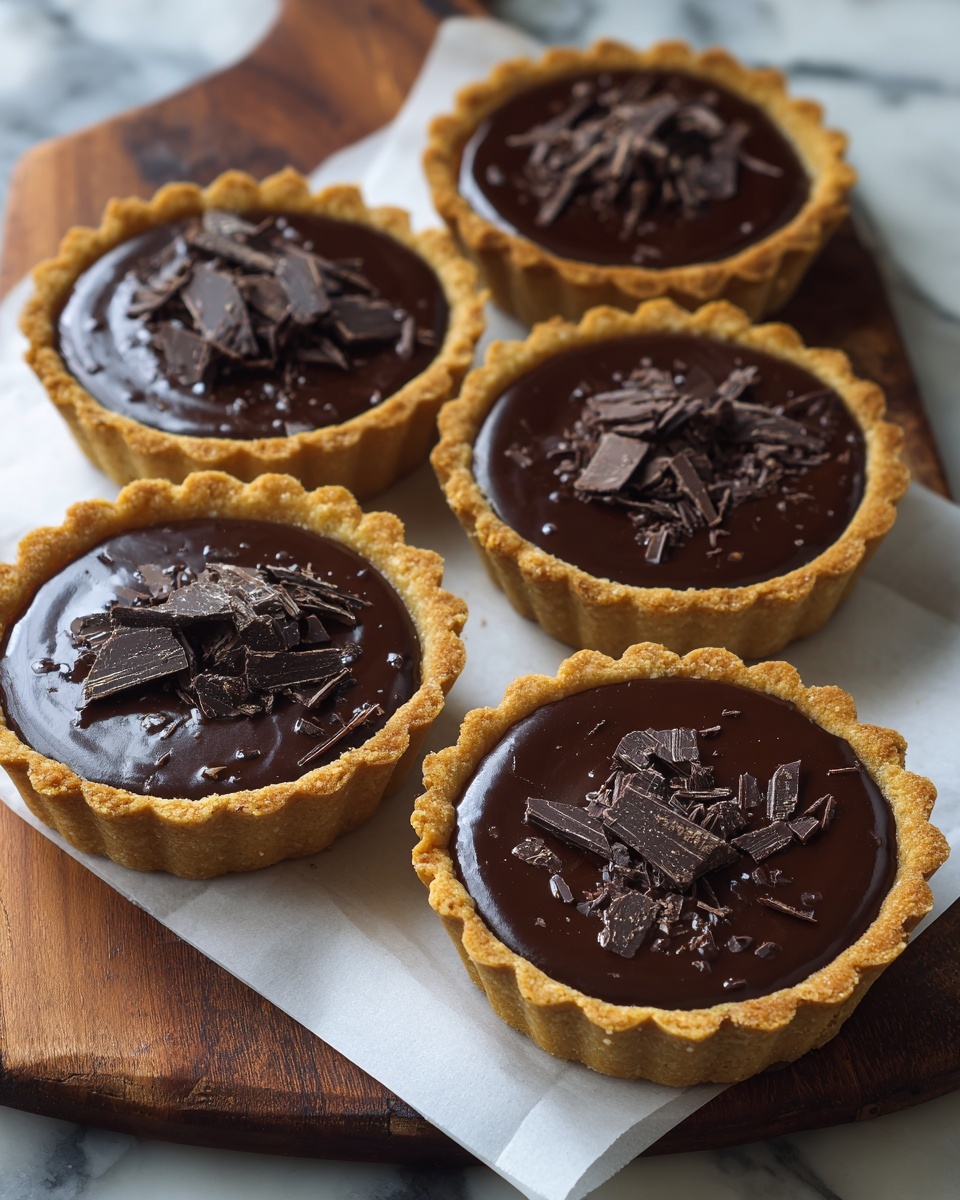
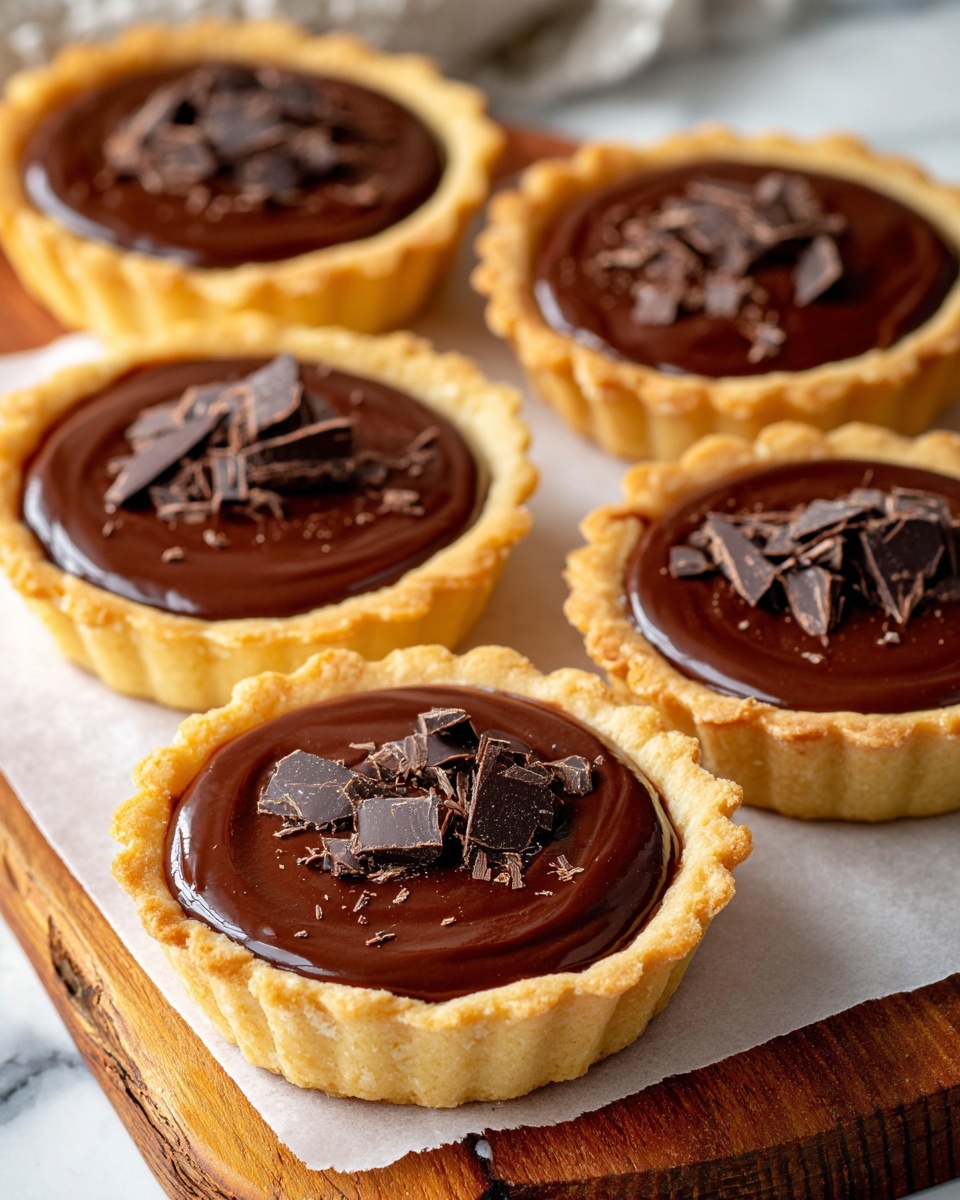
There is something utterly irresistible about these Mini Chocolate Tarts Recipe that makes them a standout treat for any occasion. Imagine a delicate, crisp cocoa-infused crust cradling a rich, glossy dark chocolate ganache that melts luxuriously on your tongue. This recipe is a perfect blend of simplicity and sophistication, delivering intense chocolate flavor in petite, charming portions that are as delightful to look at as they are to eat. Whether you’re serving them up for a special gathering or simply indulging in a moment of personal bliss, these mini tarts will quickly become a beloved favorite.
Ingredients You’ll Need
Every ingredient in this Mini Chocolate Tarts Recipe plays a key role in balancing textures and flavors, from the crumbly cocoa crust to the silky smooth ganache. These simple staples come together effortlessly, creating a dessert that looks and tastes like it required hours of skill.
- 1 cup all-purpose flour: Provides the structure for the tart crust with just the right amount of tenderness.
- 2 tablespoons unsweetened cocoa powder: Adds a deep chocolate flavor and beautiful color to the dough.
- 1/4 cup granulated sugar: Sweetens the crust, balancing the cocoa’s slight bitterness.
- 1/4 teaspoon salt: Enhances all the flavors, making the chocolate pop even more.
- 1/2 cup (1 stick) cold unsalted butter, cut into cubes: Creates the flaky, melt-in-your-mouth texture of the crust.
- 1 large egg, beaten: Binds the dough while adding richness for the perfect bite.
- 1/2 cup heavy cream: The base for the ganache, adding creaminess and a luxurious mouthfeel.
- 4 ounces high-quality dark chocolate, chopped: The heart of the ganache, providing intense, bittersweet chocolate flavor.
- 1/2 teaspoon vanilla extract: Brightens the chocolate with subtle aromatic warmth.
- Pinch of salt: Balances sweetness and deepens the ganache’s flavor.
How to Make Mini Chocolate Tarts Recipe
Step 1: Prepare the Tart Crust
Start by combining the all-purpose flour, unsweetened cocoa powder, granulated sugar, and salt in a large mixing bowl. Next, cut in the cold, cubed unsalted butter using a pastry cutter or your fingertips until the mixture resembles coarse crumbs—this is the secret to that wonderfully crumbly texture. Then, mix in the beaten egg until the dough just comes together. Shape your dough into a neat disc, wrap it tightly with plastic wrap, and chill it in the refrigerator for at least 30 minutes. This chilling step is essential as it makes rolling the dough much easier and helps prevent shrinking during baking.
Step 2: Shape and Bake the Tart Shells
After the dough is chilled, lightly flour your work surface and roll the dough out to a thin, even layer. Using a small round cutter, cut circles that will fit snugly into your mini tart pans or a mini muffin tray. Gently press the dough circles into the pans, trimming any excess dough for a clean edge. Pop the shaped crusts back into the fridge for about 15 minutes to firm up—you want them chilled before baking to keep their shape. Meanwhile, preheat your oven to 350°F (175°C). Bake the tart shells for about 12 minutes or until they’re firm but not browned, then let them cool completely before filling. Cooling is crucial to prevent the ganache from melting when added.
Step 3: Make the Chocolate Ganache
Heat the heavy cream gently in a small saucepan over medium heat until it’s just about to simmer—avoid boiling. Pour the hot cream over the chopped high-quality dark chocolate in a heatproof bowl. Let it sit for a minute so the chocolate softens, then stir gently in one direction until the ganache is smooth and glossy. Stir in the vanilla extract and a pinch of salt to elevate the deep chocolate flavor. This step transforms simple ingredients into pure indulgence.
Step 4: Fill and Chill
Carefully spoon or pipe the luscious chocolate ganache into the cooled tart shells, filling them right up to the edge. Place the filled tarts in the refrigerator for at least one hour, allowing the ganache to set into a silky, firm texture that’s perfect for serving. The result is a beautiful, elegant dessert that’s as satisfying as it is stunning.
How to Serve Mini Chocolate Tarts Recipe
Garnishes
To elevate your Mini Chocolate Tarts Recipe even further, consider adding fresh raspberries or sliced strawberries on top for a pop of color and natural sweetness. A light dusting of powdered sugar, a few mint leaves, or even some edible gold flakes can turn these tarts into showstoppers that dazzle your guests.
Side Dishes
Pair these rich chocolate tarts with a scoop of vanilla bean ice cream or a dollop of freshly whipped cream to add creaminess and contrast. A cup of robust coffee or a glass of chilled dessert wine also complements the intense chocolate flavor beautifully, turning your dessert break into a moment of pure bliss.
Creative Ways to Present
Presentation can take these mini tarts to the next level. Arrange them on a pretty tiered cake stand for casual parties or plate individually with a drizzle of raspberry coulis and a sprinkle of sea salt flakes for a restaurant-style experience. You can also serve them in decorative mini tart boxes or alongside a selection of other bite-sized desserts for an indulgent dessert spread.
Make Ahead and Storage
Storing Leftovers
Leftover tarts can be stored in an airtight container in the refrigerator for up to 3 days. Keeping them chilled preserves the delicate texture of the ganache and the crispness of the tart shells.
Freezing
You can freeze baked and cooled tart shells separately for up to one month. Once ready to serve, thaw them at room temperature and fill with freshly made ganache. Unfortunately, freezing filled tarts isn’t recommended as it can affect the ganache’s creamy texture.
Reheating
For the best experience, enjoy these tarts cold. However, if you prefer them slightly softened, let them sit at room temperature for about 10 minutes before serving. Avoid microwaving as it can cause the ganache to separate.
FAQs
Can I use milk chocolate instead of dark chocolate in this Mini Chocolate Tarts Recipe?
Yes, you absolutely can! Milk chocolate will make the ganache sweeter and creamier, but it may be less rich and slightly less firm than dark chocolate. Adjust the sugar if needed to balance the sweetness.
Is it necessary to chill the dough and tart shells?
Chilling is key to preventing the crust from shrinking and helps create that perfect flaky texture. It also makes handling the dough easier, so try not to skip this step for the best results.
Can I make these tarts gluten-free?
Yes! Substitute the all-purpose flour with a gluten-free blend that measures cup-for-cup and ensure all other ingredients are gluten-free. The texture might vary slightly, but the flavor will still shine.
How do I prevent the tart crust from getting soggy?
Baking the crust until it is firm but not browned and allowing it to cool completely before filling helps avoid sogginess. Additionally, chilling the tart shells before baking firms them up to hold the ganache better.
Can these mini tarts be made ahead of time for a party?
Definitely! You can bake and store the tart shells in advance, and prepare the ganache close to serving time for maximum freshness. Filling and chilling the tarts an hour before the event works perfectly.
Final Thoughts
I hope you feel as excited as I do to try this Mini Chocolate Tarts Recipe because it truly is a delightful little treasure. Whether you are an experienced baker or just looking for a charming dessert to impress your friends, these tarts deliver a perfect balance of flavor, texture, and elegance. Treat yourself to making these amazing treats and watch as they become your new go-to chocolate indulgence.
Print
Mini Chocolate Tarts Recipe
- Prep Time: 45 minutes
- Cook Time: 12 minutes
- Total Time: 1 hour 15 minutes
- Yield: 12 mini tarts
- Category: Dessert
- Method: Baking
- Cuisine: American
Description
Delight in these elegant Mini Chocolate Tarts featuring a rich cocoa-infused crust and silky dark chocolate ganache filling. Perfectly portioned for serving, these tarts combine a tender, buttery tart shell with a smooth, luxurious ganache, making them an impressive yet simple dessert for any occasion.
Ingredients
Tart Crust
- 1 cup all-purpose flour
- 2 tablespoons unsweetened cocoa powder
- 1/4 cup granulated sugar
- 1/4 teaspoon salt
- 1/2 cup (1 stick) cold unsalted butter, cut into cubes
- 1 large egg, beaten
Chocolate Ganache Filling
- 1/2 cup heavy cream
- 4 ounces high-quality dark chocolate, chopped
- 1/2 teaspoon vanilla extract
- Pinch of salt
Instructions
- Prepare the Tart Crust: In a mixing bowl, combine all-purpose flour, unsweetened cocoa powder, granulated sugar, and salt. Cut in the cold, cubed unsalted butter using a pastry cutter or your fingers until the mixture resembles coarse crumbs. Add the beaten egg and mix until the dough forms a cohesive mass. Shape into a disc, wrap in plastic wrap, and chill in the refrigerator for at least 30 minutes to facilitate rolling and minimize shrinkage during baking.
- Shape and Bake the Tart Shells: Lightly flour a clean surface and roll out the chilled dough to an even, thin layer. Use a small round cutter to cut dough circles sized to fit mini tart pans or mini muffin trays. Gently press the dough into the molds, trimming any excess dough. Chill the shaped crusts again for 15 minutes. Preheat the oven to 350°F (175°C). Bake the tart shells for approximately 12 minutes until they are firm but not browned. Remove from oven and let cool completely before filling.
- Make the Chocolate Ganache: Heat the heavy cream in a small saucepan over medium heat until it nearly simmers. Pour the hot cream over the chopped high-quality dark chocolate in a heatproof bowl. Let it sit for one minute, then stir gently until smooth and glossy. Stir in the vanilla extract and a pinch of salt to enhance the flavor.
- Fill and Chill: Spoon or pipe the prepared chocolate ganache evenly into the cooled tart shells, filling them to the brim. Refrigerate the filled tarts for at least one hour until the ganache sets to a silky, firm consistency, ideal for serving.
Notes
- Use high-quality dark chocolate for the best ganache flavor and texture.
- Chilling the dough before rolling helps prevent shrinking and makes it easier to handle.
- You can use mini tart pans or a mini muffin tray to shape the tart shells.
- Allow tart shells to cool completely before filling to avoid melting the ganache.
- Store filled tarts in the refrigerator and consume within 2-3 days for optimal freshness.


