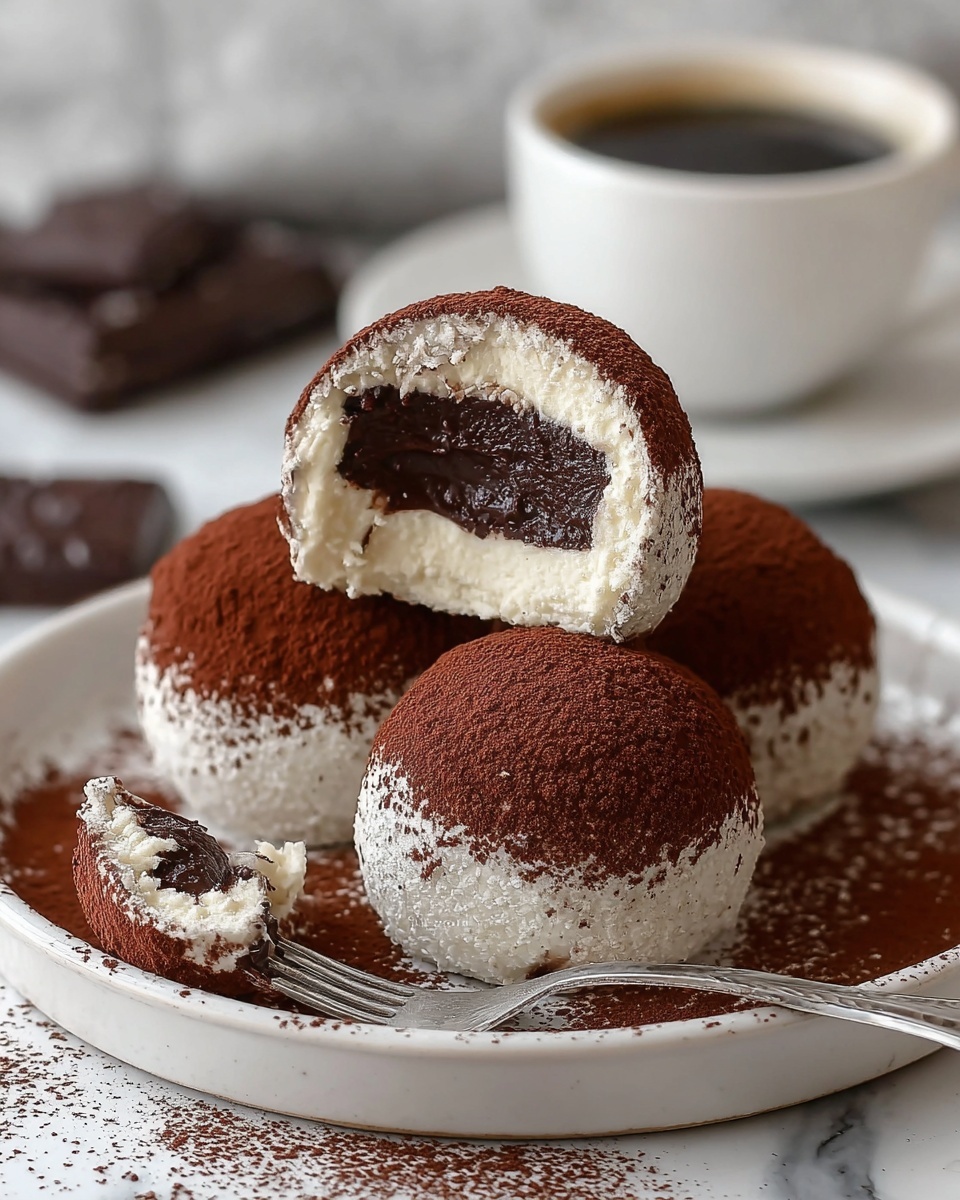
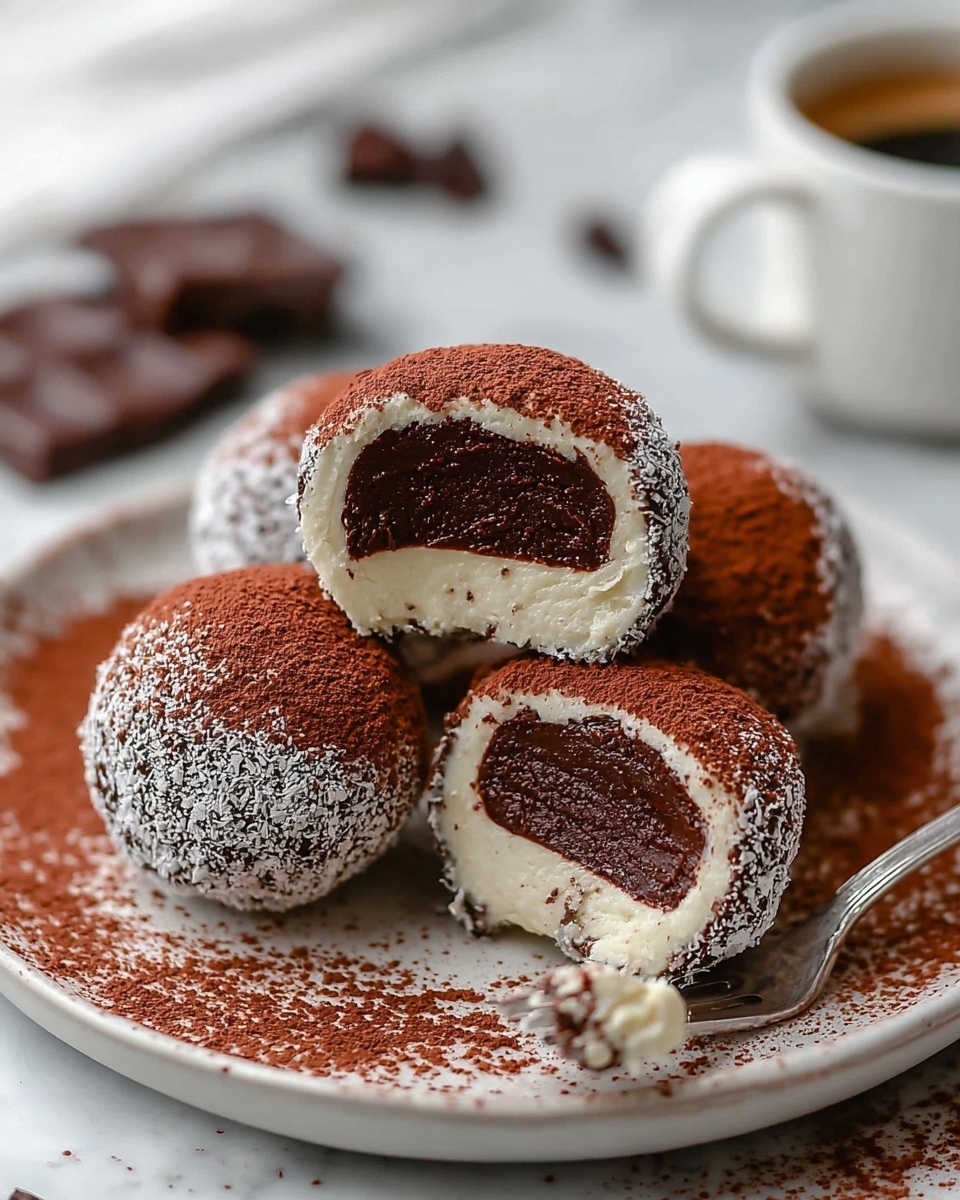
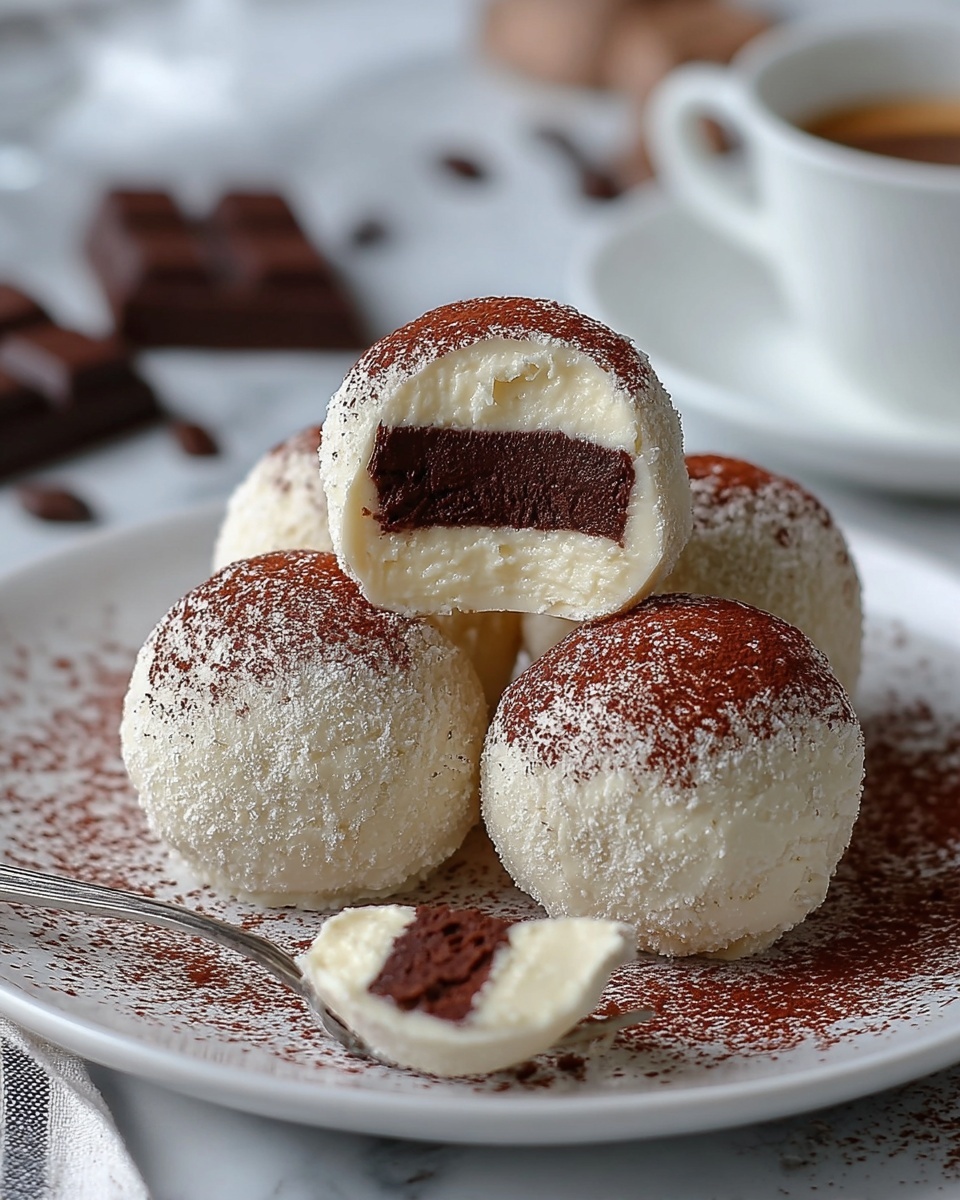
If you adore the rich, creamy flavors of classic tiramisu but want a fuss-free, bite-sized version, you will absolutely love this recipe for Tiramisu Balls: Easy No-Bake Dessert Recipe. These little delights manage to capture all the luscious mascarpone goodness and bold coffee notes in perfectly portioned balls that are as playful as they are indulgent. With no oven required, they come together in just a few simple steps, making them the ultimate crowd-pleaser for any occasion or a special treat to enjoy anytime.
Ingredients You’ll Need
Each ingredient in this recipe is super straightforward but plays a crucial role in building the perfect balance of flavors and textures. From mascarpone’s creamy silkiness to the crispy yet tender ladyfingers soaked in coffee, every element works together to create that unforgettable tiramisu experience in ball form.
- Mascarpone Cheese (250g): This rich Italian cheese gives tiramisu its signature creamy texture and mild tang.
- Heavy Cream (150ml): When whipped, it adds lightness and fluffiness to balance the dense mascarpone.
- Powdered Sugar (50g): Sifted for smooth sweetness that dissolves perfectly into the cream.
- Vanilla Extract (1 tsp): A splash that gently enhances the overall flavor with warmth and depth.
- Pinch of Salt: The secret trick to heighten all the sweet and creamy notes.
- Ladyfingers (150g): Also known as Savoiardi biscuits, these add a light crispness that softens delightfully when dipped in coffee.
- Strong Brewed Coffee (1 cup): Provides that bold, slightly bitter backbone essential for tiramisu.
- Coffee Liqueur (2 tbsp, optional): A splash of Kahlua or Tia Maria amps up the coffee flavor with a smooth kick.
- Unsweetened Cocoa Powder (2 tbsp): For dusting the balls, offering a bittersweet finish and gorgeous presentation.
- Chocolate Shavings, optional: Adds an extra touch of elegance and texture as a garnish.
How to Make Tiramisu Balls: Easy No-Bake Dessert Recipe
Step 1: Whip the Heavy Cream
Start with cold heavy cream in a chilled bowl and whip it on medium-high speed until it forms stiff peaks—about 3 to 5 minutes. Be careful not to overwhip or you’ll end up with butter! Whipped cream lightens the mascarpone mix and creates that famous fluffy texture.
Step 2: Combine Mascarpone and Sugar
In another bowl, gently mix mascarpone cheese with sifted powdered sugar until smooth. Avoid overmixing to keep the texture silky and perfect for folding in the whipped cream.
Step 3: Add Vanilla and Pinch of Salt
Stir in the vanilla extract and just a tiny pinch of salt. This simple addition really boosts all the flavors, making the creamy filling even more irresistible.
Step 4: Fold in the Whipped Cream
Carefully fold the whipped cream into the mascarpone mixture in two or three additions. Folding, not stirring, keeps the mixture airy and light—essential for those melt-in-your-mouth tiramisu balls.
Step 5: Chill the Cream
Cover the mascarpone cream and place it in the fridge for at least 30 minutes. Chilling helps everything set up nicely, making it easier to work with later.
Step 6: Brew Strong Coffee
Prepare a strong cup of coffee and allow it to cool completely. This coffee is what infuses the ladyfingers with that unmistakable tiramisu punch.
Step 7: Add Coffee Liqueur (Optional)
If you want an extra flavor kick, stir in coffee liqueur such as Kahlua or Tia Maria into the cooled coffee. It adds warmth and depth without overpowering the dessert.
Step 8: Dip and Crush the Ladyfingers
Quickly dip each ladyfinger into the coffee mixture, making sure not to soak them too long or they’ll get soggy. Then crush these dipped ladyfingers finely, either using a food processor or by hand with a rolling pin inside a ziplock bag. This creates the textured base for your balls.
Step 9: Combine Ladyfingers and Cream
Fold the crushed ladyfingers gently into the chilled mascarpone cream until it’s evenly mixed. The mixture should be firm enough to roll into balls but still creamy and flavorful.
Step 10: Chill the Mixture Again
Let the combined mixture chill in the fridge for at least an hour. This step is critical as it allows the flavors to meld perfectly and firms up the mixture so it’s easy to handle.
Step 11: Shape into Balls
Using a spoon or cookie scoop, portion out the mixture and roll each portion between your palms to form smooth balls around 1-inch in diameter. This is the fun, hands-on part where the magic comes to life!
Step 12: Dust with Cocoa Powder
Roll each ball in unsweetened cocoa powder until fully covered. This not only adds a lovely bittersweet finish but also gives your tiramisu balls that classic, elegant look.
Step 13: Garnish (Optional)
If you’re feeling fancy, top your tiramisu balls with chocolate shavings or grated chocolate for an extra decadent touch. It’s all about making them feel special and inviting.
Step 14: Chill Before Serving
Place the finished tiramisu balls on a parchment-lined tray and chill them in the refrigerator for at least 30 minutes before serving. This chilling step allows everything to firm up perfectly so they hold their shape and taste divine.
How to Serve Tiramisu Balls: Easy No-Bake Dessert Recipe
Garnishes
Sprinkling a little extra cocoa powder or adding chocolate shavings over the top makes the tiramisu balls look stunning and adds a wonderful textural contrast. You can also try dusting with crushed espresso beans or even a pinch of cinnamon for a twist.
Side Dishes
Serve your tiramisu balls alongside fresh berries or a dollop of whipped cream to cut through the richness and add a refreshing bite. A scoop of vanilla gelato on the side also pairs beautifully, amplifying the creamy coffee flavors.
Creative Ways to Present
For a party, arrange tiramisu balls in mini cupcake liners or on a pretty serving platter dusted with cocoa powder. You can even skewer them on decorative toothpicks for a fun take on dessert bites that guests can easily grab and enjoy.
Make Ahead and Storage
Storing Leftovers
Leftover tiramisu balls keep wonderfully in an airtight container in the refrigerator for up to 3 days. The flavors deepen over time, though the texture might soften slightly, which is still delicious.
Freezing
You can freeze tiramisu balls by placing them on a tray to freeze individually first, then transferring them to a sealed container or bag. Freeze for up to 1 month. Thaw in the fridge overnight before serving for best results.
Reheating
Since tiramisu balls are best enjoyed chilled, reheating is not recommended. Let your dessert sit at room temperature for 10-15 minutes before serving if they feel too cold straight from the fridge.
FAQs
Can I use regular cream cheese instead of mascarpone?
While cream cheese can work in a pinch, mascarpone offers a much smoother, creamier texture and a classic flavor that’s key to authentic tiramisu balls.
How long do tiramisu balls last?
Stored properly in the refrigerator, tiramisu balls remain fresh and delicious for up to 3 days. Beyond that, the texture and flavor may start to diminish.
Can I make this recipe dairy-free?
For a dairy-free version, you can experiment with vegan cream cheese and coconut cream, though the flavor and texture will differ from traditional tiramisu.
Is coffee liqueur necessary?
Not at all! The coffee liqueur adds extra flavor depth but the dessert tastes amazing even without it. Feel free to omit it for a kid-friendly or alcohol-free version.
How do I prevent the ladyfingers from becoming soggy?
Dip ladyfingers quickly and gently into the coffee mixture without soaking. This helps retain some crunch and ensures the balls hold their shape nicely.
Final Thoughts
There is something truly special about Tiramisu Balls: Easy No-Bake Dessert Recipe that makes every bite feel like a sweet celebration. Whether you’re making them for a holiday, a casual get-together, or simply because you deserve a treat, these delightful balls are bound to bring smiles all around. Give this recipe a try—you might find it becoming your new go-to dessert!
Print
Tiramisu Balls: Easy No-Bake Dessert Recipe
- Prep Time: 20 minutes
- Cook Time: 0 minutes
- Total Time: 2 hours 20 minutes (including chilling time)
- Yield: 24 tiramisu balls
- Category: Dessert
- Method: No-Cook
- Cuisine: Italian
Description
These delightful Tiramisu Balls offer a quick and easy twist on the classic Italian dessert, combining creamy mascarpone, rich coffee-soaked ladyfingers, and a dusting of cocoa powder. Perfect bite-sized treats for any occasion that require minimal preparation and refrigeration time.
Ingredients
Mascarpone Mixture
- 250g Mascarpone Cheese, at room temperature
- 150ml Heavy Cream, cold
- 50g Powdered Sugar, sifted
- 1 tsp Vanilla Extract
- Pinch of Salt
Ladyfingers and Coffee
- 150g Ladyfingers (Savoiardi biscuits)
- 1 cup Strong Brewed Coffee, cooled
- 2 tbsp Coffee Liqueur (e.g., Kahlua or Tia Maria), optional
Finishing Touches
- 2 tbsp Unsweetened Cocoa Powder, for dusting
- Chocolate shavings or grated chocolate, for garnish (optional)
Instructions
- Whip the Heavy Cream: In a large, chilled bowl, whip the cold heavy cream on medium-high speed until stiff peaks form, about 3-5 minutes. Take care not to overwhip to avoid curdling.
- Combine Mascarpone and Sugar: In a separate bowl, gently mix the mascarpone cheese with the sifted powdered sugar until smooth and creamy, being careful not to overmix.
- Add Vanilla and Salt: Stir in the vanilla extract and a pinch of salt to enhance flavor balance.
- Fold in the Whipped Cream: Carefully fold the whipped cream into the mascarpone mixture in two or three additions to maintain a light, fluffy texture.
- Chill the Cream: Cover the bowl and refrigerate the mascarpone cream for at least 30 minutes to firm up.
- Brew Strong Coffee: Brew a strong cup of coffee and allow it to cool completely to room temperature.
- Add Coffee Liqueur (Optional): If desired, stir the coffee liqueur into the cooled coffee to add depth of flavor.
- Dip the Ladyfingers: Quickly dip each ladyfinger into the cooled coffee mixture, ensuring they absorb some coffee but do not become soggy.
- Crush the Ladyfingers: Place the coffee-dipped ladyfingers into a food processor and pulse until finely crushed. Alternatively, crush them manually using a rolling pin inside a ziplock bag.
- Combine Ladyfingers and Cream: Gently fold the crushed ladyfingers into the chilled mascarpone cream until well incorporated.
- Chill the Mixture: Cover the combined mixture and refrigerate for at least 1 hour, or up to 4 hours for best flavor and texture.
- Shape into Balls: Using a spoon or cookie scoop, take portions of the mixture and roll them between your palms to form smooth, approximately 1-inch diameter balls.
- Dust with Cocoa Powder: Place the unsweetened cocoa powder in a shallow dish and roll each tiramisu ball in it until fully coated.
- Garnish (Optional): Decorate each ball with chocolate shavings or grated chocolate to enhance presentation.
- Chill Again: Arrange the finished tiramisu balls on a parchment-lined plate or tray and refrigerate for at least 30 minutes before serving to set.
Notes
- Be careful not to soak ladyfingers too long in coffee to avoid sogginess.
- Ensure heavy cream is cold for better whipping results.
- The dessert benefits from resting time in the fridge to develop flavors.
- Optional coffee liqueur adds richness but can be omitted for alcohol-free version.
- Serve chilled and consume within 2 days for best taste and freshness.


