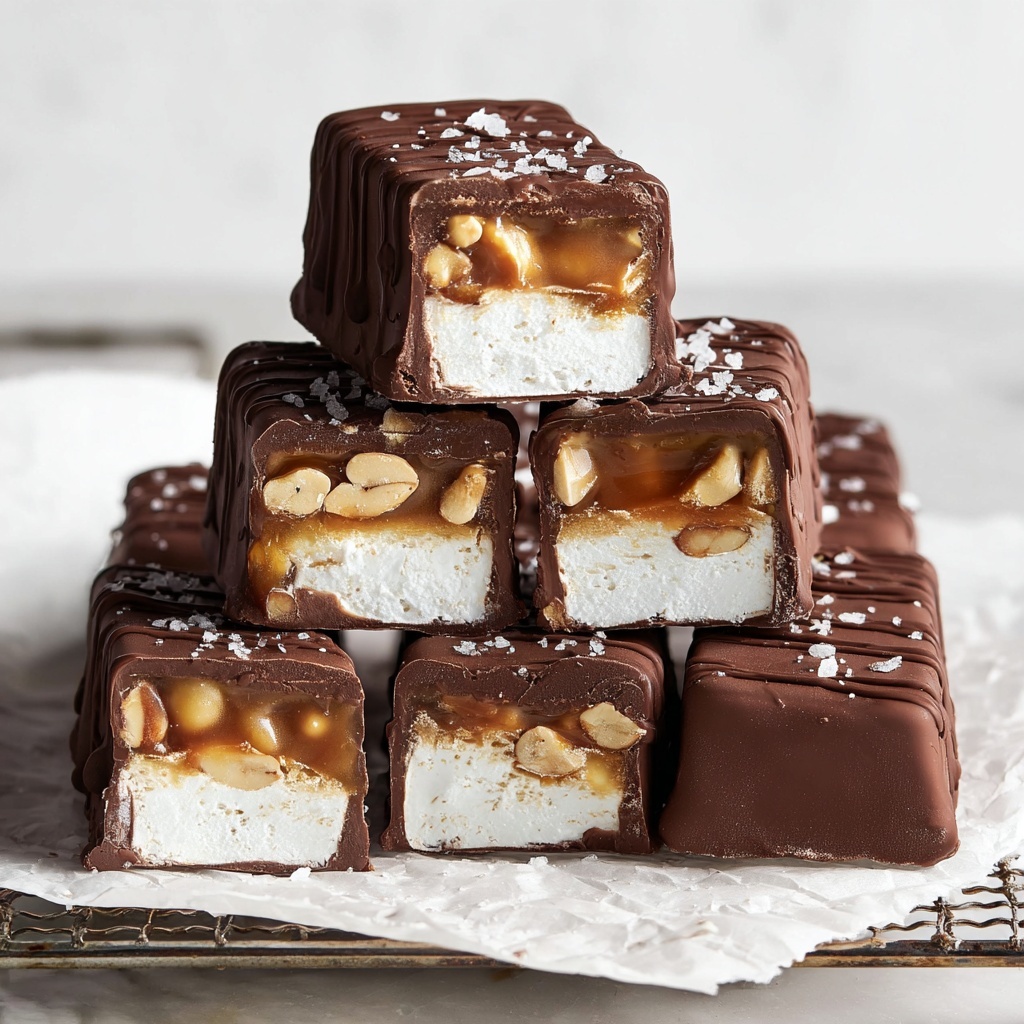
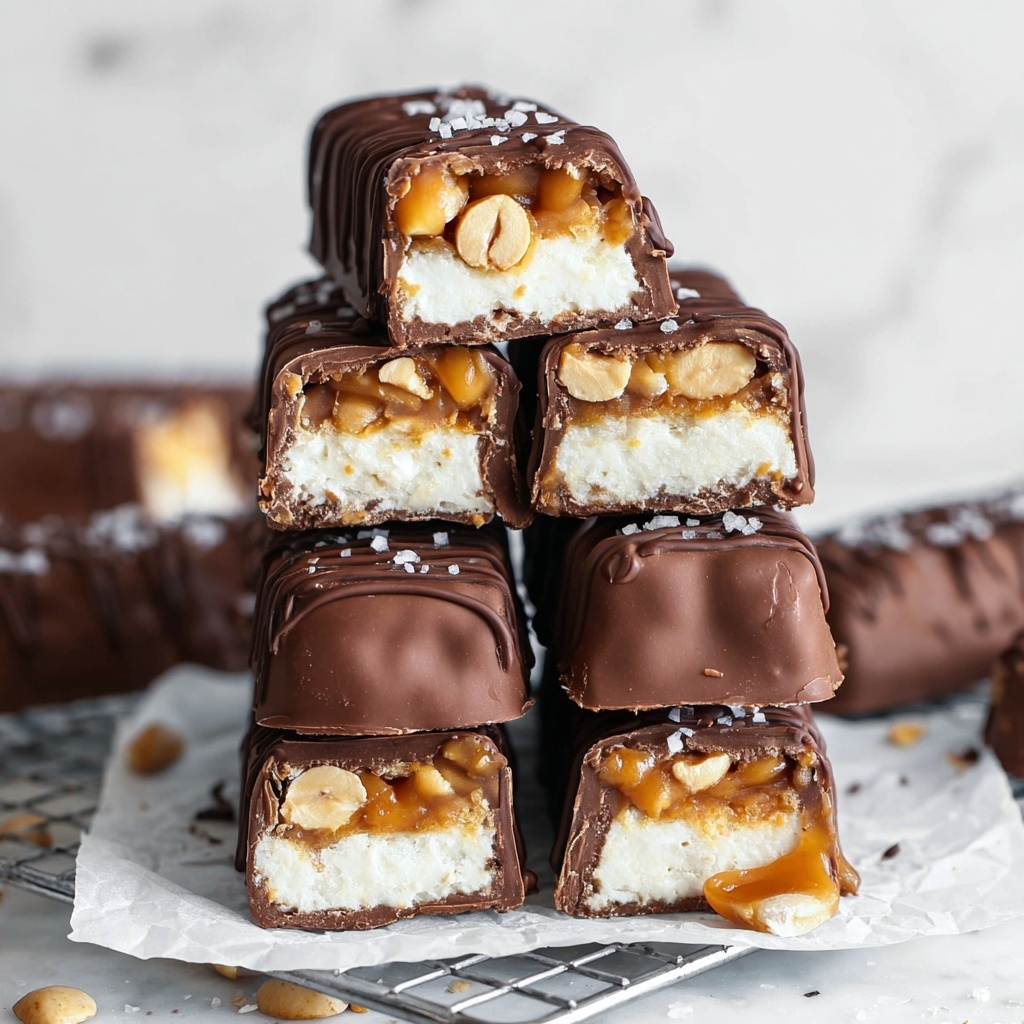
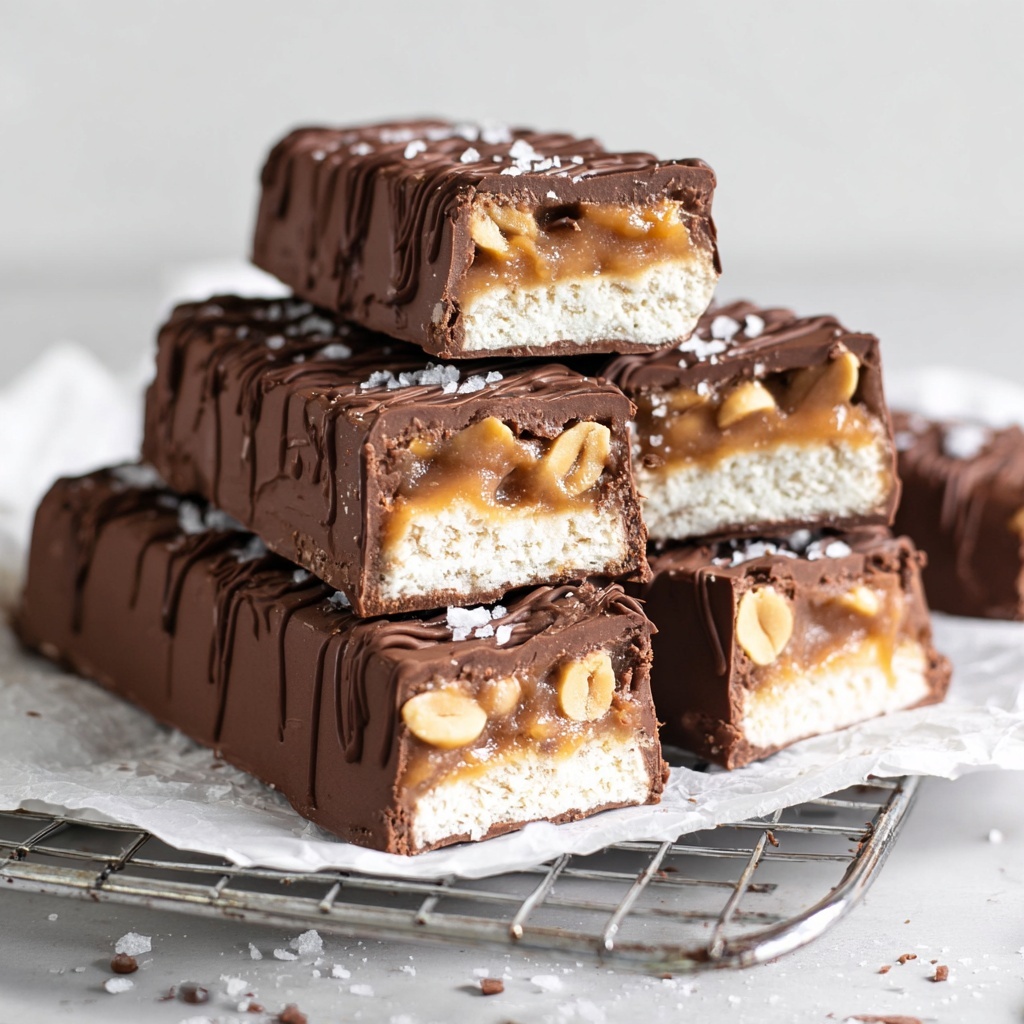
If you have a soft spot for classic candy bars but crave something wholly indulgent, refreshing, and entirely plant-based, this Vegan Snickers Ice Cream Bars Recipe is about to become your new obsession. Creamy, crunchy, chocolaty, and nutty, these bars are a luscious combination of smooth coconut-based ice cream, rich peanut butter caramel, roasted peanuts, and a silky vegan chocolate shell. The whole experience captures everything you love about Snickers but in a delightfully dairy-free, vegan-friendly frozen treat that’s perfect for sunny days, decadent desserts, or anytime you need a sweet pick-me-up that feels both wholesome and indulgent.
Ingredients You’ll Need
Gathering your ingredients is simple and straightforward, but every item has an essential role in crafting the rich layers of flavor and texture in this recipe. From creamy cashews that give the ice cream its luscious base to crunchy roasted peanuts for that irresistible bite—each component elevates this dessert to something truly special.
- Cashews (1 cup, soaked): Soaking softens them to blend into a creamy, silky ice cream base.
- Chilled coconut milk (1 400ml can): Adds natural richness and creaminess without dairy.
- Pure maple syrup (½ cup + ½ cup): Brings natural, smooth sweetness essential for both ice cream and caramel layers.
- Peanut butter (2 tablespoons for ice cream + 1 cup for caramel): The star nutty flavor tying this whole recipe together perfectly.
- Vanilla bean paste (½ teaspoon): Infuses a warm, fragrant depth into the ice cream that lingers delightfully.
- Vanilla soy yogurt (¼ cup): Contributes tangy body and creaminess, but you can sub with plain soy or coconut yogurt if you prefer.
- Maca powder (1 tablespoon, optional): Adds a subtle caramel-like note and a boost of nutrition in the caramel layer.
- Plant-based milk (1 tablespoon): Helps loosen the caramel mixture for the perfect spreadable consistency.
- Sea salt (1 teaspoon + sprinkling): Enhances overall flavor with just the right balance of sweet and salty.
- Roasted peanuts (1 cup): For that crucial crunch and authentic Snickers feel.
- Vegan-friendly chocolate (300 g): To coat the bars in a smooth, glossy chocolate shell that hardens perfectly.
How to Make Vegan Snickers Ice Cream Bars Recipe
Step 1: Prepare the Cashews
Begin by soaking the cashews as indicated in the notes, typically for at least 4 hours or overnight. This softens them enough so they blend seamlessly into your ice cream base, lending it a luscious, creamy texture without any graininess. Trust me, this step is a game changer for that dreamy mouthfeel.
Step 2: Blend the Ice Cream Base
In a high-speed blender, combine your soaked cashews, chilled coconut milk, half a cup of maple syrup, peanut butter, vanilla bean paste, and soy yogurt. Blitz everything until the mixture is smooth, creamy, and utterly irresistible. This is your ice cream layer, so make sure there are no lumps, and it’s beautifully combined.
Step 3: Freeze the Ice Cream Layer
Line an 11″x7″ or 8″x8″ baking tin with parchment paper, ensuring the sides extend beyond the rim for easy lifting later. Pour in your creamy ice cream blend, then gently tap the tin on your countertop to release any trapped air bubbles. Slide this into the freezer and let it set for about 2 hours until firm but not rock solid.
Step 4: Whisk Up the Peanut Butter Caramel
While the ice cream chills, whisk together peanut butter, the remaining half cup of maple syrup, maca powder if you’re using it, plant-based milk, and sea salt in a bowl until completely smooth and lump-free. This silky caramel layer is where the rich peanut flavor intensifies and adds that gooey dimension crucial to the bars.
Step 5: Assemble the Layers
Once the ice cream layer is set, carefully spread the peanut butter caramel evenly on top using a spatula. Sprinkle the roasted peanuts over the caramel, then press them in gently so they stick and create that perfect crunchy topping. This multi-textured layer is exceptionally satisfying!
Step 6: Freeze the Assembled Bars
Return the baking tin to the freezer and let everything firm up for at least two more hours or, better yet, overnight. This wait will allow the layers to meld together and become solid enough to handle when cutting and dipping.
Step 7: Cut and Freeze Again
Lift the set dessert out of the tin using the parchment edges and place it on a chopping board. Slice into 12 even servings. Pop these bars back into the freezer while you prepare the chocolate coating. It’s important they’re frozen solid before you dip them to avoid melting or sogginess.
Step 8: Melt the Chocolate Properly
Gently melt your vegan-friendly chocolate over a double boiler — avoid overheating to prevent it from seizing or becoming grainy. The warmth of the steam below the bowl is enough to create a smooth, glossy chocolate melt ready for dipping.
Step 9: Dip and Finish
One by one, remove the frozen bars and set them on parchment paper. Using a fork underneath, carefully dip each bar in the melted chocolate, fully coating the top and sides. Spoon extra chocolate over to cover any gaps, then sprinkle a pinch of sea salt on top for that elegant contrast. Let these sit for about 10 minutes to set before enjoying.
How to Serve Vegan Snickers Ice Cream Bars Recipe
Garnishes
A sprinkle of flaky sea salt elevates the caramel and chocolate’s sweetness beautifully. For an extra touch of glam, finely chopped roasted peanuts or a drizzle of melted peanut butter over the bars right before serving create stunning, mouthwatering presentation that dazzles your guests and taste buds alike.
Side Dishes
Serve these bars alongside fresh berries or a fruity sorbet to balance the richness, or pair with a light, aromatic herbal tea like peppermint or chamomile, which refreshes the palate without overpowering the decadent flavors.
Creative Ways to Present
Try stacking the bars on a rustic wooden board for a casual vibe or arrange them neatly on a decorative platter sprinkled with crushed peanuts and edible flowers for a more elegant dessert experience. Wrapping individual bars in parchment paper tied with twine makes a charming gift or party favor too!
Make Ahead and Storage
Storing Leftovers
Keep any leftover Vegan Snickers Ice Cream Bars in an airtight container in the freezer. This prevents freezer burn and keeps the bars tasting fresh and delicious for up to 2 weeks.
Freezing
If you want to prepare these bars well in advance, no problem! Simply follow the full recipe and let them freeze completely overnight or longer. When properly wrapped, the texture and flavor hold up wonderfully so you can enjoy them any time you wish.
Reheating
These bars are best enjoyed frozen and don’t require reheating. If they soften slightly at room temperature, just pop them back into the freezer for about 10-15 minutes to firm up before serving again. Melted layers won’t quite return to their original state once warmed.
FAQs
Can I make this recipe nut-free?
While cashews and peanuts are fundamental to this recipe’s flavor and texture, you could experiment with substitutes like sunflower seed butter and roasted seeds, but expect some changes in taste and creaminess.
Do I need to soak the cashews overnight?
Soaking for at least 4 hours is recommended to soften them fully, ensuring a smooth ice cream base. Quick soaking in hot water for 1-2 hours can work in a pinch but may not yield the same silky texture.
Can I use another type of plant-based yogurt?
Absolutely! Plain coconut or almond yogurt works well too — just choose unsweetened to keep control over your sweetness level.
Is maca powder necessary?
Maca adds a subtle caramel-like flavor and health benefits, but it’s optional. You can omit it without impacting the overall success of the bars.
How long do the chocolate-coated bars keep once dipped?
When stored airtight in the freezer, the chocolate-coated Vegan Snickers Ice Cream Bars stay deliciously fresh for up to 2 weeks. Beyond that, they may start to lose peak texture but remain tasty.
Final Thoughts
This Vegan Snickers Ice Cream Bars Recipe is a celebration of plant-based indulgence that’s surprisingly straightforward to make and utterly rewarding to eat. Whether you’re treating yourself after a long day or impressing friends with a show-stopping dessert, these bars deliver creamy, crunchy, and chocolatey joy in every bite. I can’t wait for you to try it and fall in love just as I have!
Print
Vegan Snickers Ice Cream Bars Recipe
- Prep Time: 20 minutes
- Cook Time: 0 minutes
- Total Time: 4 hours 40 minutes
- Yield: 12 servings
- Category: Dessert
- Method: Freezing
- Cuisine: Vegan
- Diet: Vegan
Description
These Vegan Snickers Ice Cream Bars combine creamy cashew and coconut milk ice cream with a rich peanut butter caramel layer, crunchy roasted peanuts, and a smooth chocolate coating. Perfect as a refreshing, plant-based frozen treat with all the flavors reminiscent of classic Snickers, but dairy-free and vegan-friendly.
Ingredients
Ice Cream Base
- 1 cup cashews (soaked, see notes)
- 1 400ml can chilled coconut milk
- ½ cup pure maple syrup
- 2 tablespoons peanut butter
- ½ teaspoon vanilla bean paste
- ¼ cup vanilla soy yogurt (or plain soy/coconut yogurt)
Caramel Layer
- 1 cup peanut butter
- ½ cup pure maple syrup
- 1 tablespoon maca powder (optional)
- 1 tablespoon plant-based milk of choice
- 1 teaspoon sea salt
Topping & Coating
- 1 cup roasted peanuts
- 300 g vegan-friendly chocolate
Instructions
- Soak Cashews: Soak the cashews in water for at least 4 hours or overnight to soften them for blending.
- Make Ice Cream Base: In a high-speed blender, combine the soaked cashews, chilled coconut milk, maple syrup, peanut butter, vanilla bean paste, and soy yogurt. Blend until the mixture is smooth and creamy.
- Prepare Tin: Line an 11″x7″ or 8″x8″ baking tin (at least 2 inches deep) with parchment paper for easy removal.
- Freeze Ice Cream Layer: Pour the blended ice cream mixture into the lined tin, gently tap to remove air bubbles, and place in the freezer to set for 2 hours.
- Mix Caramel: In a bowl, whisk together peanut butter, maple syrup, maca powder (if using), plant-based milk, and sea salt until smooth and lump-free. Chill in the fridge until the ice cream layer firms.
- Layer Caramel: Remove the ice cream from the freezer and carefully spread the prepared caramel evenly on top using a spatula.
- Add Peanuts: Evenly distribute roasted peanuts over the caramel layer and gently press them into the caramel with a spatula.
- Freeze Bars: Return the tin to the freezer and freeze for at least 2 hours or overnight until completely set.
- Cut Bars: Once set, lift the whole slab from the tin using the parchment paper, place on a chopping board, and cut into 12 bars.
- Freeze Bars Again: Place the bars back in the freezer to ensure they are fully frozen before coating with chocolate.
- Melt Chocolate: Gently melt the vegan chocolate over a double boiler, taking care not to overheat, allowing steam to melt it slowly.
- Dip Bars: Remove bars from freezer, place on parchment paper, and dip each bar into the melted chocolate, covering tops and sides. Use a spoon to help coat thoroughly.
- Salt & Set: Sprinkle sea salt over the chocolate-coated bars and allow them to set for 10 minutes before serving.
Notes
- Soak cashews for a minimum of 4 hours or overnight to ensure a creamy texture in the ice cream base.
- Use a full-fat, canned coconut milk to achieve a rich and creamy consistency.
- Maca powder in the caramel is optional but adds a subtle malt flavor and nutritional benefits.
- For easier removal of bars, ensure the baking tin is well lined with parchment paper.
- Use a double boiler for melting chocolate to avoid burning or seizing.
- Keep bars frozen until ready to serve for best texture and coating stability.


