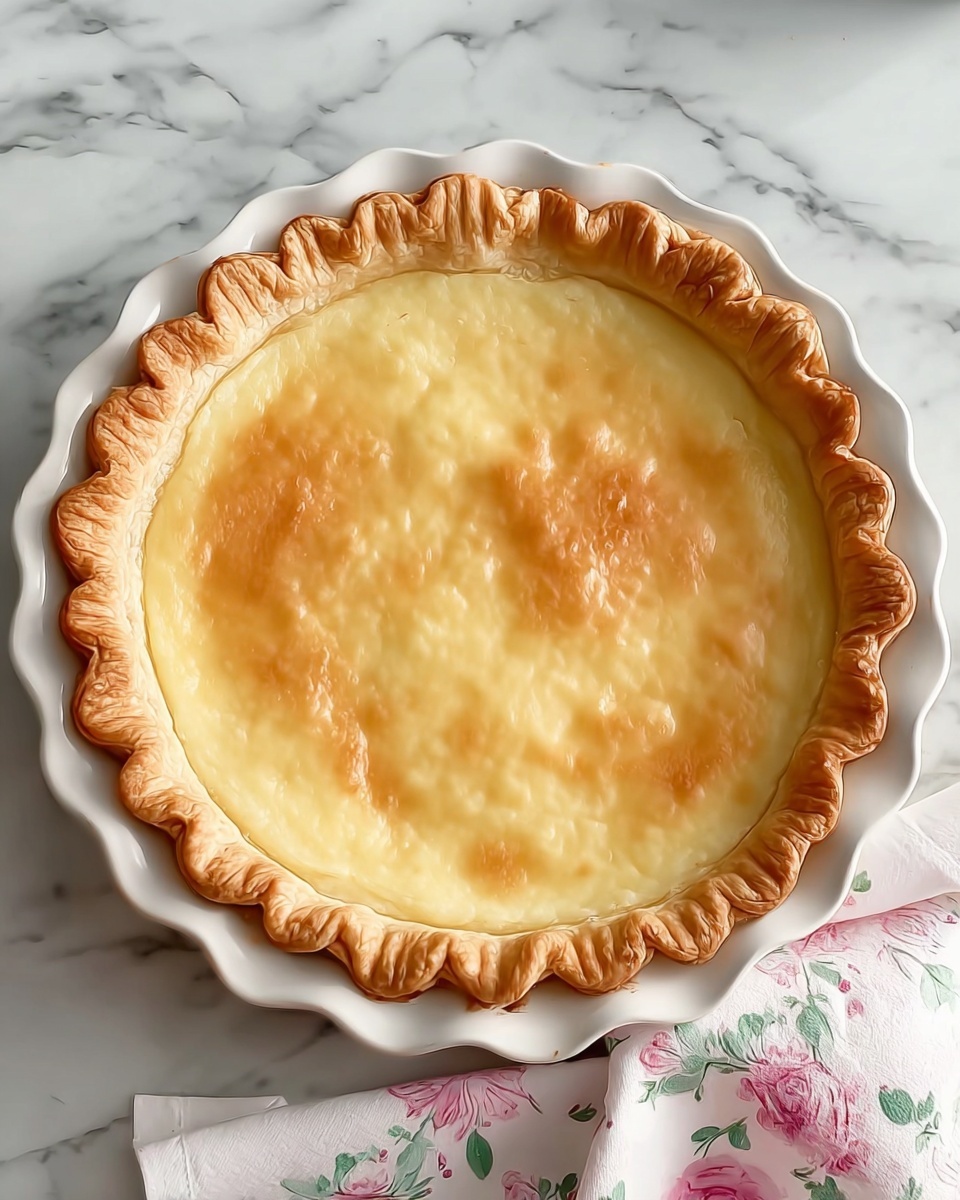
If you’re on the lookout for a dessert that’s as charmingly simple as it is surprisingly delicious, this Water Pie Recipe will quickly become a beloved staple in your kitchen. With just a few humble ingredients and straightforward steps, you end up with a silky, custard-like filling nestled in a flaky pie crust that’s both nostalgic and satisfying. It’s a wonderful example of how minimalism in baking can translate into maximum comfort and delight, perfect for those moments when you want a sweet treat without the fuss.
Ingredients You’ll Need
These ingredients are wonderfully basic, but each one plays a crucial role in building the perfect balance of texture and flavor in your Water Pie Recipe. From the flaky crust to the velvety filling, every element counts.
- 1 9-inch deep-dish pie crust, unbaked: This forms the sturdy, buttery base that holds all the delicious filling.
- 1 1/2 cups water: The magic liquid that cooks into a creamy, custard-like texture without any eggs or milk.
- 4 tablespoons all-purpose flour: Acts as the thickening agent giving the pie its silky consistency.
- 1 cup sugar: Brings just the right amount of sweetness to balance the pie’s light flavor.
- 2 teaspoons vanilla extract: Infuses a warm, comforting aroma and a touch of sweetness to elevate the entire pie.
- 5 tablespoons butter, cut into 5 pieces: Adds richness and a luscious finish as it melts into the filling during baking.
How to Make Water Pie Recipe
Step 1: Prepare Your Oven and Crust
Start by preheating your oven to 400°F to ensure it’s hot enough to create that perfect crust texture. Place your unbaked pie crust on a baking sheet, which will catch any drips and make handling the pie easier. This step sets the stage for a crisp, golden base that supports the custard filling beautifully.
Step 2: Add the Water
Pour the full 1 1/2 cups of water carefully into the pie crust. This might seem unusual because it looks very watery now, but trust the process — this water will eventually transform into the silky custard that defines the Water Pie Recipe.
Step 3: Combine Flour and Sugar, Then Sprinkle
In a small bowl, mix the flour and sugar thoroughly, then sprinkle that mixture gently and evenly over the surface of the water-filled crust. Resist the urge to stir here; letting the flour and sugar sit on top helps create that smooth, cohesive custard texture as it bakes.
Step 4: Flavor and Butter Topping
Drizzle the vanilla extract across the surface, then evenly distribute the pieces of butter on top. These butter chunks melt during baking, adding an incredible richness to the pie and helping it develop a lovely glossy finish. This final flavor boost is what makes the Water Pie Recipe so special despite its simplicity.
Step 5: Baking to Perfection
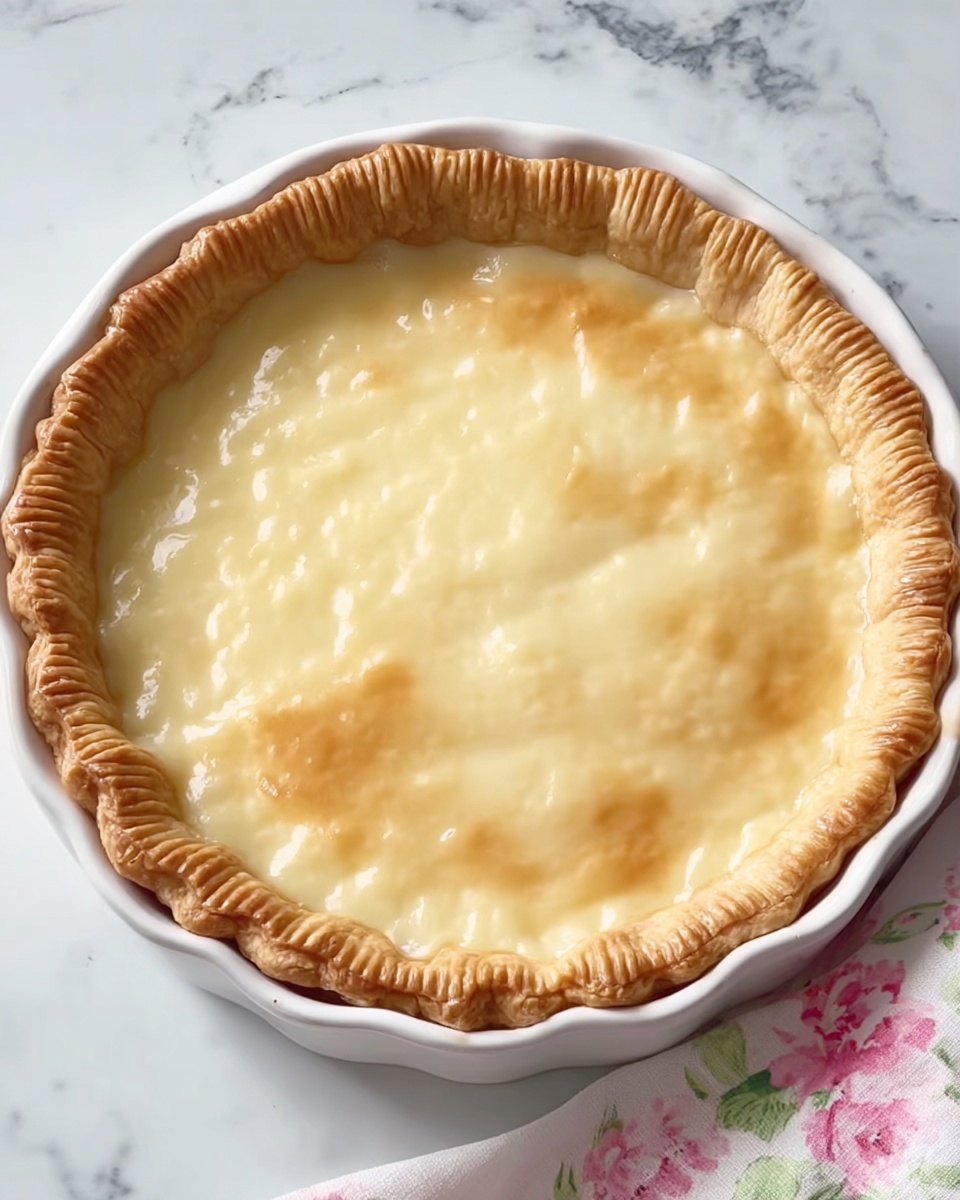
Bake at 400°F for 30 minutes to jumpstart the cooking process. Then lower the oven temperature to 375°F for an additional 30 minutes. If you notice the crust edges darkening too fast, cover them with foil to prevent burning. This slow bake allows the filling to set slowly without curdling, resulting in a perfectly smooth custard.
Step 6: Cooling and Serving Prep
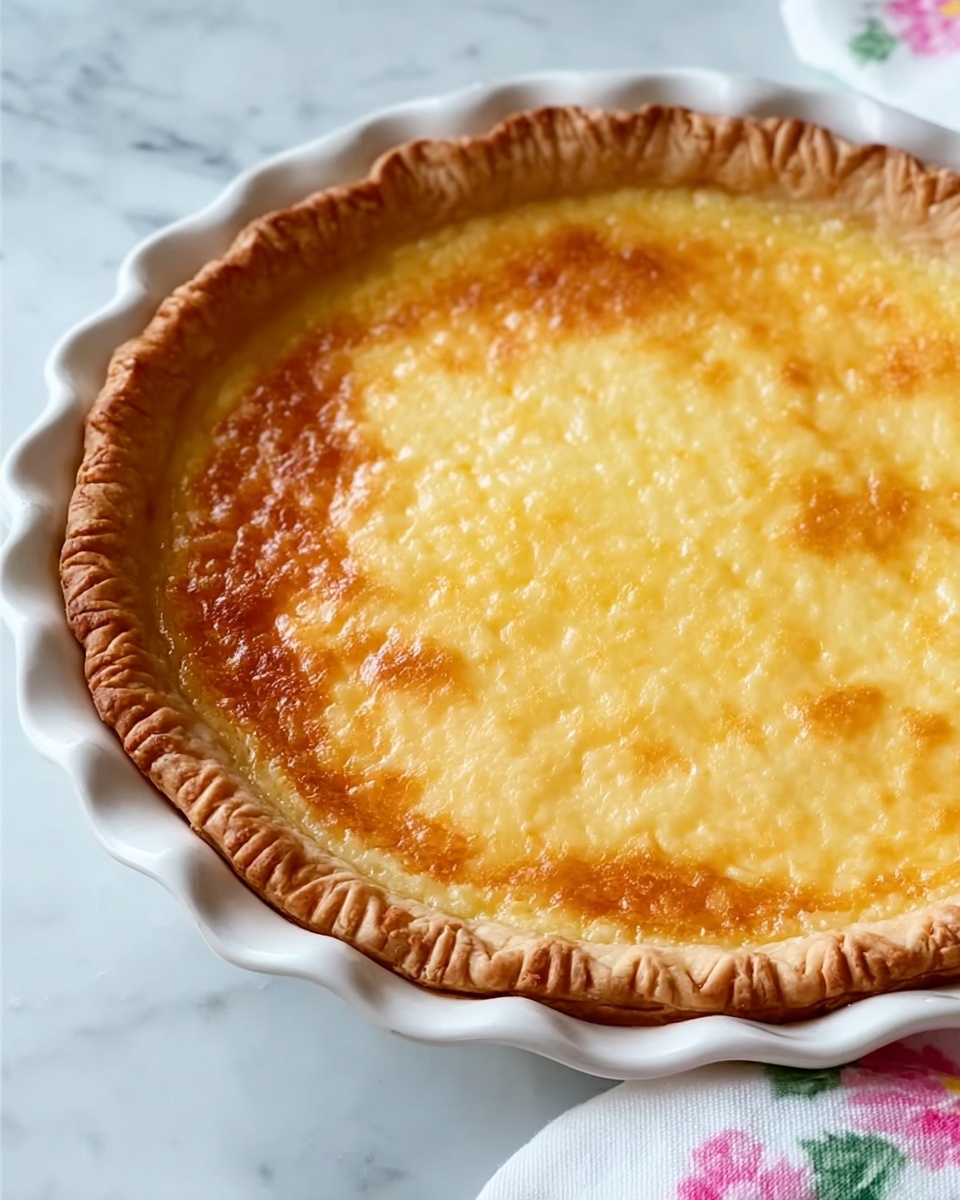
The pie will look quite watery and fragile while it’s still hot, but patience is key—once it cools completely and chills in the fridge, it sets into the custardy, sliceable dessert you’re aiming for. Cover and refrigerate it fully before slicing to enjoy that ideal texture and flavor balance.
How to Serve Water Pie Recipe
Garnishes
Keep it simple to highlight the delicate flavor of the Water Pie Recipe. A light dusting of powdered sugar or a few fresh berries on top adds a lovely visual touch and a fresh burst that complements the custard. Whipped cream is another fantastic option, adding both creaminess and a subtle sweetness that pairs beautifully.
Side Dishes
Water Pie is a comforting dessert that pairs well with fresh, simple sides. A scoop of vanilla ice cream or a dollop of crème fraîche works wonders alongside the cool custard filling. If you want to go savory, a light cup of chamomile tea or freshly brewed coffee rounds out the experience without overwhelming the pie’s gentle sweetness.
Creative Ways to Present
Try serving individual slices of Water Pie Recipe with small edible flowers or a drizzle of honey or caramel sauce for a touch of elegance. For a casual twist, crumble the cooled pie over ice cream or yogurt to turn it into a luscious parfait. The dessert’s versatility shines in both rustic and refined presentations!
Make Ahead and Storage
Storing Leftovers
Once your Water Pie has fully cooled and chilled, wrap it tightly with plastic wrap or place it in an airtight container. Store leftovers in the refrigerator for up to 3 days to keep the custard smooth and the crust crisp.
Freezing
Though freezing is possible, it’s best to enjoy your Water Pie Recipe fresh as freezing may alter the creaminess of the custard. If you do freeze it, wrap it well to prevent freezer burn and thaw overnight in the fridge before serving.
Reheating
Because the custard sets cold, this pie is usually enjoyed chilled. However, if you prefer it warm, gently reheat single slices in the microwave for about 20 seconds, but avoid heating too much to prevent breaking down the custard texture.
FAQs
What does Water Pie taste like?
Water Pie has a mild, sweet, and creamy flavor with a custard-like texture that’s light and delicate. The vanilla and butter add warmth and richness, making it a comforting dessert without being too heavy.
Is Water Pie Recipe gluten-free?
Traditional Water Pie uses an all-purpose flour crust and flour in the filling, so it’s not gluten-free. You can experiment with gluten-free pie crusts and flours if needed, but results may vary.
Can I use a homemade pie crust?
Absolutely! Using a homemade pie crust can add extra flavor and control over the ingredients. Just make sure it’s prepped as a 9-inch deep dish and unbaked before starting the recipe.
Why does the Water Pie look watery right after baking?
The filling is still fluid when hot but thickens as it cools. That’s normal and expected with this recipe. Don’t be discouraged; chilling the pie solidifies the custardy texture perfectly.
Can I add spices or other flavors to the Water Pie?
You can definitely customize the flavor by adding a pinch of cinnamon, nutmeg, or lemon zest to the sugar and flour mixture. Just be cautious not to overpower the gentle nature of the pie.
Final Thoughts
Water Pie Recipe is one of those delightful surprises that prove simple ingredients and open minds can create something truly special. Whether you need a nostalgic dessert or a no-fuss sweet finish, this pie offers comfort, charm, and ease in every bite. I hope you give this lovely Water Pie Recipe a try—it might just become your new favorite, too!
Print
Water Pie Recipe
- Prep Time: 15 minutes
- Cook Time: 1 hour
- Total Time: 1 hour 15 minutes
- Yield: 4 to 4 servings
- Category: Dessert
- Method: Baking
- Cuisine: American
Description
Water Pie is a unique and surprisingly delicious dessert made with a simple mixture of water, flour, sugar, and butter baked into a golden deep-dish pie crust. With a smooth custard-like filling that sets as it cools, this vintage recipe is easy to make and delightfully sweet with a hint of vanilla. Perfect for those looking for an economical yet tasty treat.
Ingredients
Pie Crust
- 1 9-inch deep-dish pie crust, unbaked
Filling
- 1 1/2 cups water
- 4 tablespoons all-purpose flour
- 1 cup sugar
- 2 teaspoons vanilla extract
- 5 tablespoons butter, cut into 5 pieces
Instructions
- Preheat Oven and Prepare Crust: Preheat your oven to 400°F. Place the unbaked deep-dish pie crust on a baking sheet to catch any drips and make handling easier.
- Add Water to Crust: Pour 1 1/2 cups of water directly into the pie crust without partially baking the crust. This forms the base of the filling.
- Mix and Sprinkle Dry Ingredients: In a small bowl, combine 4 tablespoons all-purpose flour and 1 cup sugar until evenly blended. Sprinkle this mixture evenly over the water in the pie crust, but avoid stirring it in. This layer will help thicken the filling as it bakes.
- Add Vanilla and Butter: Drizzle 2 teaspoons of vanilla extract over the pie, then place 5 tablespoons of butter, cut into pieces, evenly on top of the sugar and flour mixture.
- Bake the Pie: Bake the pie in the preheated oven at 400°F for 30 minutes. After the initial baking, reduce the oven temperature to 375°F. If the crust edges begin to brown too quickly, cover them with foil or pie crust protectors to prevent burning. Continue baking for another 30 minutes. The pie will appear watery when hot but will set as it cools.
- Cool and Chill: Remove the pie from the oven and allow it to cool completely at room temperature. Once cooled, cover the pie and refrigerate it until chilled and fully set before slicing and serving.
Notes
- Do not stir the dry ingredients into the water; this helps create the unique texture as it bakes.
- Cover the crust edges if they brown too fast to avoid burning.
- The filling will appear watery when hot but will firm up as it cools and chills.
- Use a deep-dish pie crust for best results to hold the water mixture.
- Chilling the pie for several hours improves the texture and flavor before serving.


