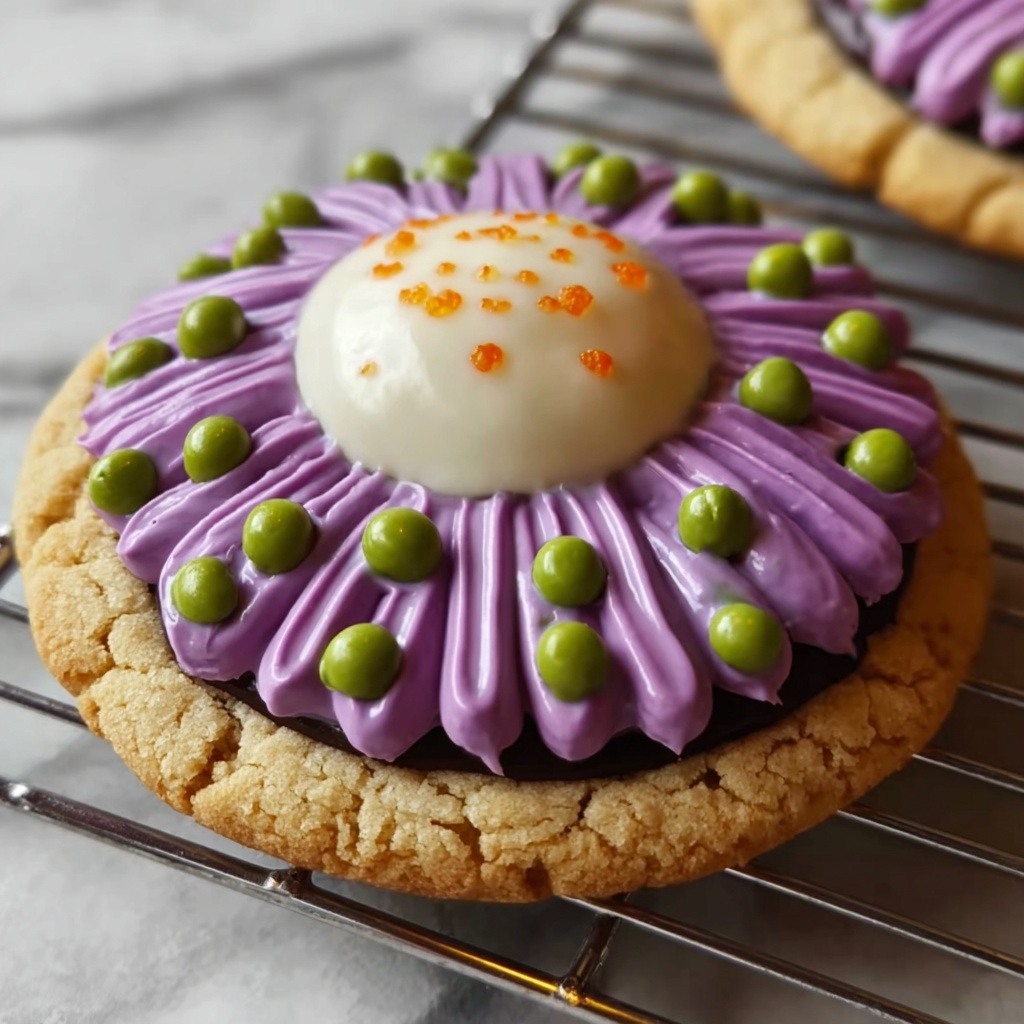
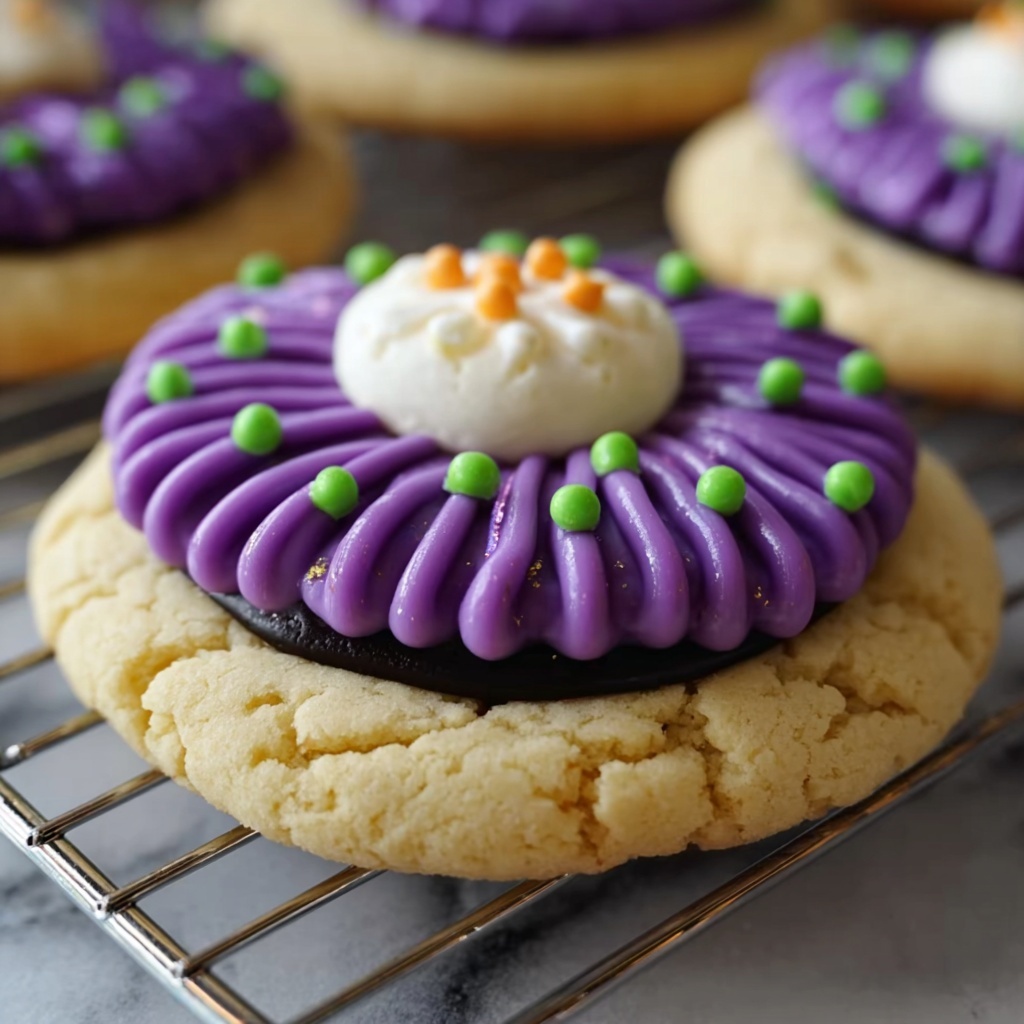
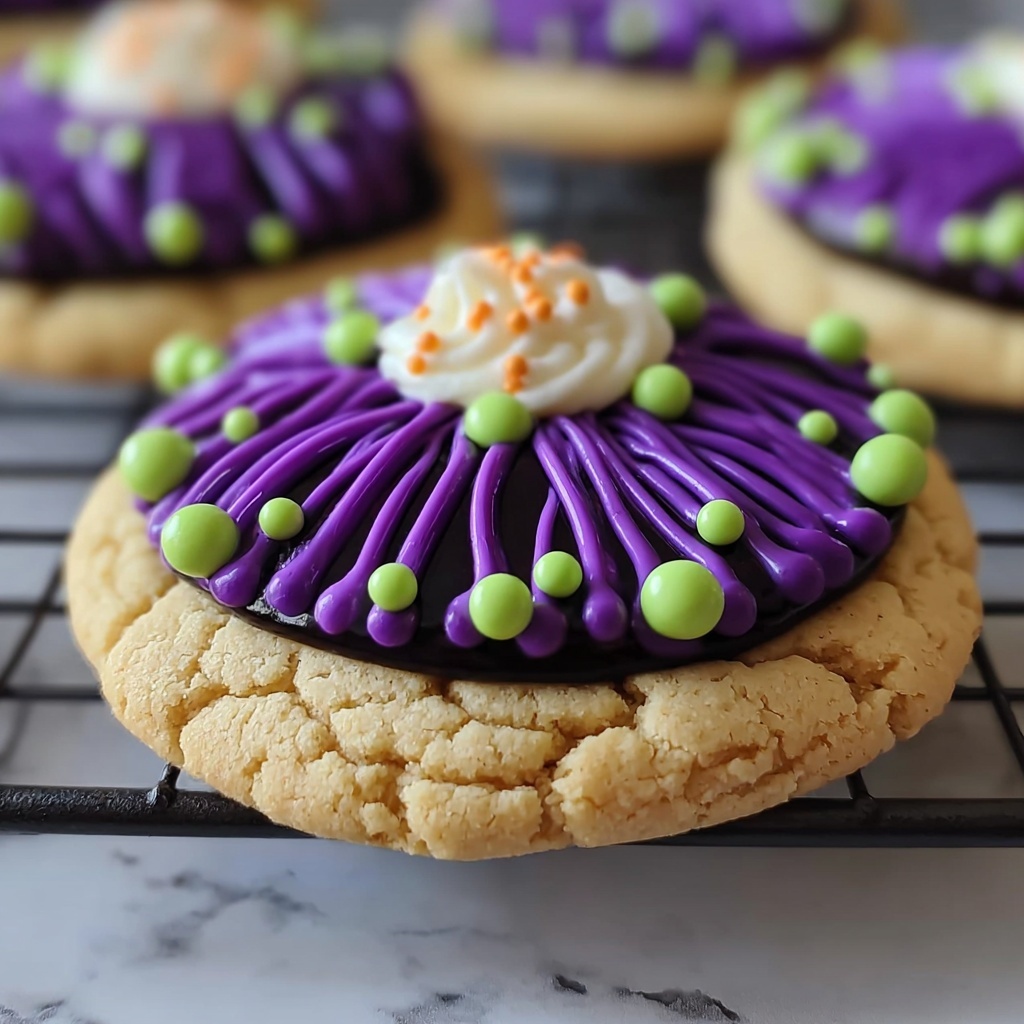
If you’re on the hunt for a fun and festive treat that captures the playful spirit of Halloween, look no further than this Witch Hat Cookies Recipe. These charming cookies combine the nostalgic flavors of peanut butter and chocolate with a delightful pop of color and texture, making them the perfect centerpiece for any spooky gathering or cozy night in. You’ll love how each cookie looks like a tiny witch’s hat—complete with vibrant sprinkles and a shiny chocolate top—bringing both whimsy and deliciousness to your bakeware. Trust me, once you try this Witch Hat Cookies Recipe, it will become a standout favorite in your seasonal dessert rotation!
Ingredients You’ll Need
This Witch Hat Cookies Recipe keeps things wonderfully simple by using pantry staples and a few festive touches. Each ingredient plays a key role in delivering the perfect texture, flavor, and appearance that makes these cookies so magical.
- All-purpose flour (1 ½ cups): The base of the dough providing structure and tenderness.
- Cornstarch (2 tsp): Adds a delicate softness to keep the cookies light.
- Baking soda (½ tsp) and baking powder (¼ tsp): The perfect leavening duo that helps the cookies puff up just right.
- Fine sea salt (⅛ tsp): Balances sweetness and enhances overall flavor.
- Unsalted butter, softened (½ cup): Gives the cookies richness and that melt-in-your-mouth texture.
- Granulated sugar (1 cup): Sweetens and contributes to a lovely golden color.
- Large egg (1): Binds the ingredients and adds moisture.
- Creamy peanut butter (¾ cup): Infuses a classic nutty flavor and creamy texture.
- Vanilla extract (1 tsp): Adds warmth and depth to the flavor profile.
- Purple gel food coloring: Brings a fun, spooky hue to the dough—feel free to swap in your favorite color!
- Halloween sprinkles or purple sanding sugar: For that festive crunch and sparkle on each cookie.
- Hershey’s Hugs or Kisses, unwrapped (33): Tops each cookie perfectly, resembling the pointed tip of a witch’s hat.
How to Make Witch Hat Cookies Recipe
Step 1: Cream Butter and Sugar
Start by creaming the softened butter and granulated sugar together using an electric mixer for about 2 minutes until the mixture turns light and fluffy. This step is key because it aerates the dough, giving your cookies a tender crumb. Then, mix in the egg, creamy peanut butter, and vanilla extract until everything is well combined, creating a smooth, luscious base for your dough.
Step 2: Add Dry Ingredients
In a separate bowl, whisk together the all-purpose flour, cornstarch, baking soda, baking powder, and fine sea salt. Gradually incorporate this dry mixture into the wet peanut butter mixture, stirring just until combined. Overmixing can make cookies tough, so mix gently to maintain that tender texture perfect for your Witch Hat Cookies Recipe.
Step 3: Color the Dough
Now comes the fun part—add the purple gel food coloring to your dough and mix evenly until the color is consistent throughout. This bright splash of color sets these cookies apart visually and adds an exciting Halloween vibe. You can adjust the intensity of the color to suit your tastes or even choose a different hue to match your party theme.
Step 4: Chill the Dough
Cover the dough tightly with plastic wrap and refrigerate for at least 2 hours or even overnight. Chilling firm ups the dough, making it easier to work with and helping the cookies maintain their shape during baking. Plus, it allows the flavors to deepen, resulting in a more flavorful bite.
Step 5: Coat with Sprinkles
Once chilled, roll the dough into small balls and then gently roll each ball in Halloween sprinkles or sanding sugar. This coating not only adds a festive crunch but also helps the cookies look enchanting and colorful—like they’ve just come from a Halloween party themselves!
Step 6: Bake to Perfection
Arrange the sprinkle-coated dough balls about 2 inches apart on a lined baking sheet to allow for spreading. Bake them for 9 to 11 minutes until they puff up and start to crack, signaling that they are perfectly baked. The edges will be lightly golden while the centers remain soft, capturing that ideal balance of texture.
Step 7: Freeze to Set Chocolate
After pulling the cookies from the oven, place the tray in the freezer for 10 minutes before adding the Hershey’s Hugs or Kisses. This quick chill prevents the chocolate from melting immediately, so your Witch Hat Cookies Recipe retains their charming pointed tops, completed with that smooth chocolate finish everyone will adore.
How to Serve Witch Hat Cookies Recipe
Garnishes
To elevate your cookies even further, consider adding extra Halloween sprinkles around the base of the chocolate kisses once they’re set. A light dusting of edible glitter or a drizzle of white chocolate can also create a whimsical witchy effect that will captivate both kids and adults at your gathering.
Side Dishes
Witch Hat Cookies pair beautifully with warm fall beverages like hot cocoa, chai lattes, or spiced apple cider. Their rich peanut butter and chocolate flavors complement these drinks perfectly, making for a cozy treat during chilly autumn evenings or Halloween parties.
Creative Ways to Present
Try arranging your cookies on a black or Halloween-themed platter with fake cobwebs and mini pumpkins for a festive display. You can also insert small decorative picks or edible eyes around them to turn your dessert table into a spooky delight. Presentation adds an extra layer of fun, turning these adorable Witch Hat Cookies Recipe treats into the star of the show.
Make Ahead and Storage
Storing Leftovers
Once completely cooled, store your Witch Hat Cookies in an airtight container at room temperature for up to 4 days. Keeping them well sealed ensures they stay soft and fresh without losing their vibrant colors or festive crunch.
Freezing
You can freeze unbaked cookie dough balls by placing them on a baking sheet, flash freezing for an hour, and then transferring to a freezer-safe bag. Bake straight from frozen, just adding a couple of extra minutes to the bake time. This way, you can always have a quick batch of Witch Hat Cookies Recipe ready whenever you’re craving some spooky sweets.
Reheating
To enjoy your cookies warm, pop them in the microwave for about 10 seconds or briefly in a low oven. This gently refreshes the texture and slightly melts the chocolate center, delivering a bakery-fresh feel that’s hard to resist.
FAQs
Can I use crunchy peanut butter instead of creamy?
Absolutely! Crunchy peanut butter will add a delightful bit of texture to the cookies, though it may change the overall smoothness of the dough. Either way, your Witch Hat Cookies Recipe will taste amazing.
What if I don’t have gel food coloring?
You can substitute regular liquid food coloring, but be careful not to add too much liquid, or it may affect the cookie dough consistency. Gel coloring is great because it provides intense color with minimal moisture.
Can I make these cookies vegan or dairy-free?
With some ingredient swaps like plant-based butter and egg replacers, you can definitely tweak the recipe. Keep in mind texture and flavor might vary slightly, but the witch hat fun remains intact!
Why do I need to freeze the cookies before adding the chocolate?
The quick freeze helps the cookies cool down so the chocolate won’t melt immediately when placed on top, allowing the Hershey’s Hugs or Kisses to maintain their shape and look like authentic witch hats.
How long do the cookies stay fresh?
Stored properly in an airtight container, these cookies stay fresh for about 4 days at room temperature. For longer storage, freezing is your best friend!
Final Thoughts
There’s something truly special about sharing a batch of Witch Hat Cookies Recipe with friends and family. They’re not just adorable; they bring a comforting, nostalgic flavor that makes fall celebrations a little bit sweeter and a lot more fun. I can’t wait for you to whip up these spook-tacular treats and watch everyone’s faces light up with delight. Happy baking and happy haunting!
Print
Witch Hat Cookies Recipe
- Prep Time: 2 hours 15 minutes
- Cook Time: 10 minutes
- Total Time: 2 hours 25 minutes
- Yield: 33 cookies
- Category: Dessert
- Method: Baking
- Cuisine: American
Description
Witch Hat Cookies are festive Halloween treats featuring a soft peanut butter cookie base dyed with purple gel food coloring, dipped in sprinkles or sanding sugar for a spooky touch, and topped with a Hershey’s Hug or Kiss to resemble a witch’s hat. These cookies are perfect for holiday parties or trick-or-treaters and offer a fun and colorful twist on classic peanut butter cookies.
Ingredients
Dry Ingredients
- 1 ½ cups all-purpose flour
- 2 tsp cornstarch
- ½ tsp baking soda
- ¼ tsp baking powder
- ⅛ tsp fine sea salt
Wet Ingredients
- ½ cup unsalted butter, softened
- 1 cup granulated sugar
- 1 large egg
- ¾ cup creamy peanut butter
- 1 tsp vanilla extract
- Purple gel food coloring (or any color of choice)
Decorations
- Halloween sprinkles or purple sanding sugar
- 33 Hershey’s Hugs or Kisses, unwrapped
Instructions
- Cream the Wet Ingredients: In a bowl, cream together the softened butter and granulated sugar using an electric mixer for 2 minutes until the mixture is light and fluffy. Then add the egg, creamy peanut butter, and vanilla extract, mixing until all ingredients are well combined.
- Combine Dry and Wet Mixtures: Gradually add the dry ingredients (flour, cornstarch, baking soda, baking powder, and salt) to the wet mixture while stirring gently until fully incorporated into a smooth dough.
- Add Color to Dough: Incorporate purple gel food coloring evenly throughout the dough by folding or mixing until the color is consistent.
- Chill the Dough: Cover the dough with plastic wrap and refrigerate it for at least 2 hours or overnight to firm up the dough for easier handling and better texture when baked.
- Prepare Dough Balls: After chilling, roll the dough into balls and coat each ball thoroughly in Halloween sprinkles or purple sanding sugar for a festive and colorful exterior.
- Arrange and Bake: Place the coated dough balls about 2 inches apart on a lined baking sheet. Bake in a preheated oven at 350°F (175°C) for 9-11 minutes or until the cookies are puffed and starting to crack on top.
- Freeze Before Decorating: Immediately after baking, place the tray of cookies in the freezer for 10 minutes to cool them quickly, which helps prevent the chocolate toppings from melting when added.
Notes
- Be sure to chill the dough thoroughly to make rolling and coating easier and to improve cookie texture.
- Using gel food coloring prevents the dough from becoming too wet like liquid colorings might.
- You can substitute peanut butter with a nut-free butter alternative if needed for allergy concerns.
- Freezing the cookies before adding chocolate ensures that the chocolate kiss or hug keeps its shape and does not melt upon contact.
- The cookies are soft and will harden slightly as they cool, so avoid overbaking to retain tenderness.

